
Hey there! I’m so excited you’re here to dive into a topic that’s super practical and can make your automotive projects shine: what gauge wire for low-voltage LED lighting? A couple of years ago, I decided to upgrade my truck with some cool LED underglow lights, and picking the right wire gauge was a bit of a puzzle. I spent hours researching, talking to an electrician friend, and testing wires in my garage. Let me tell you, it was a bright learning experience!
Let’s sit down together, and I’ll share everything I’ve learned about choosing the right wire gauge for low-voltage LED lighting in a way that’s clear and fun, like we’re chatting over a cold drink in the shop. Whether you’re wiring LEDs for your car, boat, or RV, you’ll know exactly what wire to use to keep those lights glowing safely. Ready? Let’s light it up!
Why Wire Gauge Matters for LED Lighting
First, let’s talk about why wire gauge is a big deal. Wire gauge is the thickness of the wire. Thicker wires have lower gauge numbers, like 12 or 14. Thinner wires have higher numbers, like 18 or 20. I learned this when I used a too-thin wire, and my LEDs flickered.
The right gauge ensures your LEDs get enough power. If the wire’s too thin, it resists electricity, causing dim lights or overheating. I almost fried a circuit once! The wrong gauge can also be unsafe, risking fire hazards. Picking the right wire keeps your lights bright, saves energy, and protects your vehicle. Knowing this got me serious about gauges.
What Is Low-Voltage LED Lighting?
Low-voltage LED lighting runs on 12 or 24 volts, unlike household lights at 120 volts. I used 12-volt LEDs for my truck because cars and boats use 12-volt systems. LEDs are energy-efficient, using less power than old bulbs. My underglow kit only drew 2 amps but lit up like a neon sign.
Low voltage is safer because it’s less likely to shock you. I worked on my wiring without worrying much. It’s common in automotive setups, like interior lights, off-road bars, or trailer lighting. Understanding this helped me see why wire choice is key for these systems.
Factors That Affect Wire Gauge Choice
I found out several things affect which gauge to use. Here’s what I considered:
- Current (Amps): How much electricity the LEDs draw. My 10-foot LED strip used 2 amps.
- Voltage: Most automotive LEDs are 12 volts. I checked my kit’s label.
- Wire Length: Longer runs need thicker wire to avoid power loss. I ran 15 feet of wire.
- Voltage Drop: Power weakens over long distances. I aimed for less than 3% drop.
- Environment: Wires in hot engine bays need heat-resistant insulation. I used automotive-grade wire.
I calculated these to pick the right gauge. For example, a short run with low amps needs thinner wire than a long run with high amps. This planning saved me from dim lights.
Common Wire Gauges for LED Lighting
I learned about standard gauges for low-voltage LEDs. Here’s what I found:
- 18 Gauge: Good for short runs with low amps, like 1-2 amps over 10 feet. I used it for interior LEDs.
- 16 Gauge: Handles more amps or longer runs, like 3-5 amps over 20 feet. I used it for my underglow.
- 14 Gauge: For higher amps or very long runs, like 6-10 amps over 30 feet. My friend used it for an RV.
- 12 Gauge: Heavy-duty for high-power setups, like 10-15 amps. I saw it on a boat’s light bar.
Thicker gauges (lower numbers) carry more current safely. I stuck with 16-gauge for most projects because it’s versatile. Always check your LED’s specs to match the gauge.
How to Calculate the Right Wire Gauge
I got nerdy with calculations to pick my wire. Here’s how I did it:
- Find Amps: I checked my LED strip’s label. It was 2 amps.
- Measure Wire Length: I ran 15 feet from the battery to the LEDs, so I doubled it (30 feet round trip).
- Check Voltage: My truck’s system is 12 volts.
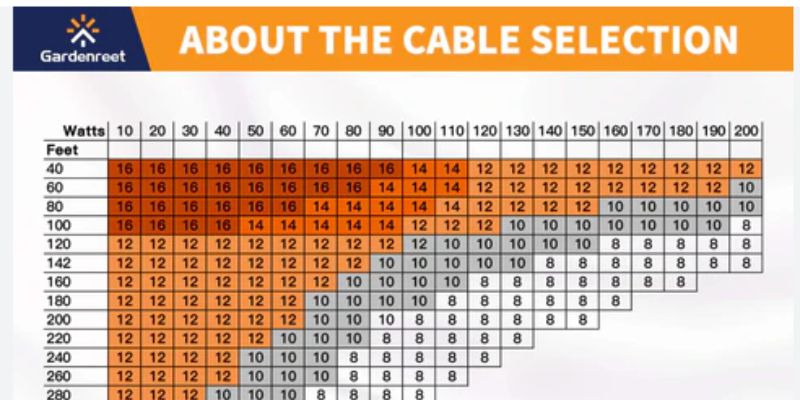
- Use a Wire Gauge Chart: I found one online. For 2 amps over 30 feet at 12 volts, 16 gauge kept the voltage drop under 3%.
- Account for Heat: I chose wire with 105°C insulation for my truck’s hot undercarriage.
I used an online calculator to confirm. It took 10 minutes, and I felt like an electrician! This ensured my LEDs stayed bright without overheating.
Table: Wire Gauge Recommendations for 12V LED Lighting
Here’s a table I made to simplify gauge choices:
| Amps | Wire Length (Round Trip) | Recommended Gauge | My Experience |
|---|---|---|---|
| 1-2 | Up to 20 feet | 18 Gauge | Used for interior dome lights |
| 2-5 | Up to 30 feet | 16 Gauge | Perfect for my underglow kit |
| 6-10 | Up to 40 feet | 14 Gauge | Friend used for RV exterior |
| 10-15 | Up to 50 feet | 12 Gauge | Saw on a boat’s 100W light bar |
This table helped me pick 16 gauge for my 2-amp, 30-foot run. Always round up if you’re close to the limit.
Types of Wire for Low-Voltage LEDs
Not all wires are the same. Here’s what I explored:
- Stranded Wire: Flexible with multiple thin strands. I used it for my truck because it bends easily.
- Solid Wire: Stiff with one thick strand. Better for permanent home setups, not cars.
- Automotive Wire: Heat- and oil-resistant. I paid $10 for 25 feet of 16-gauge automotive wire.
- Tinned Copper Wire: Corrosion-resistant for boats. My friend used it for marine LEDs.
- Speaker Wire: Cheap but not ideal. I tried it once, and it overheated.
I stuck with stranded automotive wire for flexibility and durability. It’s pricier but worth it for vehicle projects.
Tools and Supplies You’ll Need
I gathered tools before wiring. Here’s my list:
- Wire: 16-gauge automotive stranded wire, 25 feet for $10.
- Wire Cutters: Cut wire cleanly. Mine cost $8.
- Wire Strippers: Remove insulation. I spent $10.
- Connectors: Butt connectors or solder for joins. I bought 20 for $5.
- Crimping Tool: Secures connectors. Mine was $12.
- Heat Shrink Tubing: Insulates connections. A $5 pack worked.
- Multimeter: Tests voltage and current. I got one for $15.
- Tape: Electrical tape for extra insulation. I paid $3.
- Zip Ties: Organize wires. A $5 pack of 100 was plenty.
- Safety Glasses: Protect eyes. They cost $5.
I spent $73 total. These tools are reusable, so it’s a one-time cost for most projects.
Step-by-Step Guide to Wiring Low-Voltage LEDs
Here’s how I wired my LEDs with the right gauge:
- Plan the Layout: I sketched where my LEDs would go under my truck.
- Measure Wire Run: I ran 15 feet from the battery to the LEDs, so 30 feet total.
- Choose Gauge: I picked 16 gauge for 2 amps over 30 feet.
- Cut Wire: I cut two 15-foot pieces (positive and negative) with wire cutters.
- Strip Ends: I stripped ½ inch of insulation from each end.
- Connect to LEDs: I crimped connectors to the LED strip’s wires and the 16-gauge wire.
- Run Wire: I routed wire along the truck’s frame, securing it with zip ties.
- Connect to Power: I attached the positive wire to the battery via a fuse (10-amp, $3) and the negative to a ground point.
- Insulate Connections: I used heat shrink tubing and electrical tape.
- Test with Multimeter: I checked for 12 volts at the LEDs.
- Turn On: I flipped the switch, and the LEDs glowed brightly!
It took two hours, and I felt like a pro. Testing ensured everything worked safely.
Avoiding Voltage Drop
Voltage drop was a new term for me. It’s when power weakens over long wire runs. I aimed for less than a 3% drop to keep my LEDs bright. For my 2-amp, 30-foot run, 16-gauge kept the drop at 2.5%. A thinner 18-gauge would’ve caused a 5% drop, dimming my lights.
I used an online voltage drop calculator. Shorter runs or thicker wire reduce drop. I also kept connections tight to avoid resistance. This planning made my LEDs shine like they should.
Safety Tips for Wiring LEDs
I stayed safe while working. Here’s how:
- Disconnect Battery: I unhooked the truck’s battery to avoid shocks.
- Wear Safety Glasses: Protected my eyes from wire snips.
- Use Insulated Tools: My strippers had rubber grips.
- Check for Shorts: I tested with a multimeter to avoid sparks.
- Route Wires Safely: I kept wires away from hot exhaust pipes.
These kept me safe and my truck undamaged. I double-checked connections before powering up.
Maintaining Your LED Wiring
I want my LEDs to last. Here’s my maintenance routine:
- Check Connections: I inspect crimps yearly for corrosion.
- Clean Wires: I wipe dust off with a rag.
- Test Voltage: I use a multimeter every six months to ensure 12 volts.
- Replace Worn Wire: I swapped a frayed section for $5.
- Secure Loose Wires: I add zip ties if wires sag.
This takes 20 minutes a year and keeps my lights glowing. I store my multimeter in my toolbox for quick checks.
Troubleshooting Wiring Issues
I hit some snags. Here’s how I fixed them:
- Dim Lights: My wire was too thin. I switched to 16 gauge.
- Flickering LEDs: A loose crimp caused it. I recriminated tightly.
- No Power: The fuse blew. I replaced it with a 10-amp fuse.
- Overheating Wire: I used speaker wire once. I swapped it for automotive wire.
- Short Circuit: A wire touched metal. I rerouted and insulated it.
Patience and a multimeter solved most issues. If it’s tricky, an electrician can help for $50.
Costs of Wiring Low-Voltage LEDs
I tracked my expenses. Here’s the breakdown:
- Wire: $10 for 25 feet of 16-gauge.
- Tools: Cutters ($8), strippers ($10), crimper ($12), multimeter ($15). Total: $45.
- Supplies: Connectors ($5), heat shrink ($5), tape ($3), zip ties ($5), fuse ($3). Total: $21.
- Professional Help: An electrician charges $50-$150. I did it myself.
- Maintenance: Wire ($5), tape ($3). Total: $8 yearly.
I spent $76 total. DIY saved me $100 compared to hiring a pro. Tools last for years.
Environmental Impact of LED Wiring
I care about the planet, so I looked at the impact. LEDs use less power than halogen lights, saving fuel in my truck. I used recyclable copper wire and reused old connectors. I avoided plastic packaging by buying wire in bulk. It’s a small way to keep my project green.
When to Consult an Electrician
I wired my LEDs myself, but pros are helpful sometimes. I’d call an electrician if:
- Complex Setup: Multiple LED zones need relays. A pro charges $100.
- No Tools: Wiring needs precision. Pros have everything.
- Safety Concerns: High-amp systems are risky. A pro’s safer.
- Time Crunch: Wiring took two hours. A pro does it in one for $75.
- Vehicle Warranty: Some mods void warranties. A pro knows rules.
I found a local electrician for $50/hour. DIY was fun and saved cash for me.

Why Choosing the Right Gauge Is Worth It
Picking the right wire gauge makes your LEDs shine bright and last long. I love cruising with my underglow lighting up the night. It’s safe, efficient, and looks awesome. I saved money by avoiding rewiring mistakes. It’s a small detail that makes your automotive project pop.
Wrapping It Up
So, what gauge wire do you need for low-voltage LED lighting? For most 12-volt automotive LEDs, 16 or 18 gauge works great, depending on amps and wire length. I went from clueless about gauges to wiring my truck’s LEDs like a pro, creating a glowing masterpiece. By calculating amps, measuring runs, and using quality wire, you can light up your car, boat, or RV safely. Grab your wire cutters, pick that 16-gauge wire, and get started—you’ve got this! Your vehicle will shine, and you’ll feel like an automotive electrician. Thanks for diving into this with me—here’s to bright lights and cool rides!
FAQs
What gauge wire do I need for 12-volt LED lights?
I used 16 gauge for my 2-amp, 30-foot run. For 1-2 amps over 20 feet, 18-gauge works. Check a gauge chart.
Can I use speaker wire for LED lighting?
I tried it, but it overheated. Automotive stranded wire, like 16 gauge, for $10, is safer and more durable.
How do I know if my wire is too thin?
If LEDs flicker or dim, the wire’s too thin. I switched from 18 to 16 gauge to fix the dim underglow lights.
How much does it cost to wire LEDs?
I spent $76 on wire, tools, and supplies. A pro charges $50-$150, but DIY saves money.
What’s voltage drop, and why does it matter?
It’s power loss over long wires. I kept it under 3% with 16 16-gauge to keep my LEDs bright.