

Remote ready means a ceiling fan is designed to work with a remote control system, either with a pre-installed receiver or by having space and wiring for one. This allows you to control fan speed, lights, and direction from anywhere in the room without needing to reach for a pull chain or wall switch.
Ever stood under a ceiling fan, squinting to find the right pull chain in the dim light, or wished you could adjust the fan speed without getting out of your comfy chair? Many of us have been there! If you’re looking at new ceiling fans, you might have seen the term “remote ready.” But what exactly does that mean for your home and your comfort? It sounds convenient, and it is! This guide will break down everything you need to know about “remote ready” ceiling fans, so you can make the best choice for your space and enjoy effortless control.
We’ll explore what it means to be remote ready, the benefits it brings, and what to look for when shopping. By the end, you’ll feel confident about choosing a fan that brings a new level of ease and modern convenience to your home.
What Does “Remote Ready” Actually Mean?
When a ceiling fan is described as “remote ready,” it means it’s built with the capability to be controlled by a remote transmitter. Think of it like a smartphone that’s ready for a new app – it has the underlying technology to make it happen.
There are generally two main ways a fan can be “remote ready”:
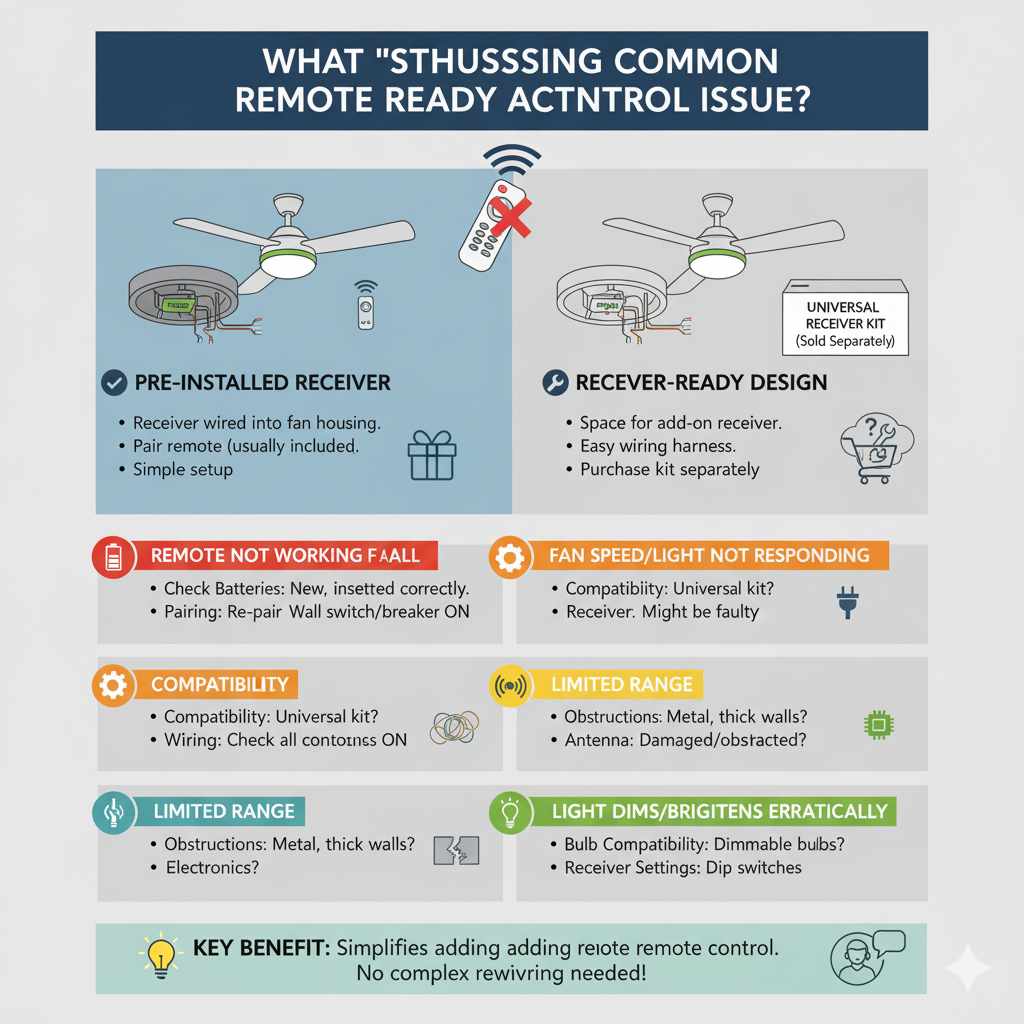
- Pre-installed Receiver: Some fans come straight out of the box with a receiver unit already wired into the fan’s housing. This receiver is the “brain” that communicates with the remote. All you need to do is install the fan and pair the remote (which usually comes with the fan).
- Receiver-Ready Design: Other fans might not have the receiver pre-installed, but they are designed with the necessary space and wiring harnesses to easily accommodate a universal or compatible remote receiver. This often means there’s a dedicated compartment or access point for the receiver, and the wiring is straightforward. You’ll typically purchase the receiver and remote kit separately for these models.
The key takeaway is that a remote-ready fan simplifies the process of adding remote control functionality. It eliminates the need for complex rewiring or extensive modifications to the fan itself. It’s all about making it easier for you to enjoy the convenience of remote operation.
Why Choose a Remote Ready Ceiling Fan? The Benefits
Moving beyond the basic function of cooling, a remote-ready ceiling fan offers a significant upgrade in convenience and functionality. It’s not just a fancy gadget; it’s a practical enhancement for your living space.
Unmatched Convenience
This is the biggest draw. Imagine this: you’re settled in for a movie, and the room gets a bit warm. Instead of pausing the film and trekking across the room, you simply reach for the remote and adjust the fan speed. Or, you can turn the fan on or off without leaving your bed. It’s about effortless control at your fingertips.
Enhanced Accessibility
For individuals with mobility issues, the elderly, or anyone who finds it difficult to reach pull chains or wall switches, a remote control is a game-changer. It empowers them to control their environment independently and comfortably.
Sleeker Aesthetics
Pull chains can sometimes detract from a fan’s visual appeal. Remote-ready fans often have a cleaner, more streamlined look because they don’t rely on these hanging cords. This can contribute to a more modern and sophisticated room design.
Added Features
Many remote control systems for ceiling fans offer more than just speed and on/off functions. They can often control:
- Light Dimming: Adjust the brightness of your fan’s integrated light.
- Fan Direction (Reverse): Switch the fan’s rotation from downdraft (cooling in summer) to updraft (circulating warm air in winter) without climbing a ladder.
- Timers: Set the fan to turn off automatically after a certain period, saving energy.
- Natural Breeze Modes: Some advanced remotes simulate a natural wind effect by varying fan speeds.
Simplified Installation (Compared to Retrofitting)
While installing a fan that isn’t remote-ready with a remote system later can be complex, a “remote-ready” fan is designed to make this process much simpler. If the receiver isn’t pre-installed, the fan is usually designed with easy access and clear wiring for adding a compatible receiver.
How to Identify a Remote Ready Ceiling Fan
When you’re browsing for a new ceiling fan, how can you be sure it’s “remote ready”? Here are some key indicators:
- Product Description: This is your first stop. Look for terms like “remote control adaptable,” “remote compatible,” “includes remote kit,” or “remote ready” in the product title or detailed description.
- Included Accessories: If a fan comes with a remote control and a receiver unit in the box, it’s definitely remote ready and comes equipped.
- Manufacturer Specifications: Check the technical specifications or user manual (often available online before purchase). These documents will detail whether the fan supports remote control operation and if a receiver is included or sold separately.
- Wiring Compartment: Visually inspecting the fan (if possible, or by looking at detailed product images) might reveal a dedicated compartment or extra wiring for a receiver.
Don’t hesitate to ask! If you’re unsure, contact the manufacturer or the retailer. They can confirm if a specific model is remote ready and what additional components, if any, you might need.
What You Need for a Remote Ready Ceiling Fan
The components required will depend on whether the receiver is pre-installed or needs to be added.
If the Receiver is Pre-installed:
- The Ceiling Fan: The fan unit itself, with the receiver already integrated into its housing.
- Remote Control Transmitter: This is the handheld device you’ll use to operate the fan. It usually comes paired with the receiver.
- Battery: Typically a common household battery (like A23 or AAA) for the remote.
If the Receiver is NOT Pre-installed (but the fan is “Ready”):
- The Ceiling Fan: The fan unit designed to accept a receiver.
- Remote Control Receiver: This unit needs to be purchased separately. It’s the crucial component that fits inside the fan’s canopy or housing and connects to your home’s wiring and the fan’s motor/light.
- Remote Control Transmitter: This handheld device is usually sold as a kit with the receiver.
- Batteries: For the remote transmitter.
- Basic Electrical Tools: Wire strippers, wire nuts, screwdriver, voltage tester – for safely connecting the receiver.
When buying a “receiver-ready” fan, ensure you purchase a compatible remote control kit. Manufacturers often have specific kits designed for their fan models, or you can opt for a universal ceiling fan remote control kit. For universal kits, always check the compatibility list to ensure it works with your fan’s motor type and wattage.
Installing a Remote Ready Ceiling Fan
The installation process for a remote-ready ceiling fan is very similar to a standard fan, with one key difference if you’re adding the receiver yourself.
Standard Installation Steps (Similar to Any Ceiling Fan):
- Safety First: Turn off power! Locate the circuit breaker that controls the fan’s power and switch it off. Double-check with a non-contact voltage tester at the ceiling box to ensure the power is completely off.
- Mount the Bracket: Securely attach the fan’s mounting bracket to the ceiling electrical box. Ensure the box is rated for ceiling fan support (usually marked on the box itself). For guidance on electrical boxes, the Consumer Product Safety Commission offers valuable safety information.
- Assemble the Fan: Follow the manufacturer’s instructions to assemble the fan motor, downrod, and canopy.
- Hang the Fan: Carefully lift the fan motor assembly and hang it on the mounting bracket (many brackets have a hook to hold it while you wire).
Wiring the Remote Receiver (If Not Pre-installed):
This is where the “remote ready” aspect comes into play. If your fan did not come with a receiver, you’ll need to install one.
- Connect the Receiver: The receiver typically has wires labeled for power input (from the house wiring) and power output (to the fan motor and light). You’ll connect the house’s “hot” (black) and “neutral” (white) wires to the receiver’s input. Then, you’ll connect the receiver’s output wires to the corresponding wires for the fan motor and light kit. Always follow the specific wiring diagram provided with your receiver and fan.
- Connect Fan Wires: Connect the fan’s motor wires and light kit wires to the appropriate output wires on the receiver.
- Secure Connections: Use wire nuts to make all electrical connections secure and insulated.
- Tuck and Mount: Carefully tuck the receiver unit into the mounting bracket or canopy as designed. Ensure no wires are pinched.
- Attach the Canopy: Slide the canopy up to the ceiling and secure it to the mounting bracket.
Final Steps:
- Install Fan Blades: Attach the fan blades to the motor.
- Install Light Kit (if applicable): Connect and install the light kit, ensuring all wiring is properly connected.
- Restore Power: Go back to the circuit breaker and turn the power back on.
- Pair and Test: Follow the remote control’s instructions to pair it with the receiver. Test all functions: fan speeds, light on/off, dimming, and direction.
Important Note on Wiring: If you are not comfortable with electrical wiring, it is always best to hire a qualified electrician. Improper wiring can be a fire hazard and can damage your fan. Resources like the This Old House website provide excellent DIY guides, but safety should always be your top priority.
Remote Control Features Explained
Modern remote controls for ceiling fans are sophisticated little devices. Here’s a breakdown of common features you’ll find:
Speed Control
This is the most basic function. You’ll typically have buttons for high, medium, and low fan speeds, and often an “off” button.
Light Control
If your fan has a light kit, the remote will control it. This usually includes:
- On/Off: Simple enough, turns the light on or off.
- Dimming: A slider or buttons (often “+” and “-“) to adjust the brightness of the light. Note that this feature requires dimmable LED bulbs or compatible incandescent bulbs.
Fan Direction (Reverse Function)
This is a fantastic feature for year-round comfort:
- Summer Mode: The fan spins counter-clockwise, pushing air downwards to create a cooling breeze.
- Winter Mode: The fan spins clockwise, pulling cooler air up and gently pushing warmer air that has risen to the ceiling down along the walls. This helps circulate heat without creating a strong draft.
A button on the remote allows you to easily switch between these modes, often without needing to climb a ladder. For more information on how ceiling fans work with seasons, check out resources from the U.S. Department of Energy.
Timer Function
This allows you to set the fan to turn off automatically after a set period, such as 1, 2, 4, or 8 hours. This is great for saving energy while you sleep or when you’re leaving a room for a short time.
Natural Breeze / Sleep Mode
Some advanced remotes offer modes that mimic a natural breeze by varying the fan speed randomly, or a sleep mode that gradually reduces fan speed over time to help you fall asleep comfortably.
Independent Light and Fan Control
You can usually turn the light on or off without affecting the fan’s operation, and vice versa.
Universal vs. Brand-Specific Remote Kits
When your fan is “receiver-ready,” you’ll need to get a remote kit. You have two main options:
Brand-Specific Kits
These are designed by the same manufacturer as your ceiling fan. They are guaranteed to be compatible and often offer the most seamless integration with your fan’s specific features.
- Pros: Perfect compatibility, often designed to match the fan’s aesthetics, straightforward installation.
- Cons: Can be more expensive, limited availability if the fan is older or from a less common brand.
Universal Kits
These kits are designed to work with a wide range of ceiling fan brands and models. They typically come with a receiver that you wire into the fan and a universal remote transmitter.
Before buying a universal kit, you MUST check:
- Compatibility List: Ensure your fan’s brand and model are listed as compatible.
- Wattage and Voltage: The kit must match your fan’s power requirements.
- Number of Wires: Some fans have more complex wiring (e.g., separate wires for light and fan).
- Pros: More affordable, widely available, can be used to upgrade older fans that weren’t originally remote ready.
- Cons: Requires careful checking of compatibility, may not support all advanced features of a specific fan model, might require slightly more complex wiring.
A good example of a reputable resource for understanding electrical components and safety is the Underwriters Laboratories (UL), which tests and certifies products for safety.
Troubleshooting Common Remote Control Issues
Even with the best technology, sometimes things don’t work perfectly. Here are some common issues and how to fix them:
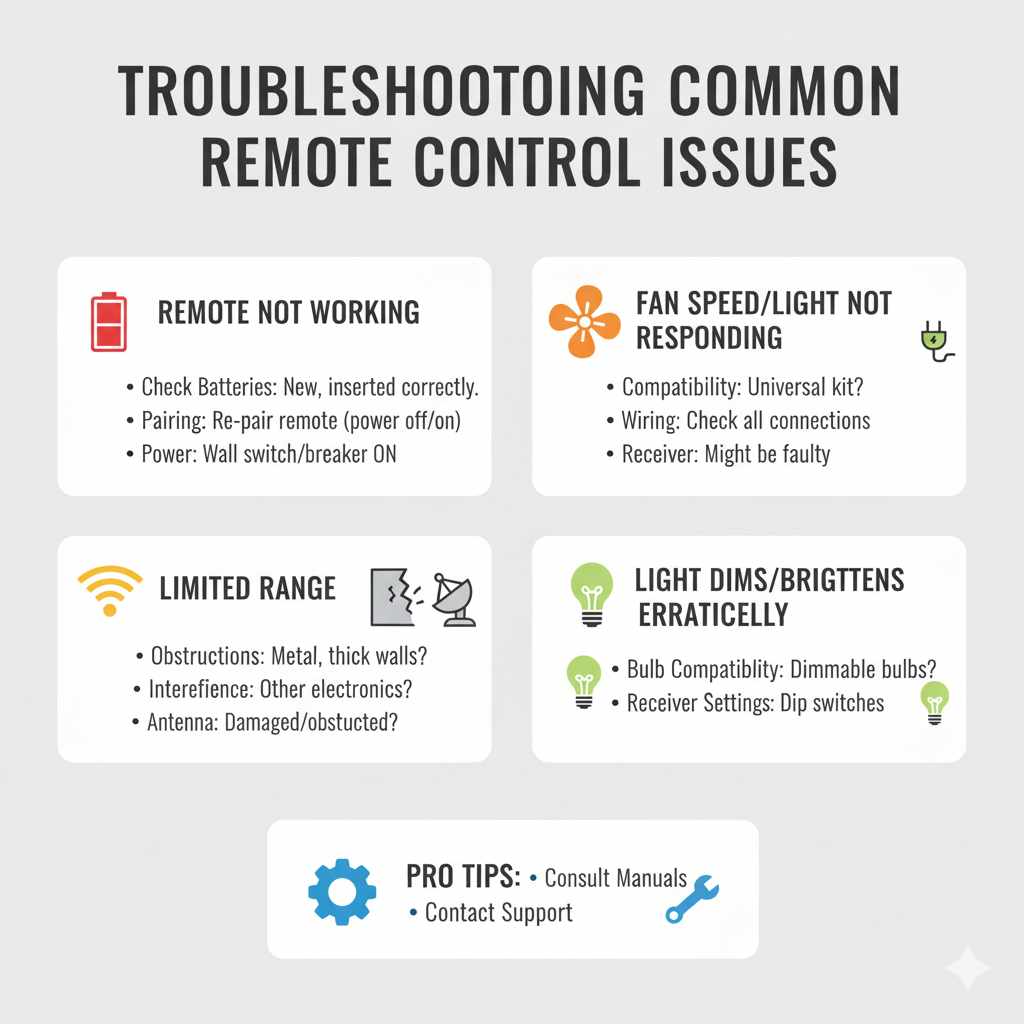
Remote Not Working at All
- Check Batteries: The most common culprit! Ensure the batteries are new and inserted correctly.
- Pairing: The remote might have lost its pairing with the receiver. Follow the manufacturer’s instructions to re-pair the remote. This often involves a specific sequence of button presses or turning the power off and on.
- Power to the Fan: Ensure the fan is receiving power from the wall switch and the circuit breaker is on.
Fan Speed/Light Not Responding Correctly
- Compatibility: If using a universal kit, ensure it’s fully compatible with your fan.
- Wiring: Double-check all wire connections to the receiver. A loose connection can cause intermittent issues.
- Receiver Issues: The receiver itself might be faulty.
Remote Has Limited Range
- Obstructions: Ensure there are no large metal objects or thick walls between the remote and the fan’s receiver.
- Interference: Other electronic devices can sometimes cause interference. Try moving to a different spot or turning off other devices temporarily.
- Antenna: Some receivers have an external antenna wire. Ensure it’s not damaged or obstructed.
Light Dims/Brightens Erratically
- Bulb Compatibility: Make sure you are using dimmable bulbs if your remote has dimming functionality. Non-dimmable bulbs can flicker or malfunction.
- Receiver Settings: Some receivers have dip switches or settings that might need adjustment.
If you’ve tried these steps and are still having trouble, consult your fan’s and remote’s user manuals. If the issue persists, contact the manufacturer’s customer support for further assistance.
Frequently Asked Questions (FAQ)
What is the difference between a remote control fan and a remote-ready fan?
A “remote control fan” usually comes with the remote and receiver pre-installed and ready to use out of the box. A “remote-ready fan” is designed to accept a remote control system, meaning it has the necessary wiring and space for a receiver, but you might need to purchase the remote and receiver kit separately.
Can I add a remote control to any ceiling fan?
You can add a remote control to many ceiling fans, especially if they are “receiver-ready.” However, some older or very basic fans might not have the internal space or compatible wiring to easily accommodate a receiver. It’s always best to check your fan’s specifications or consult an electrician.
Do I need a special type of light bulb for a remote-controlled fan?
If your remote control has a dimming feature, you will need to use dimmable light bulbs. These are typically LED bulbs labeled as “dimmable” or incandescent bulbs. Standard LED or CFL bulbs may not dim properly and could flicker or be damaged.
How do I pair my remote control to my ceiling fan?
The pairing process varies by manufacturer. Usually, it involves turning the fan’s power off and then on again, and then pressing and holding a specific button on the remote within a short timeframe. Always refer to the user manual that came with your remote control kit for precise instructions.
What happens if I lose my ceiling fan remote?
If you lose the remote, you can usually purchase a replacement from the fan manufacturer or a universal remote kit if your fan is compatible. If the fan has pull chains, you can still operate it manually while you find a replacement remote.
Is it safe to install a remote receiver myself?
If you have basic knowledge of electrical wiring and follow the instructions carefully, it can be a DIY project. However, if you are not comfortable working with electricity, it’s always safer to hire a qualified electrician to ensure the installation is done correctly and safely.
Can I use one remote to control multiple ceiling fans?
Some remote systems are designed to control multiple fans, often with different settings for each. This typically requires purchasing additional receivers for each fan and then programming the single remote to control them individually or all at once. Check the remote kit’s specifications for multi-fan control capabilities.
Conclusion
Understanding “what does remote ready mean” opens up a world of convenience and modern comfort for your home. It signifies a ceiling fan designed with ease of use in mind, making it simpler than ever to control your environment without lifting a finger or getting up from your favorite spot. Whether your fan comes with a pre-installed receiver or is designed to easily accommodate one, the benefits of remote control – from effortless speed adjustments to light dimming and timer functions – are undeniable.
By choosing a remote-ready fan, you’re investing in a more comfortable, accessible, and streamlined living space. Remember to check product descriptions, understand what components are included, and don’t hesitate to consult installation guides or professionals when needed. With the right setup, your ceiling fan will transform from a simple appliance into a smart, user-friendly addition to your home, ensuring comfort and convenience are always just a button press away.