

I’ll never forget the first time I tried to thread a ratcheting strap—it was a total mess! I was helping a friend move a couch, and the strap ended up in a knot that took forever to untangle. That flop taught me how to do it right, and now I’m here to share the easy way to thread a ratcheting strap. This guide is for beginners, enthusiasts, and even pros who want a refresher. I’ll walk you through what a ratcheting strap is, a simple step-by-step process, handy tips from my experience, and ways to avoid common mistakes. Whether you’re securing a kayak or hauling furniture, this article has you covered with clear steps, tables, and answers to your questions. Let’s make it a piece of cake!
What Is a Ratcheting Strap?
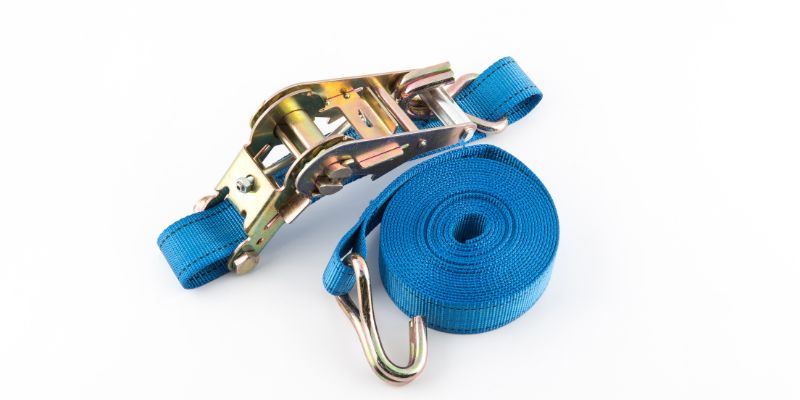
A ratcheting strap, also called a tie-down strap, is a tool to secure cargo. It has a strong polyester strap and a metal ratchet that tightens it. You use it to hold things like bikes, furniture, or boxes in place during transport. The strap goes through the ratchet, which you crank to make it tight. It’s super strong and keeps cargo safe on trucks or trailers.
Why does threading a ratcheting strap matter? If you do it wrong, your cargo might shift or the strap could jam. Done right, it’s a breeze and keeps everything secure. I’ve used these straps for years to move camping gear and even a mattress—no sweat!
Why Use Ratcheting Straps?
Ratcheting straps are awesome for many reasons. They’re easy to use, super strong, and work for all kinds of cargo. Here’s why I love them:
- Strong Hold: They keep heavy items like furniture or ATVs in place.
- Easy to Use: Once you learn to thread them, it’s quick and simple.
- Versatile: Perfect for trucks, trailers, or even roof racks.
- Adjustable: You can tighten or loosen them as needed.
The downside? They can jam if threaded wrong, and overtightening might damage fragile cargo. For lighter loads, a cam buckle strap is a good alternative—it’s gentler but less strong.

Tools and Materials You’ll Need
To thread a ratcheting strap, you don’t need much. Here’s the basics:
- Ratcheting Strap: Choose one with a weight limit that matches your cargo (check the label for working load limit, or WLL).
- Cargo: Anything from boxes to bikes you want to secure.
- Anchor Points: Sturdy spots on your truck or trailer to hook the strap.
- Optional: Corner protectors for fragile cargo or rubber bands for storage.
I recommend a 2-inch wide strap for most jobs, like the ones from US Cargo Control. They’re tough and easy to find at hardware stores for about $10-$20.
Step-by-Step Guide to Thread a Ratcheting Strap
Threading a ratcheting strap is simple if you follow these steps. I’ll break it down so it’s clear as day, even if it’s your first time.
Step 1: Open the Ratchet
Press the release lever on the ratchet handle. This is usually a small metal tab near the top. Flip the handle fully open until it’s flat. The slot in the middle (called the mandrel) should face up. If it doesn’t, pump the handle a couple of times to rotate it.
Step 2: Feed the Strap Through
Take the loose end of the strap (the part without the ratchet). Slide it through the mandrel slot from the bottom, pushing it up and out the top. Pull it through about 5-6 inches so it overlaps the strap on the other side. Keep it straight—no twists!
Step 3: Pull Out Slack
Pull the loose end to remove extra slack. Don’t make it super tight yet; the ratchet will do that later. The strap should feel snug but still have a little give.
Step 4: Secure the Hooks
Attach the hooks on both ends of the strap to strong anchor points, like D-rings on a truck bed. Make sure the strap lies flat across your cargo. I once forgot to check this and my kayak wobbled the whole trip—lesson learned!
Step 5: Tighten the Strap
Pump the ratchet handle up and down. Each pump winds the strap around the mandrel, making it tighter. Stop when the cargo feels secure but not so tight you can’t fit a finger between the strap and cargo. Overtightening can damage stuff!
Step 6: Lock It Down
Push the ratchet handle down until it clicks and locks. This keeps the strap tight. Tie up any loose strap ends with a rubber band to stop them from flapping.
Step 7: Check and Go
Double-check that the cargo is secure and the strap isn’t twisted. Stop during your trip to ensure nothing has shifted, especially after bumpy roads.
Here’s a quick table summarizing the steps:
| Step | Action | Tip |
|---|---|---|
| 1. Open Ratchet | Press release lever, open handle flat | Ensure mandrel slot faces up |
| 2. Feed Strap | Slide strap through mandrel from bottom | Keep strap straight, no twists |
| 3. Pull Slack | Pull loose end to remove slack | Leave a little give for ratcheting |
| 4. Secure Hooks | Attach hooks to anchor points | Check for sturdy anchor points |
| 5. Tighten Strap | Pump handle to tighten | Don’t overtighten fragile cargo |
| 6. Lock Ratchet | Push handle down to lock | Listen for the click |
| 7. Check Cargo | Ensure strap and cargo are secure | Stop and check during transport |
Table 1: Steps to Thread a Ratcheting Strap
Tips from My Experience
After years of using ratcheting straps, I’ve picked up some tricks that make life easier. Here are my top tips:
- Add a Twist: Put a single twist in the strap before threading to stop it from flapping in the wind. It’s a game-changer on highways!
- Check Weight Limits: Always match the strap’s working load limit (WLL) to your cargo. A 2-inch strap with a 5,000-pound WLL is great for most jobs.
- Store Smart: Roll up straps and secure with rubber bands to avoid tangles. Store them in a dry place to prevent mildew.
- Use Corner Protectors: For fragile cargo like boxes, place corner protectors to avoid crushing. They’re cheap and save headaches.
Common Mistakes to Avoid
It’s easy to mess up if you’re new to ratcheting straps. Here are mistakes I’ve made (so you don’t have to):
- Twisting the Strap: A twisted strap won’t tighten properly and can slip. Always check it’s flat before ratcheting.
- Wrong Threading Direction: Feeding the strap from the top instead of the bottom can jam the ratchet. Bottom-up is the way to go.
- Overtightening: Too much tension can damage cargo or snap the strap. If it feels too tight, ease up a bit.
- Ignoring Wear: Frayed or mildewed straps are weak. Inspect them before use and replace if needed.
This table compares common mistakes and fixes:
| Mistake | Problem | Fix |
|---|---|---|
| Twisted Strap | Slips or jams | Keep strap flat before threading |
| Wrong Threading | Ratchet jams | Feed from bottom through mandrel |
| Overtightening | Damages cargo | Tighten until snug, not crushing |
| Worn Strap | May break | Inspect and replace if frayed |
Table 2: Common Ratcheting Strap Mistakes and Fixes
Alternatives to Ratcheting Straps
Ratcheting straps aren’t the only option. For lighter loads, cam buckle straps are easier to use and gentler on fragile items. They’re threaded similarly but tightened by pulling, not cranking. Bungee cords work for super light stuff, but they’re not as secure. For heavy machinery, check out Rhino USA’s reinforced straps with steel hooks for extra strength.
Visual Ideas for Clarity
To make threading easier to understand, here are some visual ideas (not included but great for reference):
- Diagram of Ratchet Parts: Show the release lever, mandrel, and handle with labels.
- Step-by-Step Illustration: Draw each threading step, like sliding the strap through the mandrel.
- Cargo Example: Sketch a truck bed with a bike secured by straps to show hook placement.
Maintenance and Storage Tips
To keep your straps in top shape, inspect them before each use for fraying or rust. Clean them with mild soap and water, then air dry. Store in a cool, dry place away from sunlight to prevent damage. I keep mine in a toolbox with E-Track bags to stay organized.
Frequently Asked Questions
How Do I Know If My Ratchet Strap Is Strong Enough?
Check the working load limit (WLL) on the strap’s label. It should be at least one-third of your cargo’s weight. For example, a 1,500-pound load needs a strap with a 5,000-pound WLL. Always use straps rated for your cargo.
What’s the Difference Between a Ratchet and Cam Buckle Strap?
Ratchet straps use a crank to tighten and are stronger for heavy loads. Cam buckle straps tighten by pulling and are better for lighter, fragile items. Ratchets are more secure but can overtighten.
How Do I Release a Ratcheting Strap?
Pull the release lever and open the ratchet handle fully flat. You’ll hear a click. Pull the strap out through the mandrel. If it’s jammed, wiggle the strap gently while pulling.
Can I Use a Ratchet Strap for Fragile Cargo?
Yes, but use corner protectors and don’t overtighten. A cam buckle strap might be better for delicate items since it’s gentler. Check for damage before securing.
Why Does My Ratchet Strap Keep Jamming?
Jamming happens from twisting or threading the strap wrong. Ensure the strap is flat and fed from the bottom through the mandrel. Pull out slack before ratcheting.
How Many Straps Do I Need for My Cargo?
Use at least two straps for most cargo, one for each side. Heavy or large items may need four. Check US Cargo Control’s guide for specific recommendations.
How Do I Store Ratchet Straps?
Roll them up and secure with rubber bands. Store in a dry place away from sunlight to avoid mildew or fading. A toolbox or E-Track bag keeps them tangle-free.
Conclusion
Threading a ratcheting strap is easier than it looks once you know the steps. Open the ratchet, feed the strap through the mandrel, pull out slack, and crank it tight. With practice, it’s a breeze! Try securing something small, like a bike, to get the hang of it. Avoid twists and check your straps for wear to keep things safe. Got a fun cargo-securing story? Share it in the comments or try threading a strap this weekend. You’ll be a pro in no time—happy hauling!