
To stain poplar dark brown or black, follow these simple steps. First, prepare the wood.
Then, apply the stain properly. Poplar is a popular choice for woodworking projects. It has a light color that can be challenging to stain dark. But, with the right technique, you can achieve a rich, dark finish. This guide will show you how to stain poplar dark brown or black.
You’ll learn how to prepare the wood, choose the right stain, and apply it evenly. Whether you’re a beginner or an experienced woodworker, this guide will help you transform your poplar projects. Let’s get started on turning that light poplar into a beautiful, dark piece.

Credit: www.andersonlumbercompany.com
Choosing The Right Stain
Choosing the Right Stain is essential for achieving a dark brown or black finish on poplar wood. The correct stain can enhance the wood’s natural beauty and provide a durable finish. This section will guide you in selecting the right stain for your project.
Types Of Stains
There are various types of stains available, each with its own characteristics. Understanding these can help you make an informed decision.
- Oil-based Stains: These penetrate deeply into the wood and provide a rich, long-lasting color. They are easy to apply and are good for larger projects.
- Water-based Stains: These are quick-drying and emit fewer fumes. They are available in a wide range of colors and are easy to clean up with water.
- Gel Stains: These are thicker and provide even coverage. They are ideal for vertical surfaces and do not drip easily.
Best Brands
Choosing a high-quality stain brand is crucial for achieving the best results. Here are some top brands that offer excellent stains for poplar wood:
| Brand | Type | Features |
|---|---|---|
| Minwax | Oil-based, Water-based | Wide range of colors, easy to apply |
| Varathane | Oil-based, Water-based | Fast-drying, durable finish |
| General Finishes | Gel Stain | Thick consistency, even coverage |
These brands offer a variety of stain options that are ideal for poplar wood. Choose the one that best fits your project needs.
Preparing The Wood
Before staining poplar wood dark brown or black, proper preparation is essential. This ensures a smooth and even finish. Follow these steps to prepare your wood for staining.
Sanding The Surface
Start by sanding the wood surface. Use sandpaper with a grit of 120 to 150.
- Sand along the grain of the wood.
- Apply even pressure to avoid gouging.
Next, switch to finer grit sandpaper, around 220 grit. This smooths out any rough spots. Sand again along the grain. Ensure the surface is even and smooth.
Cleaning The Wood
After sanding, clean the wood thoroughly. Use a tack cloth to remove all dust. Dust can affect the stain’s absorption.
- Wipe the surface with a damp cloth.
- Allow the wood to dry completely.
For a deeper clean, use a wood cleaner. Follow the product instructions. Ensure the wood is dry before staining.
Proper preparation leads to a beautiful, dark finish. Take the time to sand and clean the wood well.
Testing The Stain
Testing the stain is a crucial step in achieving the desired color for your poplar wood. It ensures you get the exact shade of dark brown or black you want. This process helps you avoid any surprises later. By testing, you can see how the stain interacts with the wood.
Creating A Test Sample
Start by selecting a scrap piece of poplar. This piece should be from the same batch as your main project. This ensures consistency in wood grain and texture. Clean the sample piece thoroughly. Sand it down to match the finish level of your project wood.
Apply a small amount of stain to the test piece. Use a brush or cloth for even application. Let the stain sit for the recommended time. Wipe off any excess stain with a clean cloth. Allow the test piece to dry completely. Observe the color once it’s dry.
Adjusting Stain Color
If the stain is too light, apply a second coat. Let it dry before making a judgment. For a darker shade, consider mixing stains. Blend different shades until you achieve the desired color. Test this new mix on another scrap piece.
If the color is too dark, dilute the stain. Use a stain thinner or mineral spirits. Apply the diluted stain to a new test piece. Repeat testing until you are satisfied with the color. This method helps you find the perfect shade.
Applying Pre-stain Conditioner
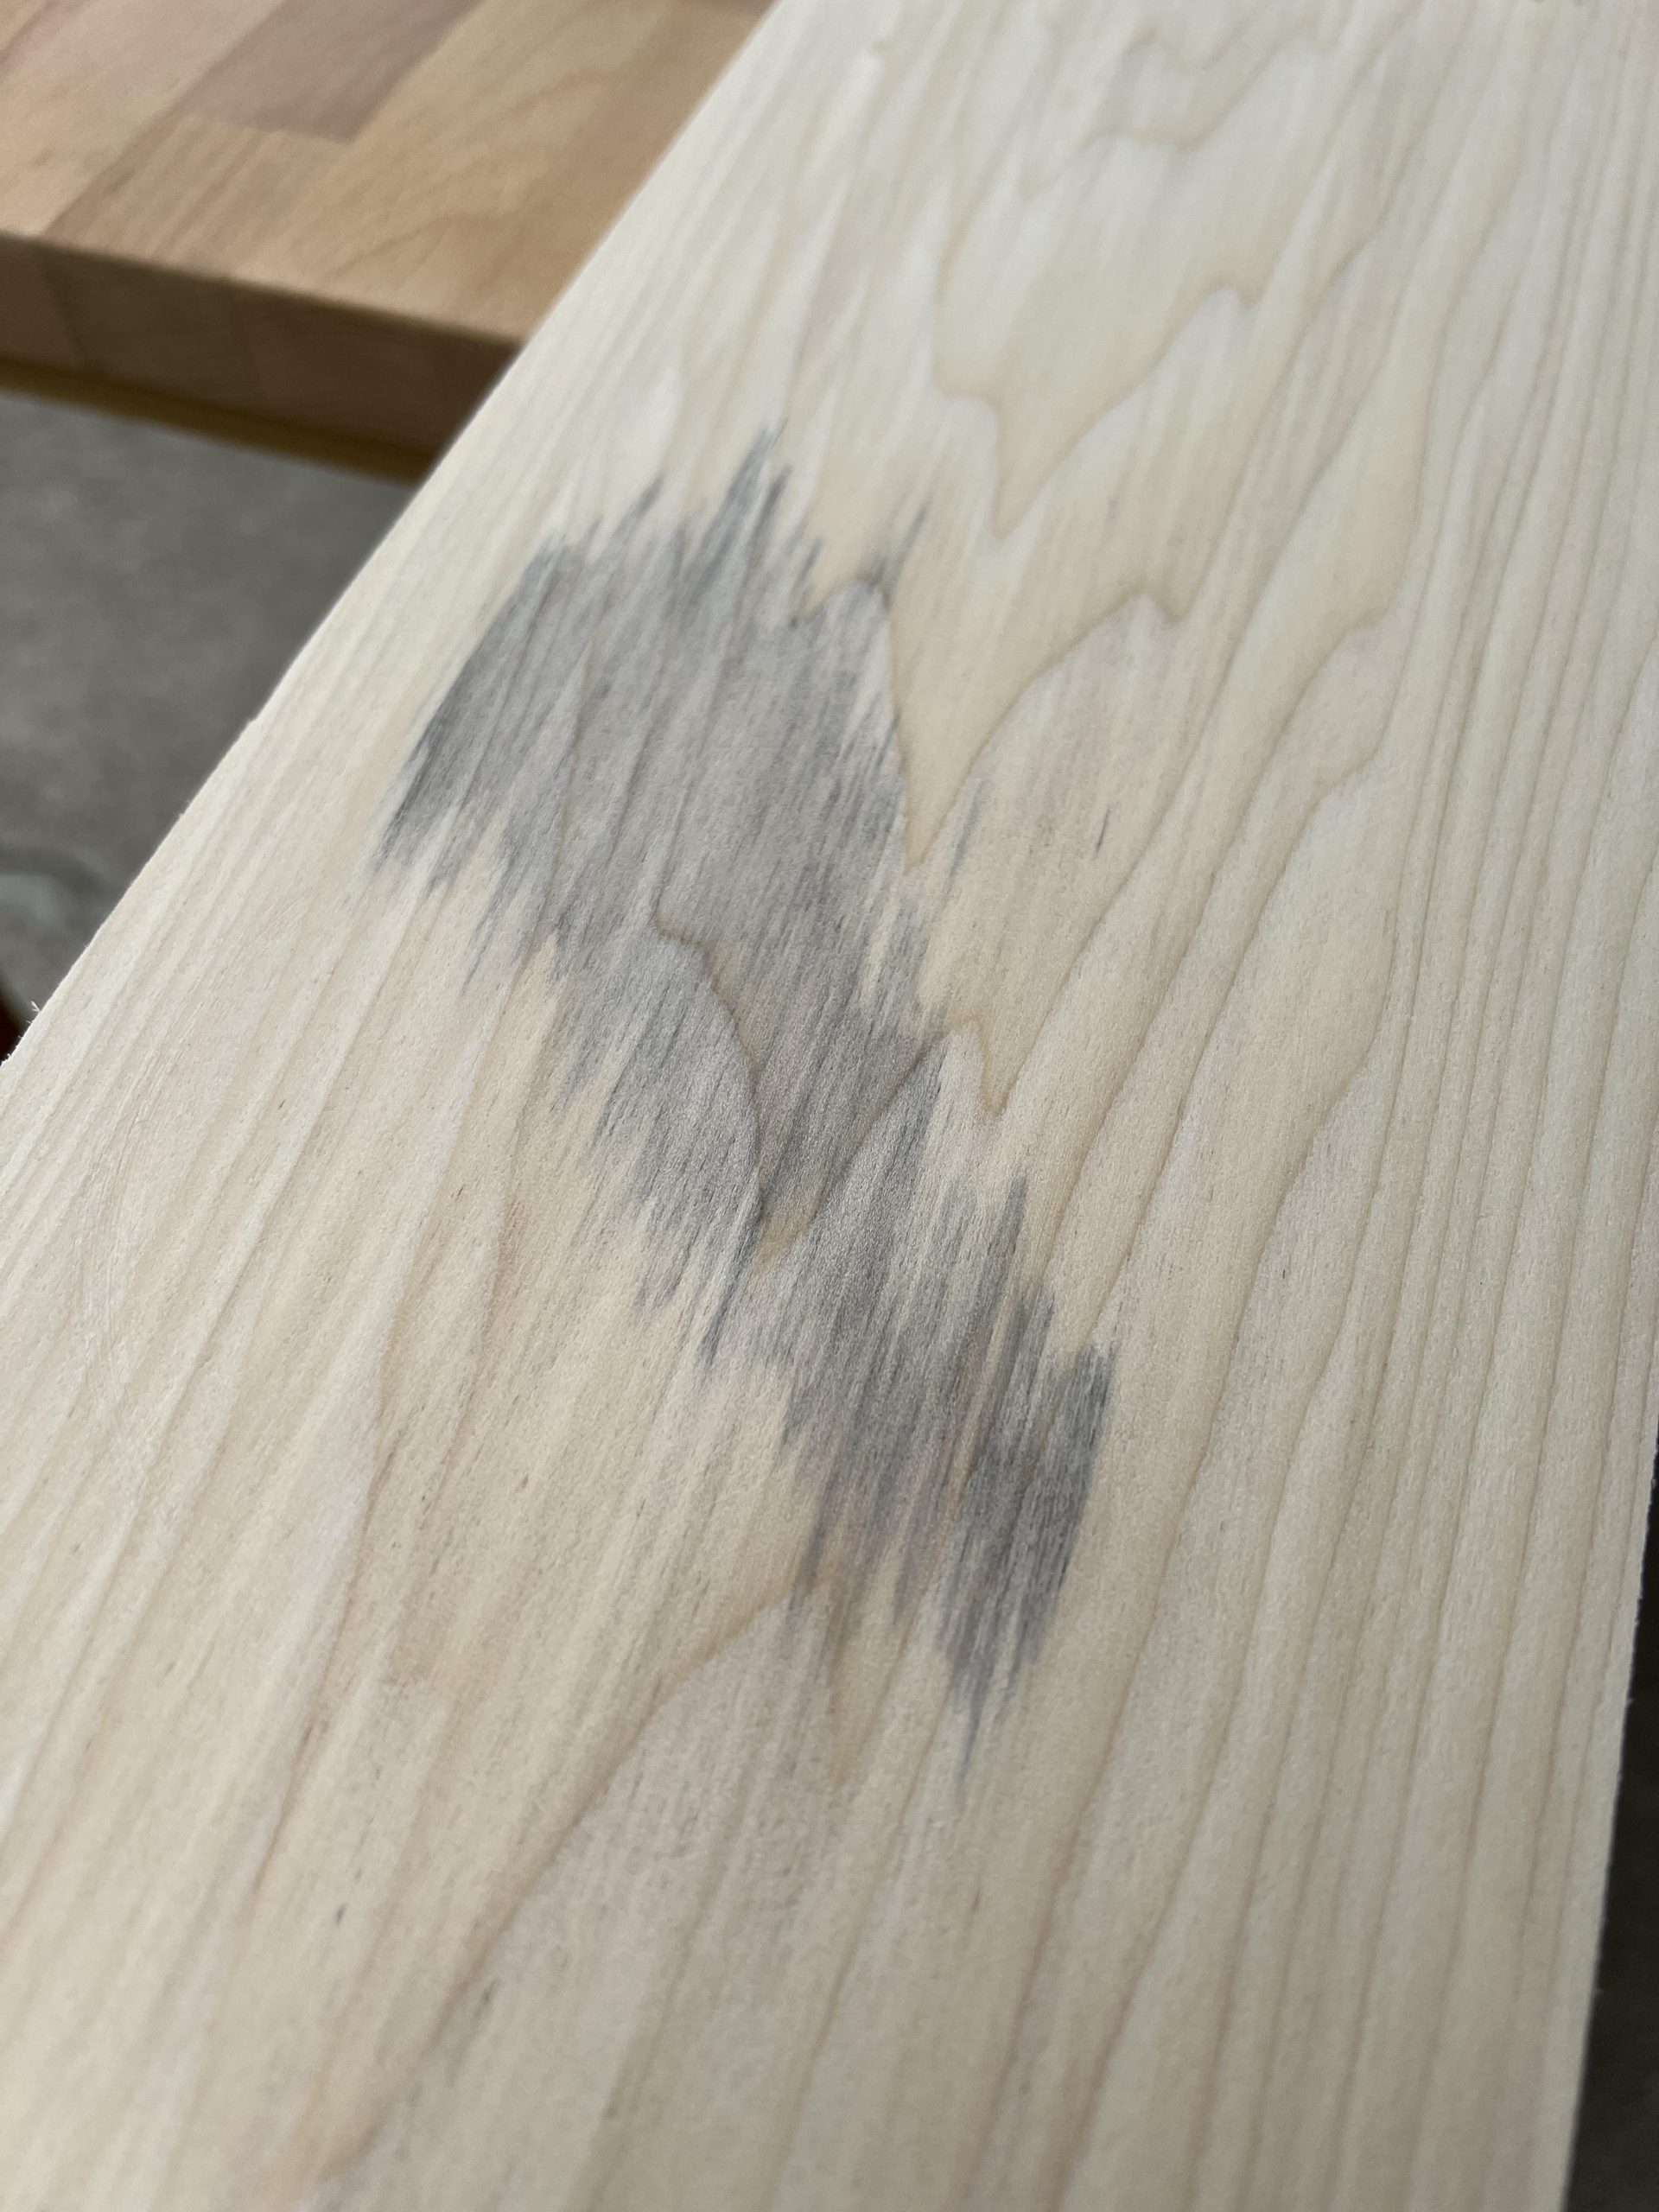
Applying a pre-stain conditioner is a crucial step in staining poplar wood dark brown or black. This process helps ensure an even and rich finish. Poplar wood can be tricky to stain because of its uneven grain. Using a conditioner helps prepare the wood to absorb the stain more uniformly.
Why Use Conditioner?
Poplar wood has an uneven grain. This can cause blotchy staining. A pre-stain conditioner helps to fix this issue. It seals the wood pores. This allows the stain to soak in evenly. The result is a smooth, consistent color.
How To Apply
First, sand the poplar wood. Use fine-grit sandpaper for a smooth surface. Remove all dust with a clean cloth. Next, apply the pre-stain conditioner. Use a brush or cloth for this step. Follow the wood grain while applying. Let it soak in for 15 minutes. Wipe off any excess with a clean cloth.
After applying the conditioner, wait 30 minutes. This allows it to penetrate the wood fully. Now, your poplar wood is ready for staining. The conditioner will help the stain go on smoothly. This ensures a beautiful, dark finish.
Staining Techniques
Staining poplar to achieve a dark brown or black finish can be rewarding. The right staining techniques can bring out the wood’s beauty and ensure a smooth, even finish. Let’s explore two popular methods: brushing and wiping, and the importance of multiple coats.
Brushing Vs. Wiping
Brushing involves using a brush to apply the stain onto the wood. This method allows for greater control over the amount of stain applied. It can help in getting the stain into the wood’s grain. Brushing can be useful for larger surfaces, ensuring even coverage.
Wiping, on the other hand, involves using a cloth to apply the stain. This method is often quicker and can provide a more even finish. Wiping can help avoid streaks and blotches. It is ideal for smaller surfaces or detailed work.
Multiple Coats
Applying multiple coats of stain can deepen the color and enhance the wood’s appearance. The first coat often sets the base color. Subsequent coats build upon this, creating a richer, darker finish.
Between each coat, let the stain dry completely. This ensures that the next coat adheres properly. Light sanding between coats can help achieve a smoother finish. Multiple coats can also help in achieving a uniform color across the entire piece.
Credit: www.makingmanzanita.com
Drying And Curing
Drying and curing are essential steps in staining poplar dark brown or black. Proper drying ensures the stain sets well, providing a durable and attractive finish. Curing is the process where the stain hardens completely, ensuring long-lasting results.
Optimal Conditions
The right environment is crucial for drying and curing. Aim for a temperature between 70°F and 80°F. This range helps the stain dry evenly and prevents cracking. Good ventilation is also important. Fresh air helps remove moisture and speeds up the drying process.
Humidity levels should be between 40% and 60%. Too much moisture can delay drying. Too little can cause the stain to dry too quickly, leading to an uneven finish. Use a dehumidifier or a humidifier if needed to maintain the right levels.
Avoiding Dust
Dust can ruin the appearance of your stained poplar. Keep your workspace clean to avoid dust settling on the wet stain. Use a tack cloth to wipe the surface before staining. This removes any dust particles that could affect the finish.
Cover your work area with plastic sheets. This minimizes the chances of dust landing on your project. A clean environment ensures a smooth, flawless finish for your stained poplar.
Sealing The Stain
Sealing the stain on your poplar wood is crucial. It protects the wood and enhances its appearance. The right sealer can make your dark brown or black stain look richer and last longer. Let’s dive into the details.
Types Of Sealers
There are several types of sealers you can use. Each has its own benefits:
- Polyurethane: Durable and water-resistant. Ideal for high-traffic areas.
- Shellac: Offers a warm, natural finish. Easy to apply.
- Varnish: Provides a hard, protective surface. Great for outdoor use.
- Lacquer: Dries quickly and gives a glossy finish. Best for indoor furniture.
Application Tips
Follow these steps for a smooth application:
- Prepare the Surface: Make sure the wood is clean and dry. Sand it lightly for better adhesion.
- Choose the Right Tool: Use a brush, roller, or spray gun depending on the sealer type.
- Apply Evenly: Spread the sealer evenly across the surface. Avoid drips and bubbles.
- Let it Dry: Allow the sealer to dry completely. Check the manufacturer’s instructions for drying times.
- Sand Lightly Between Coats: If applying multiple coats, sand lightly between each one. This ensures a smooth finish.
Sealing the stain not only protects your poplar wood but also enhances its beauty. Choose the right sealer and apply it carefully for the best results.
Credit: www.reddit.com
Maintaining The Finish
Maintaining the finish on stained poplar is essential for its longevity. Whether you’ve chosen a dark brown or black stain, regular upkeep ensures your project looks great over time. Let’s explore some key practices to help maintain that beautiful finish.
Regular Cleaning
Dust and dirt can dull the finish. Use a soft, damp cloth to wipe surfaces weekly. Avoid harsh chemicals that can damage the stain. A mild soap solution works well for deeper cleaning. Always dry the surface completely after cleaning to prevent moisture damage.
Repairing Damage
Small scratches and dents are inevitable. Use a matching stain marker to touch up minor scratches. For deeper dents, fill them with wood filler that matches the stain. Sand the area lightly and reapply the stain. Allow it to dry completely before using the surface again.
Frequently Asked Questions
What Is The Best Stain For Poplar Wood?
The best stain for poplar wood is a gel stain. Gel stains provide even color and cover wood grain variations.
How Do You Prepare Poplar For Staining?
To prepare poplar for staining, sand the wood with 220-grit sandpaper. Clean the surface with a tack cloth.
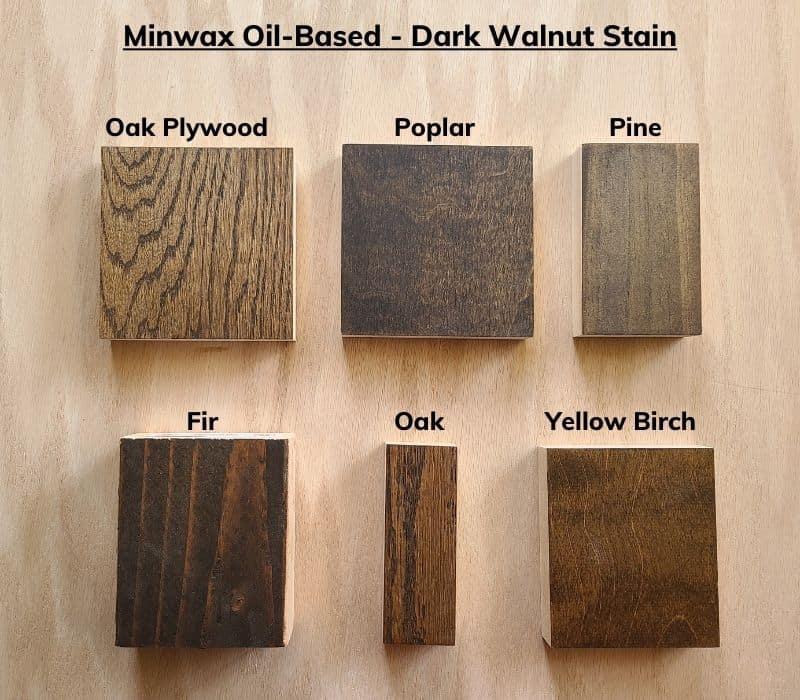
Can You Stain Poplar To Look Like Walnut?
Yes, you can stain poplar to look like walnut. Use a dark walnut stain for the best results.
Does Poplar Need A Wood Conditioner?
Yes, poplar needs a wood conditioner. Applying a wood conditioner helps achieve a uniform stain finish.
Conclusion
Achieving a dark brown or black finish on poplar is simple. Follow the steps outlined, and you will get great results. Proper sanding and choosing the right stain are crucial. Allow adequate drying time for a smooth, even finish. Experiment with different stains and techniques.
Your poplar projects will look professional and beautiful. Practice makes perfect. Enjoy transforming your poplar wood with these tips. Happy staining!