
Quick Summary: Replacing a showerhead is a simple DIY task that takes less than 30 minutes and requires only a few basic tools. This guide provides easy-to-follow steps to swap out your old showerhead for a new one, enhancing your shower experience without needing professional help.
Hello there! I’m Md Meraj, your guide to making home improvement projects feel less daunting and more like fun. Ever feel like your shower just isn’t cutting it anymore? Maybe the water pressure is weak, or the spray is all over the place. Often, the culprit is a tired old showerhead, and the good news is, replacing it is one of the easiest DIY upgrades you can tackle. You don’t need to be a plumbing whiz to do this; with just a few simple tools and this step-by-step guide, you’ll be enjoying a revitalized shower in no time. Let’s get that showerhead swapped out and get you feeling refreshed!
Why Upgrade Your Showerhead?
Upgrading your showerhead is more than just a cosmetic change; it’s a practical improvement that can significantly enhance your daily routine. Think about it: your shower is one of the first things you interact with in the morning and a place to unwind at night. A better showerhead can transform this experience. Here are some compelling reasons to make the switch:
- Improved Water Pressure: Older showerheads can become clogged with mineral deposits over time, reducing water flow. A new showerhead can restore or even boost your water pressure for a more invigorating shower.
- Enhanced Shower Experience: Modern showerheads come with various spray settings – from a gentle mist to a powerful massage spray – allowing you to customize your shower to your mood.
- Water and Energy Savings: Many new showerheads are designed to be water-efficient, using less water without sacrificing performance. This is great for your utility bills and the environment. According to the ENERGY STAR program, low-flow showerheads can reduce water heating costs by saving energy.
- Aesthetic Upgrade: A sleek, modern showerhead can instantly update the look of your bathroom, making it feel more contemporary and stylish.
- Ease of Installation: As we’ll cover, this is a project that most homeowners can complete with minimal tools and time.

Tools and Materials You’ll Need
The beauty of replacing a showerhead is that you don’t need a complex toolkit. Most of what you’ll need is probably already in your home, or easily found at any hardware store. Having the right tools makes the job smoother and prevents any accidental damage to your plumbing.
Here’s a quick rundown of what you should gather:
- New Showerhead: Choose one that fits your needs and style!
- Adjustable Wrench or Pliers: This is for loosening and tightening the shower arm connection.
- Teflon Tape (Plumber’s Tape): Essential for creating a watertight seal on the threads.
- Old Rag or Cloth: To protect the shower arm finish and to clean up any drips.
- Optional: Old Toothbrush or Wire Brush: For cleaning mineral deposits from the shower arm threads if needed.
- Optional: Step Stool: If your shower arm is high.
Let’s talk a bit about Teflon tape. It’s a thin, white tape made of plastic. When you wrap it around the threads of the shower arm, it helps to fill in any tiny gaps, preventing water from leaking out. It’s a simple but crucial step for a successful installation.
Step-by-Step Guide: How to Replace a Showerhead
Ready to get started? This process is straightforward and very rewarding. We’ll break it down into simple, manageable steps so you can feel confident at every turn. Remember, take your time, and don’t force anything!
Step 1: Prepare Your Workspace
Before you begin, make sure the shower is turned off. It’s also a good idea to place a rag or towel in the bottom of the shower or tub to catch any drips and prevent scratches. If you have a handheld showerhead, you might want to unhook it from its holder so it’s easily accessible.
This initial step is all about making the job easier and cleaner. Having everything ready means you won’t be scrambling for a tool mid-process. If you’re working in a shower with a tub, placing a towel at the bottom can save your tub from any accidental dings from dropped tools.
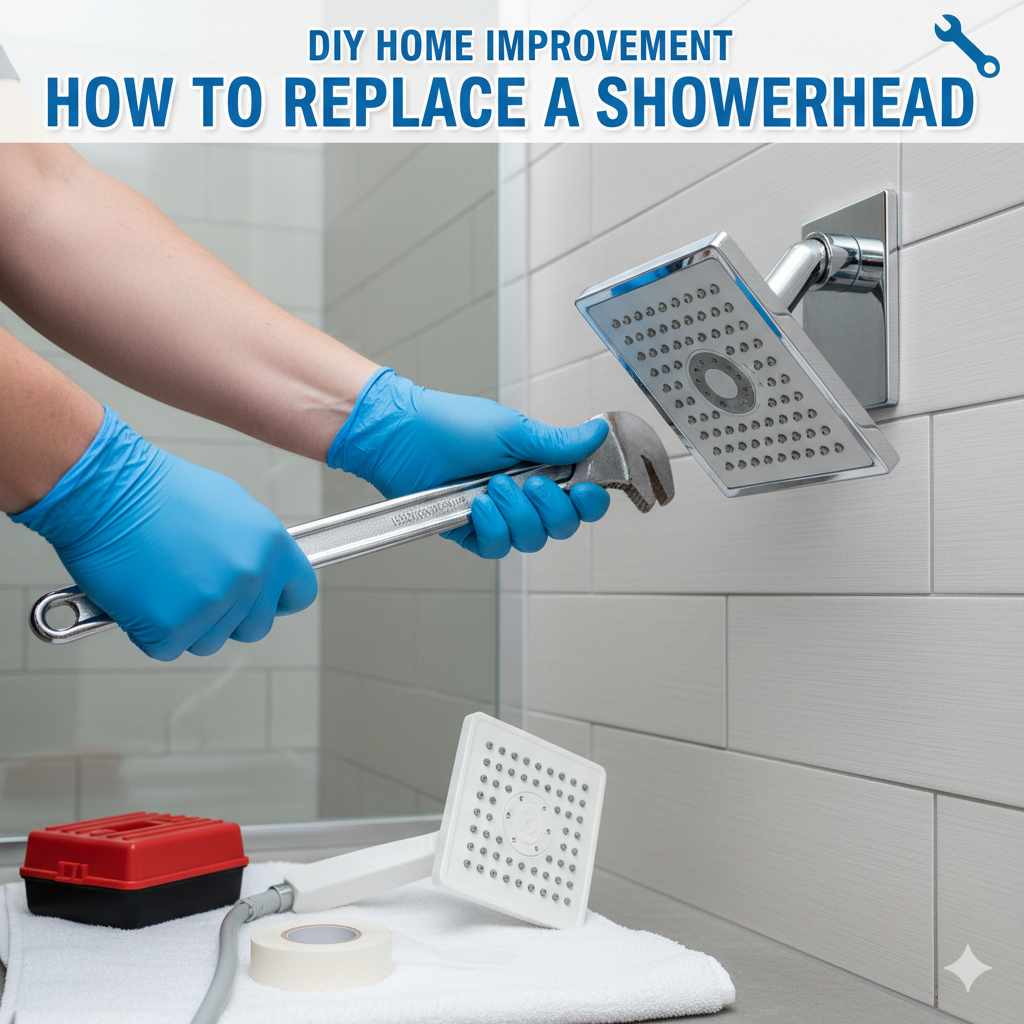
Step 2: Remove the Old Showerhead
Now, it’s time to say goodbye to your old showerhead. You’ll need your adjustable wrench or pliers for this. Grip the base of the showerhead where it connects to the shower arm (the pipe that comes out of the wall). Turn the showerhead counter-clockwise to loosen it. If it’s stuck, apply gentle, steady pressure. Sometimes, mineral buildup can make it a bit stubborn. You can try wrapping the rag around the connection point before using the wrench to protect the finish.
If it’s really tough to budge, you can try spraying a bit of penetrating oil (like WD-40) around the threads and letting it sit for a few minutes. Always remember to wipe away any excess oil before proceeding. Once it’s loose, unscrew it the rest of the way by hand.
Tip: Always turn the showerhead counter-clockwise (lefty-loosey) to unscrew it. This is the standard for most threaded connections.
Step 3: Clean the Shower Arm Threads
After removing the old showerhead, you’ll see the threaded end of the shower arm. It’s important to clean these threads. Look for any old Teflon tape, mineral deposits, or gunk. You can often pick off old tape with your fingers or a small scraper. If there are stubborn deposits, a quick scrub with an old toothbrush or a soft wire brush can work wonders. You want a clean surface for the new Teflon tape to seal effectively.
This step is often overlooked, but it’s critical for preventing leaks. Imagine trying to screw a new cap onto a dirty jar – it might not seal properly. The same principle applies here. A clean shower arm ensures a tight, leak-free connection for your new showerhead.
Step 4: Apply New Teflon Tape
This is where the magic of sealing happens! Take your roll of Teflon tape and wrap it around the threads of the shower arm. Start at the end of the threads and wrap it clockwise, going around the threads about 3-5 times. Make sure to overlap the tape slightly with each wrap. The tape should be snug but not so tight that it tears. Press the tape firmly into the threads with your fingers.
Why clockwise? Because when you screw the new showerhead on (which is also clockwise), the tape will naturally get pulled into the threads, creating a better seal. If you wrap it counter-clockwise, you risk unraveling the tape as you tighten the showerhead.
Here’s a quick visual guide to wrapping Teflon tape:
| Action | Description | Why it Matters |
|---|---|---|
| Wrap Direction | Wrap the tape clockwise around the threads of the shower arm. | Ensures the tape seals properly as the showerhead is tightened. |
| Number of Wraps | Use 3-5 layers of tape. | Provides enough material to fill gaps without making it too bulky. |
| Tension | Keep the tape snug but don’t stretch it to the point of tearing. | Prevents the tape from breaking and ensures consistent coverage. |
Step 5: Install the New Showerhead
Now for the exciting part – attaching your new showerhead! Take your new showerhead and carefully align it with the threads on the shower arm. Begin screwing it on clockwise by hand. Make sure it’s going on straight to avoid cross-threading, which can damage the threads. Screw it on as tightly as you can by hand. Most showerheads can be hand-tightened sufficiently, especially with the Teflon tape in place.
If your showerhead instructions recommend using a wrench for final tightening, or if you feel it needs a little extra snugging, use your adjustable wrench. Grip the base of the new showerhead (be careful not to damage its finish) and give it a gentle quarter-turn clockwise. Do not overtighten, as this can crack the fitting or damage the shower arm.
Pro Tip: Check the manufacturer’s instructions for your specific showerhead. Some may have different tightening recommendations.
Step 6: Test for Leaks
Turn on the shower water slowly. Let it run for a minute or two. Carefully inspect the connection point between the shower arm and the new showerhead. Look and feel for any drips or moisture. If you see any leaks, turn off the water and try tightening the showerhead a little more by hand or with a gentle wrench turn. If the leak persists, you may need to remove the showerhead, clean the threads again, reapply Teflon tape (making sure it’s wrapped correctly and sufficiently), and reattach it.
A small leak at the connection can quickly turn into a bigger problem if left unaddressed. It’s better to catch it now and fix it properly. Most leaks are simply a sign that the connection isn’t quite tight enough or the Teflon tape needs a bit more attention.
Step 7: Enjoy Your New Shower!
Congratulations! You’ve successfully replaced your showerhead. Now, turn on the water and enjoy the difference. Test out all the different spray settings your new showerhead offers. You’ve accomplished a practical home improvement that makes a real difference in your daily life. Feel that satisfying water flow? That’s the reward of a job well done!
Choosing the Right Showerhead
With so many options available, picking the perfect showerhead can feel overwhelming. But don’t worry, it’s about finding what works best for your needs and preferences. Here’s a look at some popular types and features to consider:
Types of Showerheads
- Fixed Showerheads: These are the most common and are directly attached to the shower arm. They offer a straightforward, reliable shower experience.
- Handheld Showerheads: These come with a flexible hose and a bracket to hold the head. They’re great for rinsing off kids, pets, or cleaning the shower itself, and offer more flexibility in directing the water flow.
- Adjustable/Rainfall Showerheads: Often larger than standard heads, these mimic the feel of rain. They can be fixed or mounted on a shower arm and typically offer a more luxurious, spa-like experience.
- Dual Showerheads: These systems combine a fixed showerhead with a handheld one, often controlled by a diverter valve, allowing you to use one, the other, or both simultaneously.
Key Features to Look For
- Spray Settings: Consider what you like – a powerful jet, a gentle mist, a pulsating massage, or a combination? Many showerheads offer multiple settings.
- Water Efficiency: Look for the flow rate, measured in gallons per minute (GPM). The U.S. Environmental Protection Agency (EPA) recommends showerheads with a flow rate of 2.0 GPM or less to conserve water and energy, often marked with the WaterSense label.
- Finish: Showerheads come in various finishes like chrome, brushed nickel, oil-rubbed bronze, and matte black. Choose one that complements your bathroom’s existing hardware.
- Material: Most showerheads are made of durable plastic or metal. Metal ones tend to be more durable and feel more premium.
- Ease of Installation: While most are easy to install, some might have specific requirements.
Here’s a table to help you compare different showerhead types:
| Showerhead Type | Pros | Cons | Best For |
|---|---|---|---|
| Fixed | Simple, affordable, easy to install, reliable. | Limited spray options, less flexibility. | Basic upgrades, renters, simple needs. |
| Handheld | Versatile, great for rinsing, cleaning, and assisting those with mobility issues. | Hose can tangle, requires a holder, can be more expensive. | Families with children/pets, accessible bathrooms, cleaning. |
| Rainfall/Large Head | Luxurious, spa-like experience, wide coverage. | Can use more water (unless efficient model), may require higher water pressure. | Relaxing showers, creating a spa atmosphere. |
| Dual Systems | Ultimate versatility, multiple spray options at once. | More complex installation, requires adequate water pressure, can be costly. | Couples with different preferences, luxury bathrooms. |
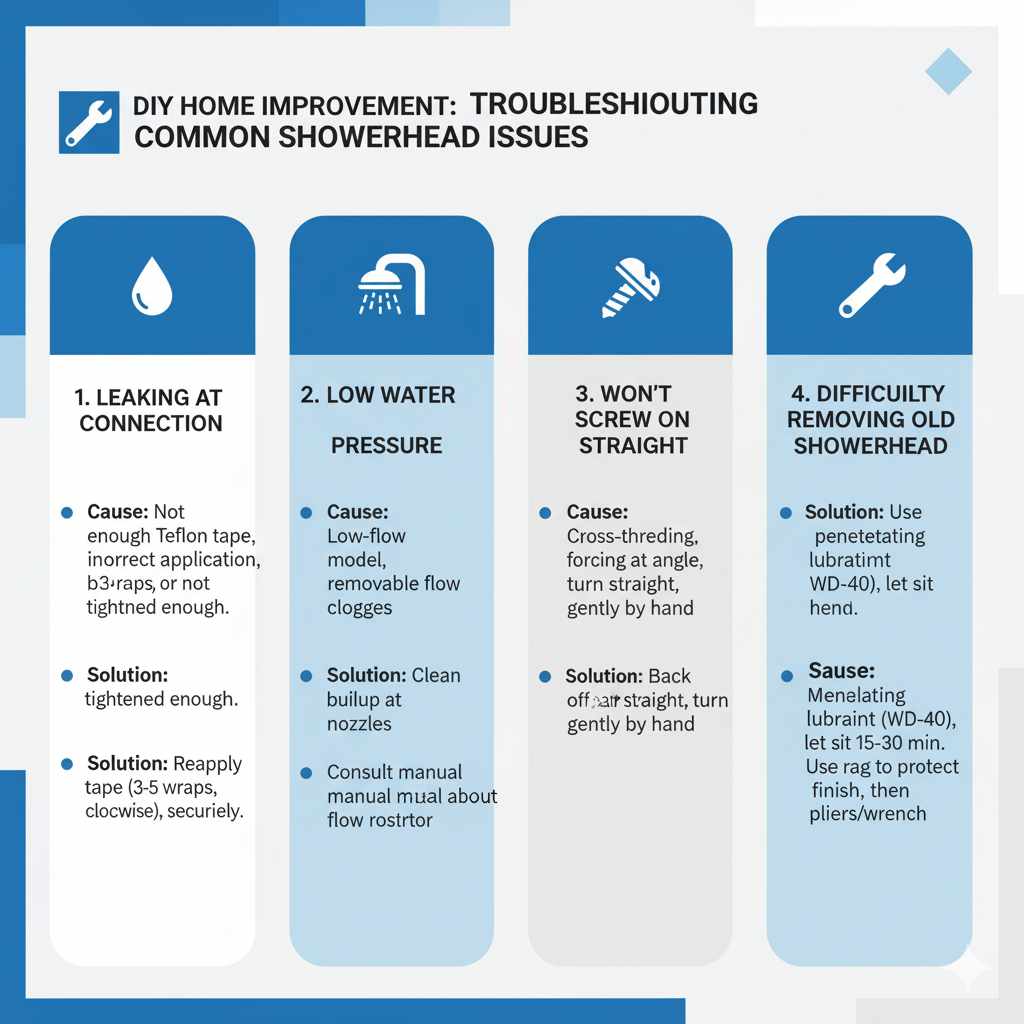
Troubleshooting Common Issues
Even with the simplest DIY projects, you might run into a snag. Here are a few common issues and how to fix them:
- Leaking at the Connection: This is the most common problem.
- Cause: Not enough Teflon tape, tape applied incorrectly, or the showerhead not tightened enough.
- Solution: Turn off water, remove showerhead, re-clean threads, reapply Teflon tape (3-5 wraps, clockwise), and tighten securely.
- Low Water Pressure:
- Cause: The new showerhead might be a low-flow model that’s not to your preference, or it could have a flow restrictor that can sometimes be removed (check manufacturer guidelines and local regulations). Clogged nozzles are also a possibility.
- Solution: Ensure you purchased a showerhead with adequate flow for your liking. Clean any mineral buildup from the nozzles with vinegar and a toothbrush. If it’s a flow restrictor issue, consult your showerhead’s manual or manufacturer.
- Showerhead Won’t Screw On Straight:
- Cause: Cross-threading. You’re forcing it at an angle.
- Solution: Back it off completely. Ensure you are starting the threads straight and turning gently by hand. It should feel like it’s screwing on smoothly.
- Difficulty Removing Old Showerhead:
- Cause: Mineral buildup and corrosion.
- Solution: Use a penetrating lubricant like WD-40 and let it sit for 15-30 minutes. Protect the shower arm finish with a rag before using pliers or a wrench.
Frequently Asked Questions (FAQs)
Q1: How long does it take to replace a showerhead?
A: For most people, it takes about 15-30 minutes, from start to finish. It’s a quick and satisfying DIY project!
Q2: Do I need a plumber to replace a showerhead?
A: No, not at all! Replacing a showerhead is one of the easiest home improvement tasks you can do yourself. You only need a few basic tools.
Q3: Can I just replace the showerhead without turning off the main water supply?
A: Yes, you only need to turn off the shower faucet itself. There’s no need to shut off the water to your entire house for this project.
Q4: How do I know if my new showerhead will fit?
A: Standard shower arms in the U.S. have a 1/2-inch threaded connection. Most showerheads are designed to fit this standard size. Always check the product description to be sure.
Q5: What if my new showerhead leaks after installation?
A: The most common reason for leaks is insufficient or improperly applied Teflon tape. You may need to remove the showerhead, re-clean the threads, reapply the tape (3-5 wraps, clockwise), and reattach it. Ensure it’s snug but not overly tightened.
Q6: Can I remove the flow restrictor in my new showerhead?
A: Many water-efficient showerheads have a flow restrictor to meet conservation standards. While some can be removed, it’s often not recommended, as it can void the warranty and may be illegal in some areas. Check your showerhead’s manual and local regulations before attempting this.
Q7: How do I clean mineral buildup from my old showerhead before replacing it?
A: For stubborn buildup, soak the showerhead in a bowl of white vinegar for a few hours or overnight. Then, use an old toothbrush or a soft brush to scrub away the loosened deposits. This can also help if you decide to keep and clean your old one.
Conclusion
There you have it! Replacing a showerhead is a straightforward, budget-friendly DIY project that can significantly upgrade your daily shower experience. You’ve learned which tools to gather, how to carefully remove the old fixture, prepare the threads, and install your new showerhead for a leak-free fit. Plus, we’ve explored different types of showerheads and features to help you choose the perfect one for your needs, whether you prioritize water savings, a luxurious spray, or simple functionality.
Remember, the key to success lies in preparation, patience, and the proper use of Teflon tape. Don’t be afraid to tackle this project – it’s a fantastic way to build confidence in your DIY skills and make a tangible improvement to your home. So go ahead, give your bathroom a quick refresh, and enjoy that revitalizing shower you deserve!