
Quick Summary: You can effectively remove paint from brass hinges without taking them off the door by using gentle scraping, specialized solvents, and careful polishing. This method preserves the hinge’s integrity and saves you installation hassle.
How to Remove Paint From Brass Hinges Without Removing Them: The Genius Method
Ever stared at your beautiful wooden door, only to be greeted by unsightly painted-over brass hinges? It’s a common frustration for homeowners and DIYers alike. Those painted hinges can really detract from the charm of your doors, especially when you’re aiming for a clean, classic look. The thought of removing each hinge, painstakingly stripping it, and then reattaching it can feel like a daunting task, often leading to stripped screws or misaligned doors.
But what if I told you there’s a way to bring back that beautiful brass gleam without the hassle of removing the hinges at all? That’s right, you can achieve a fantastic result with a bit of patience and the right approach. Get ready to discover a genius method that will have your brass hinges looking as good as new, right where they are!
As Ashraf Ahmed, a guy who’s spent more time than I can count with drills and bits in my hands, I know the value of a smart shortcut that doesn’t compromise on quality. This project is all about preserving the original setup while achieving a stunning transformation. We’ll go through it step-by-step, so you’ll feel confident tackling this yourself.
Why Bother With Brass Hinges?
Brass hinges are more than just functional hardware; they’re a statement piece. They offer a timeless elegance that can significantly enhance the aesthetic of any door, whether it’s an antique cabinet, a classic interior door, or even a decorative piece. When paint is applied over brass, it hides this natural beauty and can make even the most elegant door look dull and uninspired. Restoring them not only improves the look of your doors but also protects the brass itself from further damage or corrosion.
The goal here is to reveal the rich, warm tone of the brass underneath the paint, giving your doors a touch of vintage sophistication or a polished modern finish. It’s a rewarding DIY project that delivers visible results without requiring advanced skills.
Tools You’ll Need for the Job
Before we dive into the steps, let’s gather our arsenal. Having the right tools makes all the difference in achieving a smooth, efficient, and safe paint removal process. Remember, we’re aiming for precision and minimal damage to the surrounding door or frame.
- Safety Glasses: Always protect your eyes from paint chips and chemical fumes.
- Gloves: Protect your hands from paint and solvents. Nitrile gloves are a good choice for solvent resistance.
- Painter’s Tape: High-quality painter’s tape (like 3M blue or green tape) is crucial for masking off areas you don’t want to affect.
- Small, Flat-Edged Tools: Think plastic scrapers, old credit cards, or specialized paint scraping tools designed for delicate surfaces. Avoid metal tools that can easily scratch the brass.
- Cotton Swabs or Q-tips: Perfect for applying solvents to small areas and for cleaning up edges.
- Old Toothbrush: Useful for gently scrubbing away loosened paint in crevices.
- Brass Polish: Once the paint is off, you’ll want a good brass polish to restore the shine.
- Soft Cloths: For applying polish and buffing. Microfiber cloths work wonders.
- Denatured Alcohol or Acetone (Optional, Use with Caution): For stubborn paint. Always test in an inconspicuous area first. Denatured alcohol is generally safer and less harsh than acetone. You can find more information on safe solvent use from resources like the Occupational Safety and Health Administration (OSHA).
- Fine-Grit Sandpaper (Optional, 220 grit or higher): For very light smoothing if needed, but use with extreme caution to avoid scratching the brass.
Step-by-Step Guide: Unleashing the Brass
Now, let’s get down to business. This method focuses on working with the hinges in place, so you’ll need to be methodical and patient. The key is to be gentle and work in stages.
Step 1: Preparation is Key – Masking and Protection
This is arguably the most important step for a clean finish. You want to protect your door and its finish from any accidental paint removal or solvent damage.
- Mask the Door: Use your painter’s tape to carefully mask off the area around each hinge. Ensure the tape is pressed down firmly to create a good seal. Cover any surrounding wood, door frame, or wall that you don’t want to disturb.
- Mask the Hinge Pin (If Applicable): If your hinges have removable pins and you’re not removing the hinge itself, you might want to tape over the pin to prevent paint from getting into the mechanism.
- Ventilation: If you plan to use any solvents, ensure the area is well-ventilated. Open windows and doors.
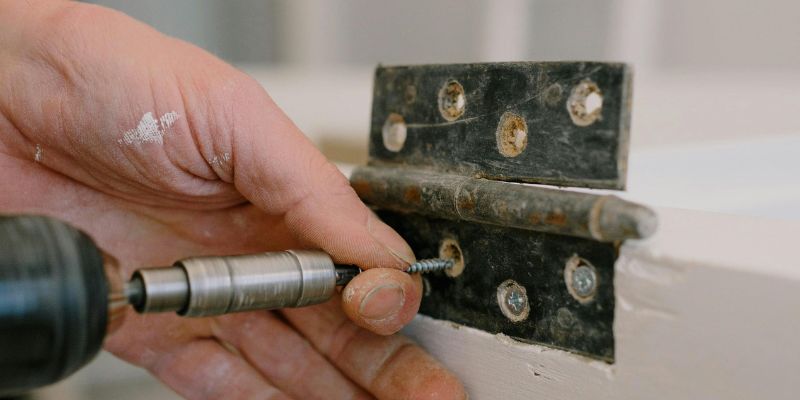
Step 2: Gentle Scraping – Loosening the Grip
We’ll start with the least aggressive method to see how much paint we can lift. This is where your plastic scraper or old credit card comes in.
- Work on Edges: Gently try to get the edge of your scraping tool under a loose flake of paint on the hinge.
- Scrape Away: Carefully scrape away any paint that lifts easily. Work slowly and deliberately. The goal is to remove loose paint without gouging the brass.
- Target Flat Surfaces: Focus on the larger, flatter surfaces of the hinge first.
This initial scraping might reveal a surprising amount of the original brass, especially if the paint job was old and prone to flaking. Don’t force it if the paint isn’t budging; that’s when we move to the next step.
Step 3: Solvent Application – The Paint Softener
For paint that’s firmly adhered, a mild solvent can work wonders. Denatured alcohol is a good starting point. Acetone is stronger but can also damage finishes, so use it with extreme caution and only on the brass itself.
- Apply the Solvent: Dip a cotton swab into your chosen solvent (start with denatured alcohol).
- Saturate the Paint: Gently dab the solvent onto the painted areas of the hinge. Don’t drench the surrounding wood. You want to target the paint on the brass.
- Let it Dwell: Allow the solvent to sit for a few minutes. This gives it time to break down the paint. Check the manufacturer’s instructions for the specific solvent you’re using. For example, some paint removers suggest specific dwell times.
- Scrape Again: After the dwell time, use your plastic scraper or credit card to gently lift the softened paint. It should come off much more easily now.
- Repeat if Necessary: You might need to repeat this process a few times for thicker layers of paint. Use the old toothbrush to get into any nooks and crannies where paint might be trapped.
Important Note on Solvents: Always test any solvent on an inconspicuous area of the brass or a similar piece of metal first to ensure it doesn’t discolor or damage the brass. Avoid getting solvents on painted or varnished wood as they can dissolve those finishes too.
Step 4: Cleaning and Detail Work
Once the bulk of the paint is removed, you’ll likely have some stubborn remnants or paint in the finer details of the hinge design.
- Cotton Swab Power: Continue using cotton swabs dipped in solvent to target these small areas.
- Fine-Tip Tools: For very tight spots, you might use a toothpick or the tip of a craft knife (with extreme care) to gently dislodge remaining paint.
- Rinse and Wipe: After using a solvent, it’s a good idea to wipe down the hinge with a cloth dampened with plain water to remove any solvent residue.
- Inspect Closely: Take a good look at the hinge from all angles. Are there any missed spots?
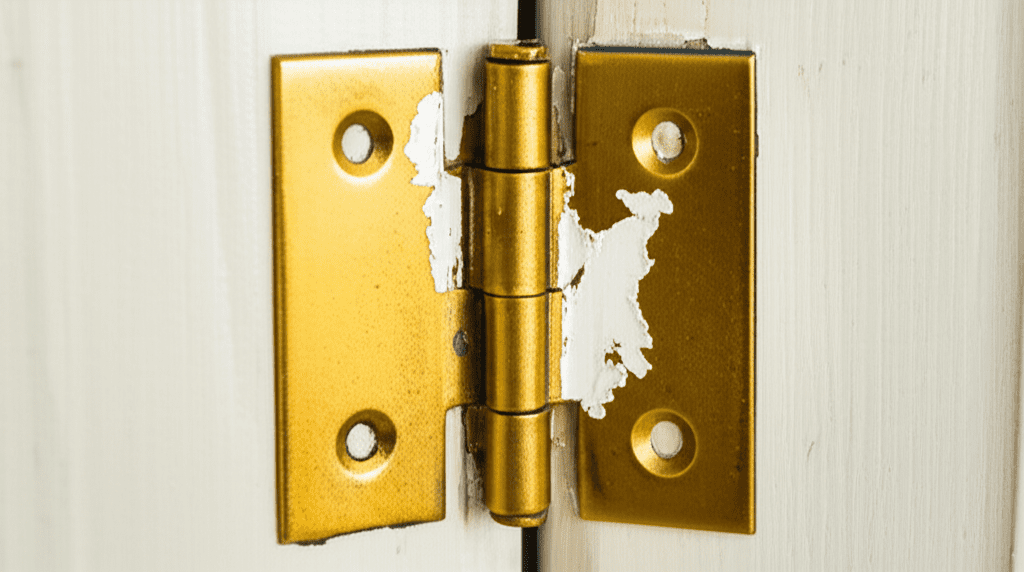
Step 5: Polishing and Finishing – The Grand Reveal
Now for the satisfying part! Your brass hinges are almost free of paint. It’s time to bring back that beautiful shine.
- Clean the Surface: Ensure the hinges are completely dry and free of any paint residue or solvent.
- Apply Brass Polish: Put a small amount of brass polish onto a soft cloth.
- Polish the Brass: Rub the polish onto the brass hinge in a circular motion. You’ll see the tarnish and any remaining paint film disappear, revealing the bright brass underneath.
- Buff to a Shine: Use a clean, dry soft cloth to buff the hinge until it gleams.
- Address the Pin: If you removed paint from the hinge pin, polish it as well before reinserting it (if you removed it at all).
This polishing step not only restores the shine but also helps to protect the brass. You can also consider applying a clear lacquer if you want to prevent future tarnishing, though many prefer the natural patina of aged brass.
Step 6: Final Cleanup
Carefully remove all the painter’s tape. Inspect the areas around the hinges on your door and frame. If any tape residue is left behind, you can often remove it with a mild adhesive remover or even a bit of Goo Gone.
Wipe down the entire area to ensure it’s clean and tidy.
When to Consider More Aggressive Methods (and Why We Avoided Them)
While this guide focuses on keeping the hinges in place, it’s worth mentioning that sometimes paint can be incredibly stubborn. If you encounter paint that simply won’t budge with gentle scraping and mild solvents, you might be tempted to use more aggressive methods:
- Heat Gun: Applying heat can soften paint, making it easier to scrape. However, this carries a significant risk of scorching or damaging the surrounding wood, the door finish, or even the hinge itself if overheated. It also releases potentially harmful fumes.
- Heavy-Duty Paint Strippers: These chemicals are powerful but can be very corrosive. They can easily damage wood finishes, and their fumes require serious ventilation and protective gear. Applying them precisely to just the hinge while it’s attached to a door is extremely difficult.
- Wire Brushes or Abrasive Pads: While effective for stripping paint from rougher metal surfaces, these will almost certainly scratch and damage the polished surface of brass, leaving it looking dull and marred.
For the method of removing paint from brass hinges without removing them, these aggressive options are generally not recommended. The risk of collateral damage to your door and frame far outweighs the convenience. The genius of the method we’ve outlined is its balance of effectiveness and safety for the attached hardware.
Pros and Cons of This Method
Every DIY approach has its upsides and downsides. Here’s a quick look at what makes this method great and where it might have limitations:
| Pros | Cons |
|---|---|
| No Reinstallation Hassle: Saves time and avoids the risk of misaligned doors or stripped screws. | Time-Consuming: Can take longer than removing and stripping hinges separately, especially for heavily painted ones. |
| Preserves Original Fit: Keeps hinges perfectly aligned with the door. | Limited to Light/Moderate Paint: May not be effective for very thick, multiple layers of hardened paint. |
| Less Risk of Damage: Using gentle tools and solvents minimizes damage to surrounding surfaces. | Requires Patience: Demands a careful, methodical approach. |
| Cost-Effective: Uses common household items and readily available DIY supplies. | Solvent Fumes: Even mild solvents require good ventilation and protective gear. |
| Achieves a Beautiful Finish: Can restore the natural beauty of brass. | Potential for Minor Scratches: If not careful with scraping tools, minor cosmetic scratches on the brass are possible. |
Maintaining Your Newly Revealed Brass Hinges
Once you’ve successfully stripped and polished your brass hinges, you’ll want to keep them looking their best. Brass is a beautiful metal, but it does tarnish over time due to exposure to air and moisture. Here are a few tips:
- Regular Dusting: A simple dusting with a soft cloth can prevent the build-up of grime that can accelerate tarnishing.
- Occasional Polishing: Depending on your environment and desired look, you might want to give them a light polish every few months.
- Consider a Lacquer: For a long-lasting shine and to prevent tarnishing altogether, you can apply a clear metal lacquer. This is usually sprayed on in thin coats. Ensure the hinge is perfectly clean and dry before applying. This is a more permanent solution, so be sure you want that consistent shine before you commit.
- Avoid Harsh Cleaners: Never use abrasive cleaners or scouring pads on polished brass, as they will scratch the surface.
The decision to lacquer or let the brass age naturally is a personal one. Natural aging gives a beautiful patina, while lacquer provides a consistent, bright finish. For more on metal finishing and care, you might find resources from the Metal Finishing Association of Australia (or a similar reputable industry body) helpful, as they often provide insights into best practices.
Frequently Asked Questions
Q1: Will this method damage my wooden door?
A1: If you mask the area thoroughly with good quality painter’s tape and are careful with solvent application, the risk of damage to your wooden door is very low. Always test solvents in an inconspicuous spot first.
Q2: How long does this process usually take?
A2: The time can vary greatly depending on how many layers of paint there are and how stubborn it is. For a single door with a few hinges, expect it to take anywhere from 1 to 3 hours. Patience is key!
Q3: Can I use nail polish remover (acetone) to remove the paint?
A3: Acetone is a strong solvent and can work, but it’s also very aggressive. It can damage wood finishes and some plastics. If you use it, apply it very carefully with a cotton swab directly to the paint on the brass, and ensure excellent ventilation. Denatured alcohol is often a safer and equally effective first choice.
Q4: What if the paint is really thick, like multiple layers?
A4: For multiple layers, you’ll need to be more patient. You might need to repeat the solvent application and scraping steps several times. You could also try a specialized paint stripper designed for metal, but be extremely cautious about protecting the surrounding wood, and follow all safety instructions meticulously.
Q5: My hinges are very ornate. Will this method work for detailed designs?
A5: Yes, this method is ideal for ornate hinges because it allows you to work precisely in small areas. Cotton swabs, toothpicks, and old toothbrushes are perfect for getting into intricate details.
Q6: What’s the best way to get the final bit of paint out of the screw holes?
A6: Use a toothpick or a fine-tipped tool dipped in solvent to gently dislodge paint from the screw holes. You can also use a small needle or a very fine drill bit (like a 1/16 inch) by hand (not with a drill) to carefully scrape out the paint from the screw heads, but be extremely gentle to avoid damaging the screw head.
Conclusion: Brass Brilliance Restored!
There you have it! By following these steps, you’ve managed to strip the paint from your brass hinges without the need to remove them from the door. This method is a testament to how thoughtful preparation and the right tools can simplify what seems like a complex task. You’ve revitalized the look of your doors, bringing back that classic warmth and elegance that only polished brass can provide. Remember, DIY success often comes down to patience, attention to detail, and using the right approach for the job. Now, step back and admire your handiwork – those gleaming brass hinges are a beautiful reward for your effort!