
Last summer, I needed to fix a squeaky garage door. It had spring-loaded hinges that made it close automatically, but one was rusty and stuck. I was nervous about removing it, but I figured it out! In this guide, I’ll show you how to remove a spring loaded door hinge step by step. It’s easier than it seems, even if you’re new to DIY. You’ll learn what these hinges are, the tools you need, and simple tips to do it safely. Let’s get started with this fun home project!
What Is a Spring Loaded Door Hinge?
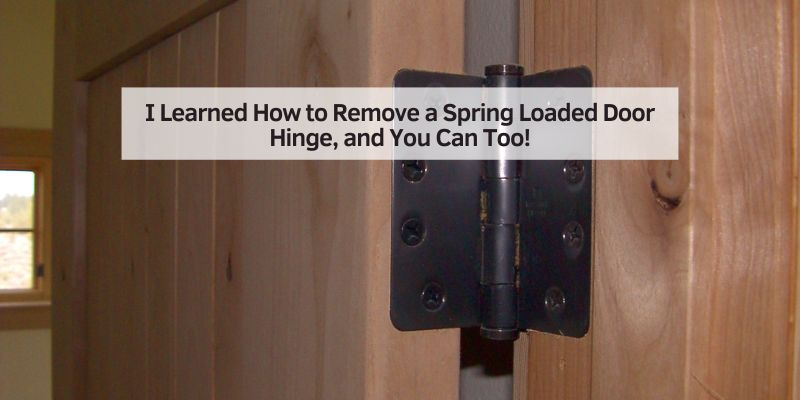
A spring-loaded hinge makes a door close on its own. It has a spring inside that pushes the door shut, like magic! These hinges are common in homes, especially on garage or fire doors. They keep doors closed for safety or to save energy. But sometimes, they get stuck or squeaky, so you need to remove them. Knowing how they work makes removing them easier.
Why Remove a Spring Loaded Hinge?
You might want to remove a spring-loaded hinge to fix a squeaky door. Or maybe you’re replacing a damaged hinge. Sometimes, you need to take the door off to move big furniture, like I did with my couch last year. Removing the hinge is a simple way to solve these problems. It’s a handy skill for any homeowner!

Tools You Need to Remove a Spring Loaded Hinge
You don’t need fancy tools for this job. Here’s what I used:
- Screwdriver: A Phillips or flathead, depending on your screws.
- Allen wrench: To release the spring’s tension.
- Hammer and punch: For stubborn hinge pins.
- Safety glasses and gloves: To stay safe.
- Lubricant: Like WD-40, for stuck pins.
I keep these tools in a small toolbox. You can find them at stores like Home Depot for cheap.
Table 1: Tool Costs for Removing a Spring Loaded Hinge
| Tool | Estimated Cost | Where to Buy |
|---|---|---|
| Screwdriver | $5–$10 | Hardware stores |
| Allen Wrench | $3–$8 | Amazon |
| Hammer | $10–$20 | Local hardware store |
| Punch | $5–$15 | Hardware stores |
| Safety Gear | $10–$20 | Lowe’s |
| Caption: Basic tools are affordable and easy to find for hinge removal. |
How to Remove a Spring Loaded Door Hinge: Step-by-Step Guide
Ready to remove that hinge? Follow these steps. I’ll make them super clear, like I’m showing my little cousin how to do it.
Step 1: Stay Safe First
Wear safety glasses and gloves. Spring-loaded hinges can snap back and hurt you. I learned this the hard way when a spring pinched my finger—ouch!
Step 2: Support the Door
Prop the door open with a chair or ask a friend to hold it. This keeps the door steady while you work. A heavy door can fall if you don’t support it.
Step 3: Release the Spring Tension
Find the tension adjustment hole on the hinge. It’s usually on the side or top. Insert an Allen wrench and turn it counterclockwise. Keep turning until the spring feels loose. This step is super important to avoid a snapping hinge.
Step 4: Remove the Hinge Pin
Use a hammer and punch to tap the hinge pin upward. If it’s stuck, spray some lubricant and wait a few minutes. Gently pull the pin out with pliers. I had to wiggle a rusty pin once, but it came out!
Step 5: Unscrew the Hinge
Use a screwdriver to remove the screws from the hinge. Start with the door frame, then the door. Keep screws in a small bag so you don’t lose them. The hinge should come off easily now.
Step 6: Check for Damage
Look at the door and frame for any scratches or rust. Clean the area with a cloth. This is a good time to decide if you need a new hinge.
Simple Tips for Success
- Work slowly to avoid breaking the hinge.
- Keep tools nearby for quick access.
- Double-check the spring tension is fully released.
Benefits of Removing a Spring Loaded Hinge
Removing a hinge lets you fix squeaks or replace old hardware. It also makes it easier to take a door off for big projects, like moving furniture. Plus, you’ll feel proud of doing it yourself! I saved money by fixing my garage door hinge instead of hiring someone.
Drawbacks and Other Options
Spring-loaded hinges can be tricky to remove if you skip steps. The spring might snap back, which is dangerous. If you don’t want to remove the hinge, you can adjust its tension instead. Use an Allen wrench to tighten or loosen the spring for better closing. This worked for my basement door when it slammed too hard.
Table 2: Hinge Removal vs. Adjustment
| Action | Pros | Cons |
|---|---|---|
| Remove Hinge | Fixes damage, allows door removal | Risk of spring snapping |
| Adjust Tension | Quick fix for closing speed | Doesn’t fix broken hinges |
| Caption: Compare removing a hinge to adjusting it for your needs. |
Common Mistakes to Avoid
I’ve made mistakes, so let me help you avoid them!
- Skipping tension release: Always loosen the spring first.
- Using wrong tools: Check your hinge for the right screwdriver or wrench.
- Not supporting the door: A falling door can cause injury or damage.
My Personal Tips for Beginners
When I started, I was scared of spring-loaded hinges. They seemed complicated! But here’s what I learned:
- Go slow: Rushing can lead to mistakes.
- Use lubricant generously: It makes stuck pins easier to remove.
- Ask for help: A friend can hold the door or tools.
I also keep a small notebook to jot down steps. It helps me stay organized, especially with multiple hinges.
Visual Ideas for Better Understanding
To make this easier, imagine these visuals:
- A diagram showing the parts of a spring-loaded hinge (spring, pin, plates).
- A photo of tools laid out on a table, labeled for clarity.
- A step-by-step infographic of the removal process.
These visuals would help you see exactly what to do.
Cost-Saving Ideas
You don’t need to buy expensive tools. Borrow a screwdriver or hammer from a neighbor. Check Ace Hardware for affordable lubricants like WD-40. If you need a new hinge, shop at discount stores or online for deals. I found a replacement hinge for $10 once!
Table 3: Cost-Saving Tips for Hinge Removal
| Tip | How It Saves Money |
|---|---|
| Borrow tools | Avoids buying new tools |
| Use WD-40 | Loosens pins without damage |
| Shop discount stores | Cheaper hinges and supplies |
| Caption: Save money with these easy hinge removal tips. |

Why Spring Hinges Are Special
Spring-loaded hinges are different from regular hinges. The spring inside makes the door close automatically. This is great for fire doors or garage entrances. But the spring makes removal trickier, so always release tension first. Understanding this helped me fix my door faster.
Frequently Asked Questions
How to Remove a Spring Loaded Door Hinge Safely?
To remove a spring-loaded hinge safely, always release the spring tension first. Use an Allen wrench to turn the tension pin counterclockwise until it’s loose. Wear safety glasses and gloves to protect yourself. Support the door to prevent it from falling. This keeps you safe and makes the job easier.
What Tools Do I Need for Spring Hinge Removal?
You need a screwdriver, Allen wrench, hammer, punch, and safety gear. A Phillips or flathead screwdriver works for most hinges. An Allen wrench releases the spring tension. A hammer and punch help remove stuck pins. Safety glasses and gloves keep you safe. These tools are cheap and easy to find.
Can I Remove a Spring Hinge Without an Allen Wrench?
It’s hard to remove a spring hinge without an Allen wrench. The wrench releases the spring tension safely. If you don’t have one, borrow or buy a small set from a hardware store. Using the wrong tool can damage the hinge or hurt you. Always use the right tool for safety.
What If the Hinge Pin Is Stuck?
If the hinge pin is stuck, spray it with lubricant like WD-40. Wait a few minutes, then tap it gently with a hammer and punch. Wiggle the pin with pliers if needed. I had a rusty pin once, and lubricant made it slide out easily. Be patient to avoid damage.
Can I Reuse a Spring Loaded Hinge After Removal?
Yes, you can reuse a spring-loaded hinge if it’s not damaged. Check for rust or wear before reinstalling. Clean it with a cloth and lubricate the pin. Reinstall it by screwing it back and adjusting the tension. I reused a hinge on my door, and it worked great!
How Do I Know If My Hinge Is Spring Loaded?
Look for a small hole or pin on the hinge’s side or top. Spring-loaded hinges often have an Allen wrench slot for tension adjustment. They also close the door automatically. If your door shuts on its own, it likely has a spring-loaded hinge. Check carefully before removing.
What If I Don’t Want to Remove the Hinge?
If you don’t want to remove the hinge, adjust its tension instead. Use an Allen wrench to tighten or loosen the spring. This fixes slamming or slow-closing doors. I adjusted my basement door’s tension instead of removing it, and it worked perfectly.
Conclusion
Removing a spring-loaded door hinge is easier than it looks! With simple tools like a screwdriver and Allen wrench, you can do it safely. Follow my steps, release the spring tension, and support the door. You’ll fix squeaks or move furniture in no time. Try it yourself this weekend—it’s a fun DIY project! Share your tips or ask questions in the comments. Let’s make home repairs easy and exciting!