
Hey there, friend! So, you’re wondering how to ratchet tie-down straps? I’m so excited to dive into this with you because it’s one of those skills every car or truck owner needs, especially if you love hauling gear for your automotive adventures.
I’ll never forget the first time I used ratchet straps to secure a set of tires in my truck bed—I was nervous they’d fly out, but once I got the hang of it, I felt like a pro. Whether you’re towing car parts, moving camping gear, or hauling a new project car, ratchet tie-down straps are your best friend for keeping things safe. I’ve spent years tinkering with cars, trailers, and loads, and I’ve learned the tricks to make strapping down easy and secure.
Let’s sit down, like we’re chilling in your garage, and I’ll walk you through every step to master ratchet tie-down straps. This guide is packed with practical tips for anyone in the USA looking to haul like a champ. Ready to lock in your load? Let’s get rolling!
Why Use Ratchet Tie Down Straps?
Ratchet tie-down straps are awesome for securing heavy or bulky items. They’re strong, adjustable, and easy to use once you know how. I love them because they give me peace of mind when I’m hauling car parts or gear on my truck. Unlike bungee cords, which can stretch or snap, ratchet straps stay tight and hold up to thousands of pounds.
These straps are perfect for automotive folks like us. You can use them to secure tires, engines, or even a motorcycle in a trailer. They’re also great for camping trips, moving, or tying down a car on a tow dolly. I once hauled a salvaged fender 200 miles without a wiggle, all thanks to my ratchet straps. They’re a must-have for any road warrior.
Understanding Ratchet Tie Down Straps
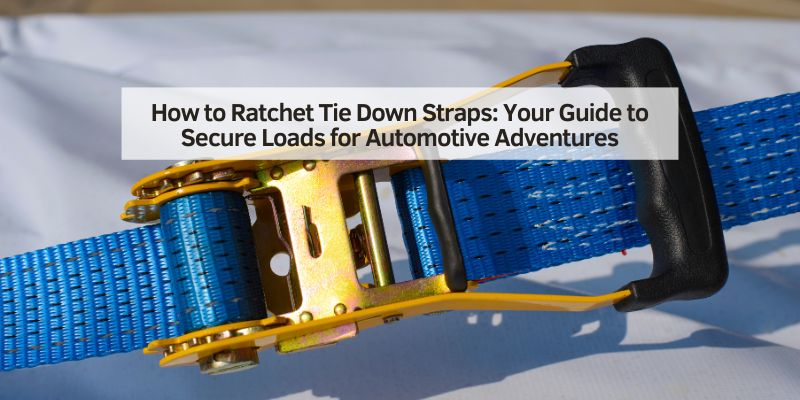
Before we strap anything down, let’s talk about what these straps are. A ratchet tie-down strap has two main parts: the strap itself and the ratchet mechanism. The strap is usually made of tough polyester webbing, which resists stretching and weather. The ratchet is a metal device that tightens the strap by winding it, like a winch. I was amazed the first time I saw how tight it could get!
Most straps come with hooks or loops at the ends to attach to anchor points, like tie-downs in a truck bed. They’re rated by weight limits, like 1,000 to 10,000 pounds. I use 2,000-pound straps for most car parts, but I have heavier ones for towing vehicles. The ratchet’s clicking sound as you tighten it is so satisfying—it’s like the strap’s saying, “I’ve got this!”
Choosing the Right Ratchet Tie Down Straps
Picking the right straps is key to a secure load. I made the mistake of buying cheap ones once, and they frayed after one trip—big nope! Here’s what I look for now:
- Strength Rating: Check the working load limit (WLL), usually one-third of the breaking strength. For example, a 6,000-pound breaking strength means a 2,000-pound WLL. I use 2,000-pound WLL straps for car parts and 5,000-pound for vehicles.
- Length: Common lengths are 8 to 30 feet. I carry 15-foot straps for versatility—they’re long enough for most loads but not too bulky.
- Width: Straps are 1 to 4 inches wide. Wider straps (2 inches) are stronger for heavy loads. I use 2-inch straps for most jobs.
- End Fittings: S-hooks, J-hooks, or flat hooks attach to anchors. I prefer J-hooks for truck bed tie-downs—they’re secure and easy to use.
- Material: Polyester webbing is durable and weather-resistant. I avoid nylon—it stretches too much.
- Ratchet Quality: Look for steel or aluminum ratchets with smooth action. My $20 straps have lasted years because of solid ratchets.
A good set of four 2-inch, 15-foot straps costs $20-$40 at hardware stores or online. I got mine for $25, and they’ve hauled everything from bumpers to bikes.
Gathering Your Supplies
You don’t need much to use ratchet straps, but a few extras help. Here’s what I keep ready:
- Ratchet Tie Down Straps: At least two, preferably four, for most loads.
- Anchor Points: Tie-downs in your truck bed, trailer, or vehicle frame. I added extra anchors to my truck for flexibility.
- Padding or Edge Protectors: To prevent straps from scratching your load or vehicle. I use old rags or $5 edge protectors.
- Gloves: To protect your hands from sharp edges or tight straps. My work gloves save my fingers.
- Tarp or Blanket (Optional): To cover loads and prevent shifting. I use a tarp for loose parts.
- Scissors or Knife: To cut excess strap or trim frayed ends. My pocketknife is always handy.
- Flashlight: For nighttime setups. I learned this after fumbling in the dark!
Most of these are already in your garage. I spent $30 total on straps and protectors, and the rest I had on hand.
Preparing Your Load
Before strapping, get your load ready. I’ve had parts shift because I rushed this step—not fun! Here’s how I prep:
- Place the Load: Center your item in the truck bed or trailer to balance weight. I put heavy car parts over the axle for stability.
- Secure Loose Parts: Tie or tape small items together. I bundle bolts in a bag before strapping a bigger part.
- Protect Surfaces: Use padding under straps to avoid scratches. I wrap rags around painted parts like hoods.
- Check Anchors: Ensure tie-down points are strong and rust-free. I tug on my truck’s anchors to confirm they’re solid.
- Plan Strap Paths: Decide where straps will go to avoid rubbing or twisting. I map out crisscross patterns for extra hold.
Taking 5 minutes to prep saves headaches on the road. I once hauled an engine block 300 miles, and it didn’t budge because I planned it right.
How to Use Ratchet Tie Down Straps Step by Step
Now, let’s get to the fun part—strapping it down! I’ve done this hundreds of times, and it’s easy once you practice. Here’s my step-by-step guide:
Step 1: Open the Ratchet
Hold the ratchet with the handle up. Pull the release lever (usually a small tab) to unlock it. Open the handle fully to create a slot for the strap. I fumbled this at first but got it after a few tries. Make sure the strap isn’t twisted in the ratchet.
Step 2: Feed the Strap
Take the loose end of the strap and thread it through the slot in the ratchet’s spool. Pull it through until you have enough length to reach your anchor point. I pull about 2-3 feet to start. Keep the strap flat to avoid jams.
Step 3: Attach the Hooks
Hook one end of the strap to an anchor point, like a tie-down in your truck bed. Attach the other end (the ratchet side) to an opposite anchor. I use J-hooks and make sure they’re fully seated. For example, I hook one end to the front left anchor and the ratchet to the back right for a diagonal hold.
Step 4: Remove Slack
Pull the loose strap through the ratchet until it’s snug but not tight. Close the ratchet handle to lock the strap in place. I tug gently to remove any slack before tightening. This keeps the load from shifting when you start ratcheting.
Step 5: Tighten the Strap
Pump the ratchet handle up and down. Each pump winds the strap tighter, making that satisfying “click-click” sound. I tighten until the strap is firm but not overstretched—about 3-5 pumps for most loads. Check that the load doesn’t wiggle.
Step 6: Lock the Ratchet
Close the handle fully to lock the ratchet. Tug the strap to ensure it’s secure. I always double-check by pushing on the load. If it’s loose, give it another pump or two.
Step 7: Secure Excess Strap
Tie or tuck the extra strap to prevent it from flapping in the wind. I wrap mine around the ratchet and tuck the end under. Flapping straps can fray or distract drivers, so I keep them neat.
Step 8: Add More Straps
Use at least two straps for small loads, four for heavy or large items. I crisscross straps for extra stability, like an X over a set of tires. Check all straps and anchors before hitting the road.
Step 9: Check During Travel
Stop after 10-20 miles to check your load. Straps can loosen as things settle. I pull over, tug each strap, and retighten if needed. I do this every 100 miles for long hauls.
This process takes me 10 minutes now, but my first try was 20! Practice on a small load in your driveway—I did, and it made me confident for bigger jobs.
Safety Tips for Using Ratchet Straps
Safety keeps your load and others on the road safe. I’ve had close calls, so here’s what I do:
- Don’t Over-Tighten: Too much force can damage your load or straps. I stop when the strap is tight but not straining.
- Check Weight Limits: Stay under the strap’s WLL. I use 2,000-pound straps for 1,500-pound loads to be safe.
- Inspect Straps: Look for fraying, cuts, or damaged hooks. I tossed a worn strap after it started tearing.
- Secure Hooks: Ensure hooks are fully attached to anchors. I double-check each one before driving.
- Avoid Sharp Edges: Use padding to protect straps from rubbing. I wrap rags around sharp car parts.
- Stay Clear of the Ratchet: Keep fingers away from the spool when tightening. I pinched my hand once—ouch!
Always follow local laws for securing loads. I check state DOT rules before long trips to avoid fines.
Maintaining Your Ratchet Straps
Good straps last for years with care. I neglected mine once, and they got tangled and faded—big mistake! Here’s how I keep them in shape:
- Clean Them: Wash with soap and water to remove dirt or grease. I scrub mine with a brush after muddy trips.
- Dry Fully: Air-dry before storing to prevent mold. I hang mine in my garage.
- Store Neatly: Roll or fold straps to avoid tangles. I keep mine in a plastic bin in my truck.
- Check for Damage: Inspect for fraying or bent hooks before each use. I replace damaged straps right away.
- Avoid Sunlight: UV rays weaken webbing. I store mine out of the sun to extend their life.
My straps have lasted four years because I care for them. A quick clean after each trip keeps them ready.
Common Mistakes to Avoid
I’ve goofed up plenty, so let’s skip these pitfalls:
- Twisted Straps: A twisted strap weakens and jams the ratchet. I flatten mine before threading.
- Overloading: Don’t exceed the WLL. I tried hauling a 3,000-pound load with 1,000-pound straps—scary!
- Loose Hooks: Unsecured hooks can pop off. I check each hook’s fit.
- Skipping Checks: Always stop to inspect your load. I had a strap loosen once because I didn’t check.
- Cheap Straps: Low-quality straps break or fray. I spend a bit more for durability.
Take your time, and you’ll avoid my rookie errors. I laugh at my early mistakes now, but they taught me well.
Advanced Tips for Automotive Hauling
Once you master the basics, try these tricks I’ve picked up:
- Crisscross Straps: Use an X pattern for extra hold. I do this for heavy engines or bumpers.
- Combine Straps: Use multiple straps at different angles. I use four straps for motorcycles—two per side.
- Add a Tarp: Cover loose items with a tarp, then strap it down. I do this for small parts like bolts.
- Use Axle Straps: For towing cars, use straps around axles instead of hooks. I bought $10 axle straps for my trailer.
- Label Straps: Mark lengths or ratings with tape. I label mine to grab the right one fast.
These make hauling smoother and safer. I’m always tweaking my setup for efficiency.
Choosing Anchor Points for Automotive Loads
Anchor points are critical for secure strapping. I’ve learned where to attach straps on vehicles and trailers:
- Truck Bed: Use built-in tie-downs or add bolt-on anchors. I installed four extra anchors for $20.
- Trailer: Hook to D-rings or frame rails. I check my trailer’s rings for rust.
- Vehicle Frame: For towing cars, use frame points or axle straps. I avoid bumpers—they’re too weak.
- Roof Rack: For light loads like kayaks, use rack bars. I strap my spare tire to my Jeep’s rack.
Always test anchors by tugging hard. I once hooked to a weak point, and it bent—scary! Strong anchors mean a safe load.
Here’s a table summarizing strap types:
| Strap Type | Width | Length | WLL | Best For |
|---|---|---|---|---|
| Light-Duty | 1 inch | 8-12 feet | 500-1,000 lbs | Small parts, bikes |
| Medium-Duty | 2 inches | 12-20 feet | 1,000-2,000 lbs | Car parts, ATVs |
| Heavy-Duty | 2-4 inches | 20-30 feet | 3,000-5,000 lbs | Vehicles, trailers |
Troubleshooting Strap Issues
If your straps misbehave, don’t stress. I’ve fixed a few problems:
- Jammed Ratchet: Release the lever fully and pull the strap to free it. I wiggle mine if it’s stuck.
- Twisted Strap: Unthread and flatten the strap. I redo it to avoid weakening.
- Loose Load: Retighten or add more straps. I had a tire shift once and added a second strap.
- Frayed Strap: Replace it immediately. I cut a frayed strap to avoid risks.
- Stiff Ratchet: Lubricate with WD-40. I revived a sticky one this way.
For big issues, like a broken ratchet, buy a new strap. I keep spares in my truck for emergencies.
Why I Love Ratchet Tie Down Straps
Ratchet straps make hauling fun and stress-free. They’re strong, easy, and let me focus on the road, not my load. I feel like a logistics pro every time I secure a car part or trailer. They’re perfect for automotive adventures, from moving engines to camping trips. My straps have been with me through cross-country hauls and muddy trails, and they’ve never let me down.
Wrapping It Up with a Tight Strap
Hey, buddy, you’re now a ratchet tie down strap master! From threading the strap to locking in your load, you’ve got all the steps to haul car parts, gear, or vehicles like a pro. I remember my first shaky attempt, but now I grin every time I hear that ratchet click. Grab your straps, head to your truck, and secure your next load with confidence. Whether you’re towing a project car or packing for a car show, ratchet straps will keep everything safe. So, hit the road, strap it tight, and enjoy the ride—I’m cheering you on!
FAQ
How do I know if my ratchet strap is tight enough?
Tug the strap—it should be firm with no wiggle. The load shouldn’t move when pushed.
Can I use ratchet straps on a car roof rack?
Yes, for light loads like kayaks, but check the rack’s weight limit. I use 1-inch straps for my roof.
What’s the difference between WLL and breaking strength?
WLL is the safe working load, usually one-third of the breaking strength. I stick to the WLL for safety.
How many ratchet straps do I need?
Use at least two for small loads, four for heavy or large items. I use four for motorcycles.
What if my ratchet strap gets stuck?
Fully open the release lever and pull the strap to free it. I wiggle it gently if it jams.
Can I leave ratchet straps in the sun?
Avoid it—UV rays weaken webbing. I store mine in a bin to protect them.
How do I clean ratchet straps?
Wash with soap and water, then air-dry. I scrub mine after muddy hauls.