

Hey there, friend! So, you’re curious about how to make a tent with a tarp? I’m thrilled to share this with you because it’s one of those awesome skills that’s perfect for automotive enthusiasts who love hitting the road and camping out. I’ll never forget the first time I tried this—my buddy and I were on a backroads trip with my old truck, and we didn’t want to haul a bulky tent. We grabbed a tarp, some rope, and got creative under the stars. After a few flops and plenty of laughs, I figured out how to build a sturdy tarp tent that kept us dry and cozy.
Whether you’re camping by your car, prepping for an overland adventure, or just want a lightweight shelter, this guide has you covered. Let’s sit down, like we’re around a campfire, and I’ll walk you through every step to make a tarp tent that’s perfect for your next trip. This article is packed with practical tips for anyone in the USA looking to camp smart and save space in their vehicle. Ready to build your own shelter? Let’s dive in!
Why Use a Tarp for a Tent?
A tarp tent is a fantastic option for campers, especially us car folks. Tarps are lightweight, compact, and easy to pack in your trunk or truck bed. I love that I can toss a tarp in my Jeep without losing space for gear. They’re also cheap—way less than a fancy tent—and super versatile. You can make different shapes depending on your needs, like a lean-to or an A-frame.
Tarps are durable too. They handle rain, wind, and sun better than some budget tents I’ve tried. Plus, they’re great for automotive adventures because you can set them up next to your vehicle for extra shade or storage. I once used my tarp tent as a garage to work on my car during a drizzle. It’s a skill that’s handy for road trips, festivals, or even emergency shelters.
Choosing the Right Tarp
Picking a good tarp is the first step. I made the mistake of grabbing a thin, flimsy tarp once, and it tore in the wind—lesson learned! Here’s what I look for now:
- Material: Go for polyethylene (poly) or nylon tarps. Poly tarps are affordable and waterproof, great for most trips. Nylon is lighter and stronger but pricier. I use a heavy-duty poly tarp for rugged camping.
- Size: A 8×10-foot tarp is perfect for one or two people. For groups, try 10×12 or larger. I carry a 10×10 tarp—it’s versatile for solo or duo setups.
- Thickness: Measured in mils (thousandths of an inch). A 10-12 mil tarp is tough enough for camping. My 12-mil tarp has survived storms without a scratch.
- Grommets: These are metal or plastic rings along the edges for tying ropes. More grommets mean more setup options. I check that they’re rust-proof.
- Color: Blue is common, but I prefer green or brown to blend with nature. Avoid bright colors unless you want to stand out.
A decent 10×10 poly tarp costs $10-$20 at hardware stores or online. I got mine for $15, and it’s been worth every penny. For overlanding, I’d invest in a $50 nylon tarp for lighter weight.
Gathering Your Supplies
You don’t need much to make a tarp tent, which is why I love it. Here’s what I pack:
- Tarp: Your main shelter, sized for your group.
- Rope or Paracord: At least 50 feet of 550 paracord for tying. I cut mine into 10-foot lengths for flexibility.
- Stakes: 6-8 metal or plastic tent stakes to secure the tarp to the ground. I use 8-inch metal stakes for $5 a pack.
- Poles or Sticks: Two trekking poles, tent poles, or sturdy branches for height. I carry collapsible trekking poles in my truck.
- Bungee Cords (Optional): For extra tension or quick setups. I keep a few in my glovebox.
- Ground Cloth: A smaller tarp or plastic sheet to protect your sleeping area. I use a 6×8 tarp for $8.
- Knife or Scissors: To cut rope or trim branches. My pocketknife does the trick.
- Tape (Optional): Duct tape for patching tears. I’ve used it to fix a grommet rip in a pinch.
- Headlamp: For setting up in the dark. I learned this after fumbling in a moonless night!
Most of these are cheap or already in your camping kit. I spent $30 total on supplies, not counting my tarp. Check your vehicle for spare rope or stakes before buying.
Picking the Perfect Campsite
Where you set up matters as much as how. I once pitched my tarp on a slope and woke up sliding downhill—not fun! Here’s how I choose a spot:
- Flat Ground: Look for level terrain to sleep comfortably. I walk the area to check for rocks or roots.
- High Ground: Avoid low spots where water pools during rain. I learned this after a soggy night in a valley.
- Trees or Anchors: You’ll need trees, rocks, or your vehicle to tie ropes. I use my truck’s roof rack as an anchor sometimes.
- Wind Direction: Face the tarp’s low side into the wind to reduce flapping. I check the breeze before pitching.
- Shade and Sun: Morning sun is nice, but too much heat can roast you. I pick spots with partial shade for comfort.
Near your car is ideal for automotive camping. I park close to trees for easy tie-offs and keep my cooler in the trunk. Always check for dead branches overhead—I call them “widowmakers” after one nearly fell on my tarp!
Basic Tarp Tent Designs
There are tons of ways to pitch a tarp tent. I’ve tried a few, and here are my favorites for car camping:
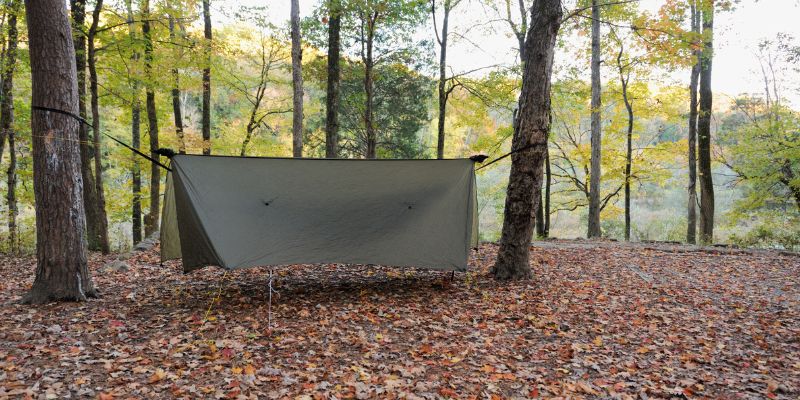
A-Frame Tarp Tent
This is my go-to because it’s simple and sturdy. It looks like a triangle and sheds rain well. Here’s how I set it up:
- Find two trees about 10 feet apart.
- Tie a rope between them, 4-5 feet off the ground.
- Drape the tarp over the rope, centering it.
- Pull the tarp’s corners to the ground and stake them tight.
- Use extra ropes on the sides for stability in the wind.
I love this setup next to my truck—it creates a covered area for cooking. It takes 10 minutes and fits two people comfortably.
Lean-To Tarp Tent
This is great for quick shelters or shade. It’s open on one side, perfect for warm nights. Here’s my method:
- Tie a rope between two trees, 6-7 feet high.
- Drape one edge of the tarp over the rope.
- Stake the other edge to the ground at an angle.
- Secure the high side with extra ropes if windy.
I used this during a desert trip—it gave shade and let breezes through. It’s fast to pitch and works with one tree and my car’s roof rack.
Diamond Tarp Tent
This is cozier for one person or stormy weather. It’s a diamond shape with low sides. Here’s how I do it:
- Tie one corner of the tarp to a tree, 3-4 feet high.
- Stake the opposite corner to the ground, pulling tight.
- Stake the other two corners to form a diamond.
- Use a pole or stick inside to lift the center for headroom.
I tried this in a rainstorm, and it kept me dry. It’s trickier to set up, but great for solo campers.
Step-by-Step Guide to Building an A-Frame Tarp Tent
Since the A-frame is my favorite, let’s walk through it in detail. I’ve done this dozens of times, and it’s beginner-friendly. Here’s how:
- Step 1: Choose Your Spot: Find flat ground with two trees 8-12 feet apart. I clear sticks and rocks first.
- Step 2: Set the Ridgeline: Tie a 10-foot paracord between the trees, 4-5 feet high. Use a taut-line hitch knot—it’s adjustable. I tighten it until it’s firm but not sagging.
- Step 3: Drape the Tarp: Fold your tarp in half to find the center, then throw it over the rope. Center it so both sides hang evenly. I tug gently to avoid snags.
- Step 4: Stake the Corners: Pull each corner to the ground, keeping the tarp taut. Hammer stakes through the grommets at a 45-degree angle. I use four stakes for the corners.
- Step 5: Add Side Guy Lines: Tie ropes to side grommets and stake them out to reduce flapping. I use two per side for windy nights.
- Step 6: Lay a Ground Cloth: Place a smaller tarp or plastic sheet inside to keep your sleeping bag dry. I tuck the edges under to avoid tripping.
- Step 7: Test It: Walk around and check for loose ropes or sagging. I shake the tarp to mimic wind and tighten anything loose.
This setup takes me 15 minutes now, but my first try was 30! Practice in your backyard first—I did, and it saved me stress on the trail.
Waterproofing and Weather Protection
Tarps are waterproof, but setup matters. I got soaked once because my tarp sagged and pooled water. Here’s how I keep dry:
- Tight Pitch: Keep the tarp taut to shed rain. I check ropes after setup to ensure no slack.
- Angle for Runoff: Slope the tarp so water flows off, not pools. My A-frame’s steep sides work great.
- Seam Sealing: Some tarps leak at seams. I apply silicone sealant ($5) to seams for extra protection.
- Windproofing: Use extra stakes and guy lines in storms. I double-stake corners if it’s gusty.
- Ground Cloth: Prevents moisture from seeping up. I always use one, even in dry weather.
For cold nights, hang a blanket inside for insulation. I did this in fall and stayed toasty. In heavy rain, dig a small trench around the tent to divert water—I learned this after a muddy wakeup call!
Using Your Vehicle in the Setup
Your car or truck can be a tarp tent superstar. I love combining my Jeep with my tarp for extra comfort. Here’s how:
- Roof Rack Anchor: Tie one end of the ridgeline to your roof rack instead of a tree. I use this for lean-to setups.
- Truck Bed Shelter: Drape the tarp over your truck bed for a raised tent. I tried this with my pickup and slept off the ground.
- Side Awning: Tie the tarp to your vehicle’s side for shade or a cooking area. I use bungee cords for quick setups.
- Wind Block: Park your car to block wind, protecting the tarp. I did this on a windy ridge and slept soundly.
Always secure ropes tightly to your vehicle to avoid damage. I check my knots twice when using my Jeep’s rack.
Safety Tips for Tarp Camping
Safety keeps the fun going. I’ve had close calls, so here’s what I do:
- Check for Hazards: Avoid dead trees or loose rocks overhead. I scan the site before pitching.
- Secure Stakes: Hammer stakes deep to hold in the wind. I lost a stake once, and my tarp flapped all night.
- Fire Safety: Keep campfires 10 feet from the tarp—tarps melt fast! I learned this after a spark singed my old tarp.
- Ventilation: Leave an open side to avoid condensation. I prop up one corner for airflow.
- Weather Awareness: Check forecasts before camping. I pack up if storms are coming.
Bring a first-aid kit and flashlight in your car. I keep these in my glovebox for emergencies.
Maintaining Your Tarp
A good tarp lasts years with care. I neglected mine once, and it got moldy—gross! Here’s how I keep it in shape:
- Clean It: Wash with mild soap and water after use. I scrub mine with a sponge to remove dirt.
- Dry Completely: Air-dry before storing to prevent mildew. I hang mine over my fence.
- Patch Tears: Use duct tape or a tarp repair kit for holes. I patched a rip, and it’s still waterproof.
- Store Dry: Keep it in a breathable bag in your garage or trunk. I use a mesh bag to avoid smells.
- Check Grommets: Replace rusty ones with a grommet kit ($10). I did this to save an old tarp.
My tarp’s been with me for three years, and it’s still like new. A little TLC goes a long way.
Advantages of Tarp Tents for Automotive Camping
Tarp tents are perfect for car campers. I prefer them over traditional tents for these reasons:
- Lightweight: A 10×10 tarp weighs 2-3 pounds, way less than a 10-pound tent. I save space in my truck.
- Compact: Folds small to fit in a glovebox or cargo area. I keep mine behind my seat.
- Versatile: Use as a tent, awning, or ground cover. I’ve even used mine as a sunshade at car shows.
- Affordable: Tarps and supplies cost $20-$50, compared to $100+ for a tent. I’m all about saving cash!
- Quick Setup: Takes 10-15 minutes once you practice. I’m faster with my tarp than my old tent.
For overlanders or festival-goers, tarp tents are a no-brainer. I love the freedom to customize my setup.
Challenges and How to Overcome Them
Tarp tents have quirks, but I’ve got fixes:
- Less Privacy: Tarps are open-sided. I hang a blanket or park my car for cover.
- No Floor: Bugs can crawl in. I use a ground cloth and bug spray.
- Wind Flapping: Stake tightly and use guy lines. I add extra ropes in gusts.
- Learning Curve: Setup takes practice. I pitched mine at home first to learn knots.
- Condensation: Open a side for airflow. I prop a corner to keep it dry inside.
These are minor compared to the benefits. I’ve camped in tarp tents for years and wouldn’t trade them.
Here’s a table summarizing tarp tent setups:
| Setup Type | Best For | Pros | Cons | Supplies Needed |
|---|---|---|---|---|
| A-Frame | Rainy weather, 2 people | Sheds rain, sturdy | Needs two anchors | Tarp, rope, 6 stakes |
| Lean-To | Warm nights, shade | Quick, airy | Less rain protection | Tarp, rope, 4 stakes |
| Diamond | Solo, storms | Cozy, windproof | Less space | Tarp, rope, 4 stakes, pole |
Enhancing Your Tarp Tent Experience
Little tweaks make tarp camping awesome. I’ve picked up these tricks:
- Add a Hammock: Hang a hammock under the tarp for lounging. I love napping in mine.
- String Lights: Clip battery-powered lights to ropes for a cozy vibe. I got some for $10.
- Side Walls: Tie smaller tarps to the sides for privacy. I used an old 6×8 tarp for this.
- Cooking Area: Set up a stove under a lean-to side. I cook breakfast without leaving the shelter.
- Gear Storage: Hang a mesh bag inside for headlamps or keys. I keep my phone handy this way.
These make your tarp tent feel like home. I’m always tweaking my setup for comfort.
Why I Love Tarp Tents
Tarp tents are my go-to for automotive adventures. They’re cheap, easy, and let me focus on the road, not gear. I feel like a survival pro every time I pitch one. They’re perfect for spontaneous trips or when you’re hauling car parts and don’t have room for a tent. My tarp tent has been through deserts, forests, and car shows, and it’s never let me down.
Wrapping It Up with a Cozy Camp
Hey, friend, you’re now ready to make a tarp tent like a camping champ! From picking the perfect tarp to pitching an A-frame by your car, you’ve got all the steps to create a lightweight, sturdy shelter. I remember my first tarp tent—wobbly but full of pride—and now I grin every time I set one up in minutes. Grab a tarp, hit the road, and enjoy the freedom of camping anywhere your vehicle takes you. Whether you’re sleeping under the stars or dodging a rainstorm, your tarp tent will keep you cozy. So, pack your gear, find a campsite, and build your shelter—I’m cheering you on!
FAQ: Your Questions Answered
What’s the best tarp size for a tent?
An 8×10 or 10×10-foot tarp is great for one or two people. Bigger groups need 10×12 or larger.
Can I make a tarp tent without trees?
Yes, use your car, trekking poles, or sticks as anchors. I tie ropes to my truck’s roof rack.
How do I keep my tarp tent waterproof?
Pitch it tight, slope it for runoff, and seal seams with silicone. I use a ground cloth too.
Is a tarp tent good for windy weather?
Yes, if you stake it tightly and use guy lines. I double-stake corners in gusts.
What’s the easiest tarp tent to set up?
The lean-to is fastest, taking 5-10 minutes. I use it for quick stops.
Can I use a tarp tent in winter?
Yes, but add insulation like blankets and choose a windproof setup like the diamond. I’ve done it in light snow.
How much does a tarp tent setup cost?
A tarp, ropes, and stakes cost $20-$50 total. I spent $30 and use it all the time.