

Imagine transforming your living space with sleek, modern lighting that blends seamlessly into your ceiling. Canless recessed lighting offers you just that—an elegant solution without the bulk of traditional fixtures.
But how do you install it yourself without hiring a professional? You might think it’s complicated, but it’s simpler than you imagine. By the end of this article, you’ll feel confident in your ability to enhance your home with this cutting-edge lighting option.
Picture walking through your newly lit rooms, enjoying the sophisticated ambiance you’ve created with your own two hands. Let’s dive in and illuminate your space together!
Credit: www.homedepot.com
Benefits Of Canless Recessed Lighting
Canless recessed lighting is easy to install. No need for big holes. Just a small cut in the ceiling. These lights fit in tight spaces. They are perfect for low ceilings. They save a lot of space.
These lights use less energy. They are very efficient. This means lower electricity bills. They last a long time. You don’t have to change them often. This saves money and time.
Modern design is a big plus. These lights look sleek. They make any room look stylish. They blend with the ceiling. This gives a clean look. They are also very safe. No can means less risk of fire.
Tools And Materials Needed
A few important tools make the job easy. You will need a drill. It helps make holes for the lights. A measuring tape is necessary. It helps measure space for lights. Wire cutters are also needed. They trim the wires to the right size. Safety goggles protect your eyes. Always wear them when drilling. A pencil is useful. It marks the spots for the lights. Screwdrivers help fix the lights in place. Make sure to have a ladder. It helps reach high ceilings. Also, get wire connectors. They join the wires safely. Recessed light kits are the main items. They contain the lights you will install.
Choosing The Right Location
First, check your ceiling structure. This is important for safety. Know if it’s wood or metal. Find joists and beams. Avoid cutting into them. They hold the ceiling up. Look for spaces between them. These are good spots for lights. Measure the space carefully. Use a stud finder for accuracy.
Next, think about your lighting needs. How much light do you need? Is the room big or small? More lights mean more brightness. Decide the number of lights. Think about light placement. Even spacing makes the room look good. Test light levels. Use a flashlight to see how it looks. Adjust as needed.
Preparing The Ceiling
Always turn off the power before starting. Safety is very important. Find the circuit breaker. Switch it to the off position. Check that the lights are off. Use a voltage tester to be sure. Better safe than sorry.
Choose the right spot on the ceiling. Measure the space carefully. Mark the spot with a pencil. Make sure it’s not too close to walls. Keep it away from ceiling joists. This ensures a proper fit.
Use a drywall saw to cut the ceiling. Follow the marked line. Be gentle and precise. Make a clean cut. Check the opening size. Ensure the light fixture fits well. Remove any debris from the cut.
Wiring The Lights
Turn off the power before starting. Safety first. Find the junction box. Open it. Inside, you will see many wires. Usually, black, white, and ground. These are important. Black is live. White is neutral. Ground is green or bare. Connect them well.
Wire connectors are useful. They keep wires together. Use them for safe connections. Choose the right size for your wires. Twist wires together. Place the connector on the twisted wires. Turn the connector until tight. This ensures good contact. Avoid loose wires. Check connections twice. Safety matters.
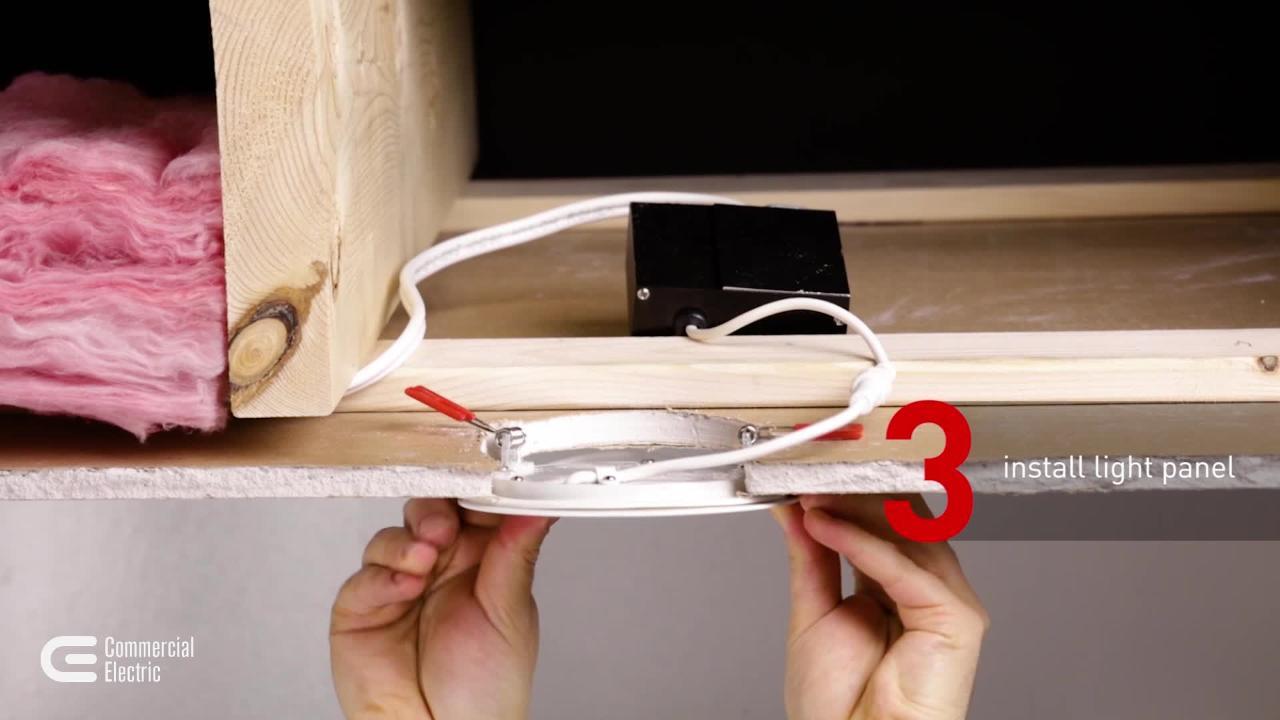
Installing The Light Fixture
Installing canless recessed lighting involves simple steps. Measure the ceiling space, cut an opening, connect wiring, and secure the fixture. Ensure everything is properly aligned for a seamless look.
Securing The Fixture
Use a screwdriver to secure the canless recessed light.
Ensure the fixture is aligned properly in the ceiling.
Tighten the screws so the light stays in place.
Check that all parts are tight and secure.
Loose screws can make the fixture fall or move.
Always double-check your work to avoid any mishaps.
Adjusting The Fixture Position
Gently move the fixture to the desired position.
Ensure it is centered and looks good in the room.
If the fixture is not straight, adjust it again.
Make small changes until the fixture is perfect.
Confirm the light is not too close to other objects.
A good position helps the light spread evenly.
Testing The Installation
Ensure the lights work by flipping the switch after installation. Check for any flickering or dimming. Confirm all lights illuminate evenly and adjust if necessary.
Restoring Power
First, turn off the light switch. Safety is important. Next, go to the circuit breaker. Flip the switch back on. This restores power to the lights. Be careful when handling electrical parts. Always check twice to ensure safety.
Checking Light Functionality
Turn on the light switch. Observe if the light is working. If it lights up, the installation is successful. No light means a problem. Check the bulb first. Ensure it is tightly screwed in. If still no light, check the wiring. Make sure all connections are secure. Test again by turning the switch on and off.
Troubleshooting Common Issues
Lights not turning on? Check the power source first. Ensure all wires are connected. Loose wires can cause problems. Inspect the circuit breaker. It might be off. Switch it on if needed.
Flickering lights can be annoying. Tighten the bulbs properly. Sometimes bulbs are loose. Check the bulb type. Use recommended bulbs only. Look for any damaged wires. Replace them if found.
Lights too dim? Clean the fixture. Dust can block light. Check the wattage. It should match the fixture. Ensure bulbs are good quality. Cheap bulbs can be dim.
Lights overheating? Don’t panic. Ensure proper ventilation. Check the wattage again. High wattage can cause heat. Use LED bulbs for less heat.
Maintenance Tips
Keep lights clean for better brightness. Dust and dirt can block light. Use a soft cloth to wipe the surface. Avoid water when cleaning. Check for loose connections. Loose wires can cause flickering.
Replace bulbs with the right type. Wrong bulbs can damage lights. Inspect the trim for gaps. Gaps let bugs and dust in. Seal gaps with proper materials.
Ensure the lights are not too hot. Overheating can be dangerous. Allow air circulation around the lights. This helps keep them cool. Regular check-ups can prevent bigger problems.

Credit: www.reddit.com
Frequently Asked Questions
What Are The Disadvantages Of Canless Recessed Lighting?
Canless recessed lighting may have limited light spread and reduced brightness. It can be challenging to install and may lack insulation contact. Overheating can occur if not properly ventilated. Some models might not be compatible with dimmers, affecting ambiance control.
Energy efficiency might also be lower compared to other options.
How Many Canless Lights Can I Put On One Circuit?
Install up to 12 canless lights on a 15-amp circuit. Each LED light uses about 1 watt. Verify total wattage stays under circuit capacity for safety. Always consult an electrician for accurate installation advice.
Are Canless Recessed Lights Code?
Canless recessed lights comply with building codes if they meet safety standards and are installed correctly. Always check local regulations and consult professionals. Proper installation ensures energy efficiency and safety. Regular inspections help maintain compliance and performance. Choose UL-listed products for reliability and adherence to standards.
How Far Apart Should Canless Lights Be Spaced?
Space canless lights 4 to 6 feet apart for optimal lighting. Adjust spacing based on room size and light intensity. Ensure even distribution for best results. Consider ceiling height and light beam angle to avoid dark spots. Proper spacing enhances ambiance and functionality.
Conclusion
Installing canless recessed lighting is simple and rewarding. Follow the steps carefully to achieve perfect results. Proper lighting enhances your room’s ambiance and functionality. Ensure safety by turning off electricity before starting. Use the right tools for a smooth process.
Measure and mark spots accurately for even installation. Choose energy-efficient lights for long-term savings. Enjoy the new look and feel of your space. With patience, you can transform any room. Share your success with friends and family. Happy lighting!