

Quick Summary
Cutting flooring around a toilet is a straightforward DIY task. This guide provides simple, step-by-step instructions, essential tools, and clever tips to achieve a clean, professional finish with minimal effort, making your flooring project a success.
Hey there, DIY warriors! Md Meraj here. Tackling a new flooring project is exciting, but when you reach the toilet, a little voice of doubt might creep in. How do you get that perfect, snug fit around the base? It’s a common hurdle, and honestly, it can feel a bit daunting. But don’t you worry! I’m here to show you that cutting flooring around a toilet is totally achievable, even if you’re new to this. We’ll break it down into easy-to-follow steps, using simple tools you likely have or can get easily. Get ready to feel confident as we transform that tricky spot into a point of pride in your home.
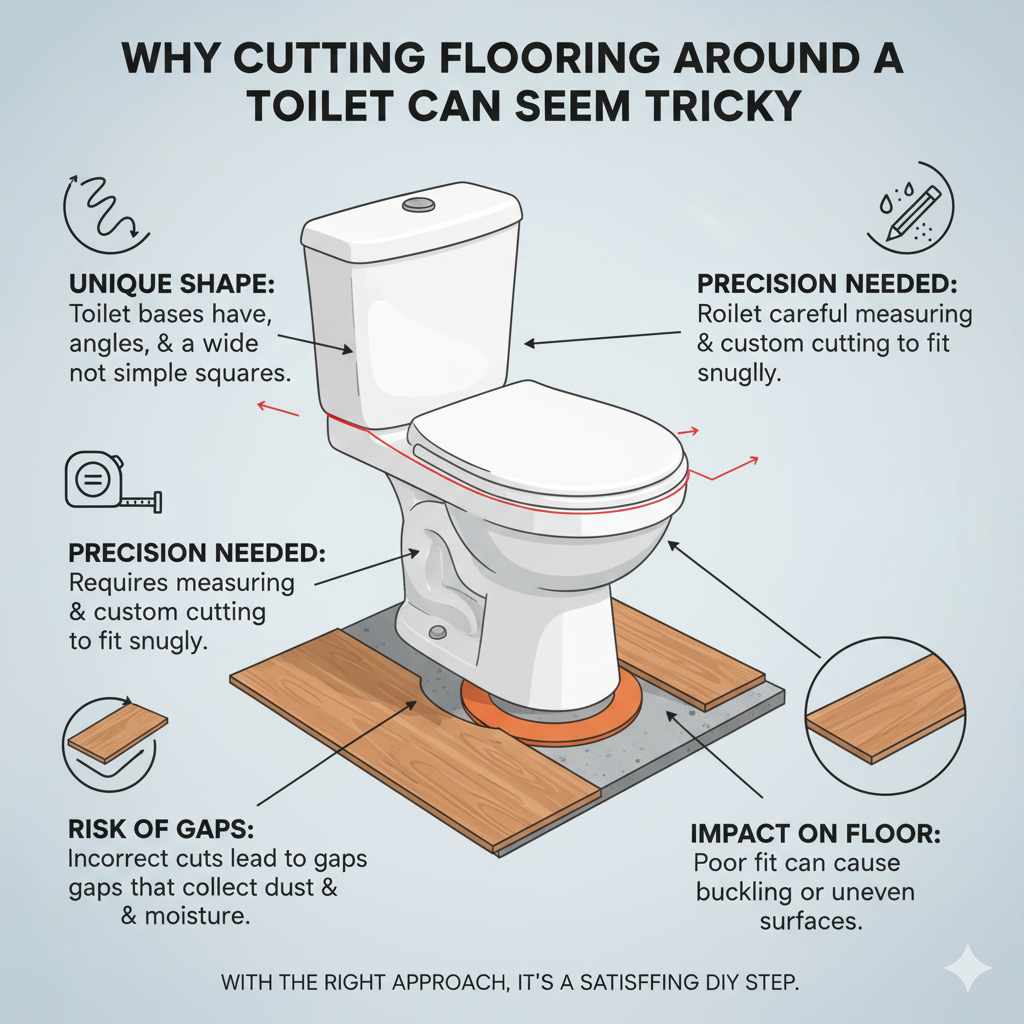
Why Cutting Flooring Around a Toilet Can Seem Tricky
Let’s be honest, that toilet base isn’t a simple square or circle. It has curves, angles, and often a wider flange that sits right on the floor. This unique shape means you can’t just lay a plank and be done. You need to carefully measure and cut the flooring material to fit snugly around it. Get it wrong, and you’ll have gaps that can collect dust and moisture, or worse, the flooring might not sit flat. It’s a detail that makes a big difference in the final look and longevity of your new floor. But with the right approach, this “tricky” part becomes just another satisfying step in your DIY journey.
Gather Your Essential Tools
Before we dive into the cutting, let’s make sure you have everything you need. Having the right tools makes the job much easier and safer. Think of it like having your trusty woodworking companions by your side!
Must-Have Tools for Cutting Flooring Around a Toilet:
- Measuring Tape: For accurate measurements.
- Pencil: A sharp pencil is key for marking your cuts.
- Utility Knife: Essential for scoring and cutting many types of flooring like vinyl or laminate.
- Jigsaw or Oscillating Multi-Tool: These are fantastic for cutting curves and intricate shapes in wood, laminate, and even some thicker vinyl. A jigsaw offers more control for curves, while an oscillating tool is great for tight spaces.
- Compass (Optional but Recommended): Especially helpful for drawing a consistent curve around the toilet base.
- Painter’s Tape: To protect the toilet base and to help transfer your pattern.
- Flooring Scraps: Always useful for practicing your cuts.
- Safety Glasses: Protect your eyes from dust and debris.
- Work Gloves: For a better grip and to protect your hands.
- Dust Mask: Recommended when cutting, especially laminate or wood.
Step-by-Step: How to Cut Flooring Around a Toilet
Alright, let’s get down to business! This process is all about patience and precision. We’ll go through it step-by-step, so you can feel confident with each move.
Step 1: Prepare the Area
First things first, make sure the area around the toilet is clean and clear. Remove any old flooring or underlayment right up to the toilet base. You’ll want to ensure the subfloor is clean and dry. If you have a wax ring seal that’s still intact, you might need to carefully remove it. For safety and to prevent accidental flushing, it’s a good idea to turn off the water supply to the toilet and flush it to empty the tank and bowl. You can also prop the toilet seat up or remove it entirely if it gets in your way.
Step 2: Measure and Mark Your Flooring Piece
This is where the magic happens. You need to create a template of the toilet base. The easiest way to do this is by using a piece of scrap flooring or even thick paper or cardboard.
- Position the Flooring: Lay a full piece of your new flooring next to the toilet. You’ll want to cut this piece to fit snugly against the wall and any adjacent flooring.
- Trace the Toilet Base: Place your scrap flooring, paper, or cardboard directly over the toilet flange and base.
- Use a Compass (Recommended for Curves): If you have a compass, set it to the widest part of the toilet base (usually the flange). Place the compass point on the edge of your flooring material and draw a curve around the base. This ensures a consistent distance from the center.
- Freehand or Template (If No Compass): If you don’t have a compass, carefully trace around the toilet base with your pencil. You’ll want to leave a small gap (about 1/8 to 1/4 inch) between your traced line and where the flooring will actually end. This gap allows for expansion and contraction of the flooring material.
- Mark the Cut Lines: Once you have your curve or outline, carefully mark the exact cutting line on your flooring material.
Pro Tip: For a more precise fit, especially with complex toilet base shapes, you can use painter’s tape. Wrap the tape around the base of the toilet, then carefully trace the outline onto the tape with a pencil. Peel off the tape and transfer this pattern to your flooring scrap. This method often yields a more accurate template.
Step 3: Cut Your Flooring Piece
Now it’s time to make the cut! The tool you use will depend on your flooring material and the tools you have available.
- For Vinyl or Linoleum: A sharp utility knife is often sufficient. Score the line several times, then carefully bend the material to snap the cut. For thicker luxury vinyl tile (LVT) or plank (LVP), you might need to score and cut multiple times or use a jigsaw.
- For Laminate or Engineered Wood: A jigsaw or an oscillating multi-tool is your best friend here.
- Jigsaw: Insert the blade into a pre-drilled hole within the waste area of your cut (or carefully plunge cut with the blade down). Follow your marked line slowly and steadily. Keep the base of the jigsaw flat on the flooring.
- Oscillating Multi-Tool: This is excellent for tight spots and offers good control. Use a wood or multi-purpose blade and move slowly along your line.
- For Hardwood: Similar to laminate, use a jigsaw or oscillating tool. Be extra careful not to chip the wood.
Important Note on Safety: Always wear safety glasses when cutting. Ensure your flooring is securely supported, especially when using power tools. If using a jigsaw, make sure the power cord is safely out of the way.
Step 4: Test Fit and Refine
Before you commit to gluing or clicking your flooring into place, do a dry fit. Carefully place the cut piece around the toilet. Does it fit snugly without being too tight? Are there any high spots or gaps? If it’s not perfect, don’t worry!
- Minor Adjustments: Use your utility knife or a rasp to shave down any areas that are too tight.
- Larger Adjustments: If you need to cut more, carefully re-measure and make your adjustments. It’s much easier to trim a little more than to add material back!
This test fit is crucial. It’s your chance to ensure a seamless look. You want the flooring to be as close to the toilet base as possible without actually touching it, allowing for that slight expansion gap.
Step 5: Install the Flooring
Once you’re happy with the fit, it’s time to install the piece permanently. The method will depend on your flooring type:
- Click-Lock Systems (Laminate, LVP): You’ll typically need to slide the plank into place, ensuring the locking mechanism engages with the adjacent planks. You might need to tap it gently with a tapping block and mallet to secure the connection.
- Glue-Down Systems (Vinyl, Hardwood): Apply the manufacturer-recommended adhesive to the subfloor or the back of the flooring piece (follow product instructions). Carefully place the flooring into the adhesive and press down firmly. You may need to use a floor roller to ensure good adhesion.
Ensure the piece sits flat and is securely fastened. Any rocking or instability at this stage will be noticeable later.
Step 6: Finishing Touches
After the flooring is installed, you can reassemble the toilet if you removed parts. Reconnect the water supply, let the tank fill, and check for any leaks. Once you’re confident everything is dry and secure, you can caulk around the base of the toilet where it meets the flooring. Use a color-matched caulk or a clear silicone caulk for a clean, waterproof seal. This not only looks professional but also prevents water from seeping underneath your new floor.
Choosing the Right Tool for the Job: A Quick Guide
The best tool for cutting flooring around a toilet really depends on the type of flooring you’re installing and your comfort level with different tools. Here’s a little breakdown:
| Flooring Type | Recommended Tools | Ease of Use (Beginner) | Notes |
|---|---|---|---|
| Sheet Vinyl/Linoleum | Utility Knife, Jigsaw (for thicker vinyl) | Easy to Moderate | Score and snap for thinner vinyl. Jigsaw for thicker materials or intricate cuts. |
| Luxury Vinyl Plank/Tile (LVP/LVT) | Utility Knife (for scoring), Jigsaw, Oscillating Multi-Tool | Moderate | LVP/LVT can be thick. Scoring with a utility knife and snapping works for some, but a jigsaw or multi-tool offers cleaner cuts. |
| Laminate Flooring | Jigsaw, Oscillating Multi-Tool | Moderate to Difficult | Requires precise curves. Jigsaw is ideal. Ensure a fine-tooth blade for clean cuts and minimal chipping. |
| Engineered Wood | Jigsaw, Oscillating Multi-Tool | Moderate to Difficult | Similar to laminate, but care must be taken to avoid splintering the wood veneer. |
| Solid Hardwood | Jigsaw, Oscillating Multi-Tool | Difficult | Requires the most precision and care to avoid damaging the wood. Use a high-quality blade. |
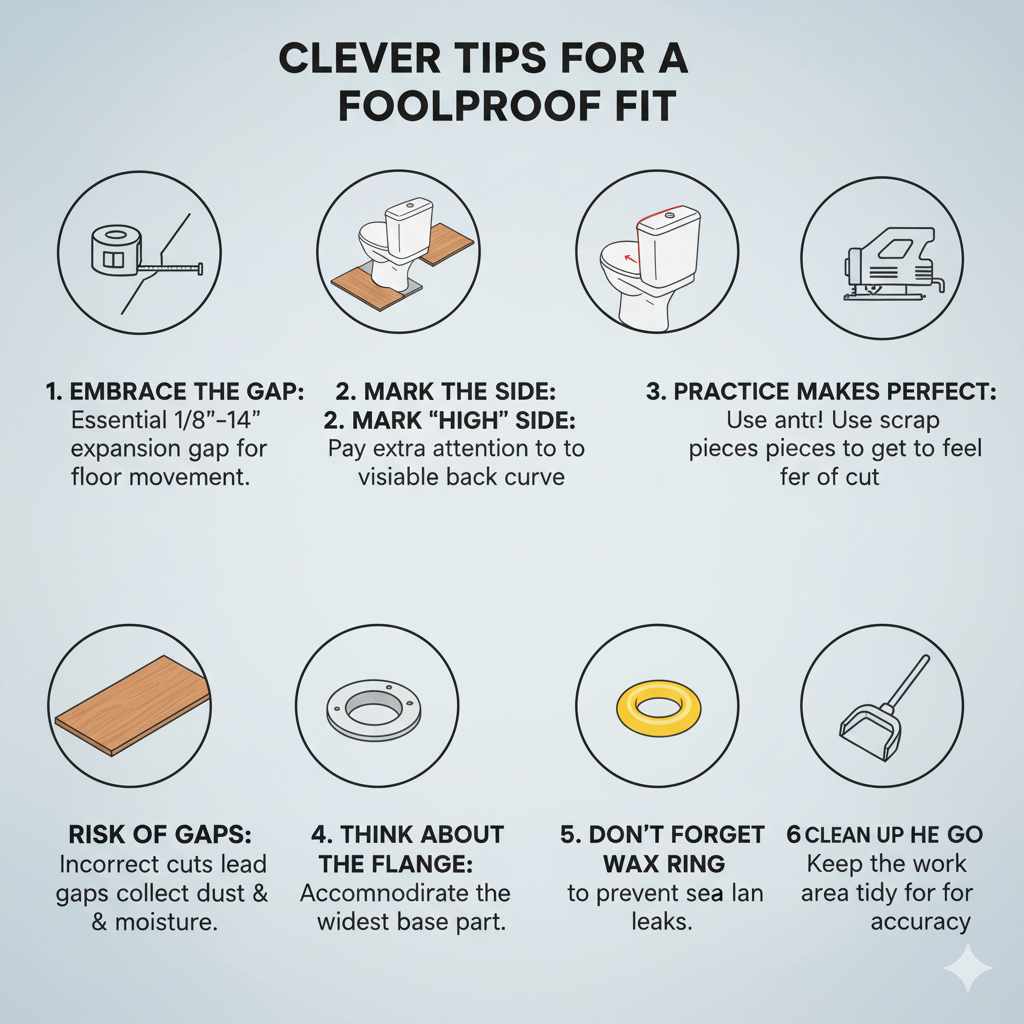
Clever Tips for a Foolproof Fit
Beyond the basic steps, a few extra tricks can make all the difference between a good job and a great one.
- Embrace the Gap: Remember that small expansion gap (1/8″ to 1/4″) you leave around the toilet base? It’s not a mistake; it’s essential for the flooring’s lifespan. Flooring expands and contracts with changes in temperature and humidity. Without this gap, it can buckle or warp.
- Marking the “High” Side: When tracing around the toilet, the side facing the wall is often the most visible and the trickiest. Pay extra attention to getting a clean, tight fit on this side.
- Practice Makes Perfect: If you’re nervous, grab a few scrap pieces of your flooring material and practice cutting curves. Get a feel for your tool and how it handles the material.
- Think About the Flange: The toilet flange is usually the widest part. Your cut needs to accommodate this. If your tracing or compass method is too tight, you might need to adjust slightly.
- Don’t Forget the Wax Ring: When reinstalling the toilet, a new wax ring seal is crucial to prevent leaks. You can find detailed guides on this from plumbing resources like HomeownerToolkit.gov.
- Clean Up as You Go: Sawdust and debris can make it hard to see your lines and can interfere with the flooring installation. Keep your work area tidy.
Frequently Asked Questions (FAQ)
Q1: How much space should I leave around the toilet base when cutting flooring?
You should leave a small expansion gap, typically between 1/8 inch and 1/4 inch, around the entire toilet base. This gap allows the flooring material to expand and contract with changes in temperature and humidity without buckling.
Q2: Can I just use a utility knife to cut around the toilet?
For thinner sheet vinyl or linoleum, a sharp utility knife is often sufficient. You’ll score the line multiple times and then snap the material. However, for thicker materials like LVP, laminate, or hardwood, a jigsaw or oscillating multi-tool will provide cleaner, more accurate cuts.
Q3: My toilet base has an irregular shape. How do I get an accurate cut?
Using a compass is the easiest way to get a consistent curve. If you don’t have one, you can carefully trace around the base, or use the painter’s tape method: wrap tape around the base, trace the outline on the tape, peel it off, and transfer the pattern to your flooring. Always add a small expansion gap.
Q4: What if I mess up the cut? Can I fix it?
It’s usually easier to trim a piece that’s too large than to fix one that’s too small. If your cut is slightly off, you can often make small adjustments by carefully trimming with a utility knife or a rasp. If it’s significantly wrong, you may need to cut a new piece. Always have a few extra pieces of flooring for mistakes.
Q5: Do I need to remove the toilet to install flooring around it?
While it’s possible to cut flooring around a toilet without removing it, it’s often much easier and results in a more professional finish if you do. Removing the toilet allows for better access, more accurate measurements, and a cleaner installation. It also ensures you can properly replace the wax ring seal.
Q6: What’s the best way to ensure the flooring sits flat around the toilet?
After cutting and test-fitting, ensure the subfloor is level. When installing, especially with glue-down flooring, use a floor roller or apply firm, even pressure to the piece to ensure it adheres properly and sits flush with the surrounding flooring. For click-lock systems, ensure all edges are properly engaged.
Conclusion
See? Cutting flooring around a toilet doesn’t have to be a project that keeps you up at night. With the right tools, a little patience, and these straightforward steps, you can achieve a clean, professional-looking result that you’ll be proud of. Remember to measure twice, cut once, and don’t be afraid to make those small adjustments during your test fit. This skill is a fantastic addition to your DIY toolkit, and it’s one that will serve you well for many flooring projects to come. So go ahead, tackle that toilet cut with confidence. You’ve got this!