
Hey there! So, you’re curious about how to clean a toilet tank? I totally get why you’d want to tackle this! A few years ago, I noticed my toilet wasn’t flushing as well as it used to, and when I peeked inside the tank, I was shocked at the grime and stains. It was like a secret mess hiding right in my bathroom! After some trial and error, a chat with a plumber friend, and a bit of elbow grease, I learned how to make that tank sparkle. I’m super excited to share everything I’ve discovered with you!
This guide is perfect for anyone in the USA looking to keep their toilet tank clean, improve flushing, and maintain a fresh bathroom. I’ll keep it simple, fun, and easy to follow, so grab some gloves, and let’s dive into cleaning that toilet tank!
Why Cleaning Your Toilet Tank Matters
Let’s start with why this is worth your time. The toilet tank is like the engine of your toilet. It holds water and parts that make flushing happen. I didn’t realize how much gunk—like mineral deposits, mold, and bacteria—can build up inside. That mess can weaken your flush, cause leaks, or even make your bathroom smell.
I cleaned my tank and noticed my toilet worked better and used less water. Regular cleaning saves money on repairs—plumbers charge $100-$200 for tank issues. Plus, it keeps your bathroom hygienic. It’s like changing your car’s oil—small maintenance prevents big problems. Let’s look at what’s inside the tank.
Understanding Your Toilet Tank’s Components
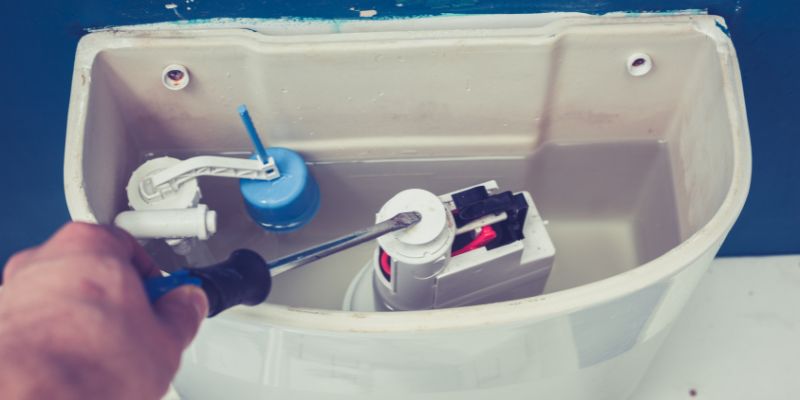
Before you start scrubbing, it’s good to know what’s in there. I was nervous opening my tank the first time, thinking I’d break something. Here’s what I found:
- Fill valve: Controls water flow into the tank. Mine had some rust around it.
- Flapper: A rubber seal that releases water to the bowl. My flapper was slimy!
- Overflow tube: Prevents spills if the tank overfills. It had hard water stains.
- Float: Regulates water level. Mine was a ball type, but some are cups.
- Chain: Connects the flapper to the flush handle. It can get tangled.
Knowing these parts helped me clean without damaging anything. I took a quick photo of the tank to remember where things went. Let’s gather the tools you’ll need.
Tools and Materials You’ll Need
Having the right supplies makes this job easy. I tried cleaning with just a sponge once—big mistake! Here’s what I use now:
- White vinegar: Breaks down stains and kills germs. I got a $3 gallon jug.
- Baking soda: Helps scrub tough spots. I had a $1 box in my kitchen.
- Toilet tank cleaner tablets: Optional for ongoing maintenance. I spent $5 on a pack.
- Scrub brush or sponge: For cleaning tank walls. I used a $2 brush.
- Gloves: To keep your hands clean. I got $1 disposable gloves.
- Old toothbrush: For tight spots. I repurposed one from my bathroom.
- Bucket or towel: To catch drips. I used an old towel.
- Screwdriver: To remove stubborn parts. I had one in my toolbox.
- Rags or paper towels: For wiping surfaces. I used old rags.
- Optional: Pumice stone: For hard stains. I bought one for $4.
My total cost was about $20, and most items are reusable. Check your tank for any special parts, like a unique flapper, before starting. Let’s prep your bathroom for cleaning.
Preparing Your Bathroom for the Job
Before you dive in, a little prep keeps things tidy. I spilled water everywhere my first time—oops! Here’s how I set up now:
- Turn off the water: Find the shut-off valve behind the toilet and turn it clockwise. I did this to stop water flow.
- Flush the toilet: This empties the tank. I held the handle down to drain most of the water.
- Clear the area: Move rugs, towels, or toiletries. I put mine on the counter.
- Protect the floor: Lay a towel under the toilet. I used an old one to catch drips.
- Open a window: Ventilation helps with cleaner fumes. I cracked my bathroom window.
This prep takes 5 minutes but saves a mess. It’s like checking your tires before a drive—do it right! Let’s start with the main cleaning method.
Method 1: Cleaning with Vinegar and Baking Soda
This is my go-to method for a deep clean. It’s cheap and effective. Here’s how I cleaned my tank:
- Empty the tank: With the water off, flush to drain it. I sponged out leftover water.
- Pour in vinegar: Add 1-2 gallons of white vinegar to the tank. I used a funnel to avoid spills.
- Let it soak: Wait 1-2 hours for the vinegar to break down stains. I left mine while watching TV.
- Scrub the tank: Use a brush to scrub walls and parts. I focused on rusty spots.
- Add baking soda: Sprinkle 1 cup of baking soda into the tank. It fizzed and loosened grime.
- Scrub again: I used an old toothbrush for tight spots, like around the fill valve.
- Flush to rinse: Turn the water back on and flush twice. My tank looked spotless!
- Wipe down: Dry the tank with a rag. I polished the parts for extra shine.
This took about 2 hours, mostly waiting, and cost $4. The vinegar smell was strong but faded fast. If you have tough stains, try the next method.
Method 2: Tackling Stubborn Stains with a Pumice Stone
For hard water stains, I used a pumice stone. My tank had stubborn rings that vinegar didn’t budge. Here’s how I did it:
- Empty the tank: Turn off water and flush. I sponged out remaining water.
- Wet the pumice stone: Soak it in water to avoid scratching. I dipped mine in a bucket.
- Scrub gently: Rub the stone on stains in circular motions. I focused on the overflow tube.
- Check progress: Wipe with a rag to see results. My stains faded in 10 minutes.
- Rinse the tank: Turn on the water and flush. I flushed twice to clear debris.
- Clean parts: Scrub the flapper and valve with a brush. I used vinegar for extra cleaning.
- Dry and inspect: Wipe the tank dry. My tank was like new!
This took 30 minutes and cost $4 for the pumice stone. Be gentle—pumice can scratch if you press too hard. If you want ongoing maintenance, try the next method.
Method 3: Using Toilet Tank Cleaner Tablets
For easy upkeep, I use tank cleaner tablets. They’re great for busy weeks. Here’s how I use them:
- Choose a tablet: Pick a bleach-free brand to protect parts. I got a $5 pack of 6.
- Drop it in: Place a tablet in the tank with water full. I did this after a deep clean.
- Let it work: The tablet dissolves over weeks, cleaning as you flush. Mine lasted a month.
- Scrub lightly: Once a month, I brush the tank to remove any buildup.
- Replace as needed: Add a new tablet when the water’s clear. I do this every 4-6 weeks.
- Flush regularly: Normal use keeps the tank fresh. I flush twice daily.
This takes 5 minutes monthly and costs $1 per tablet. It’s not a deep clean but keeps things tidy. Let’s troubleshoot common issues.
Troubleshooting Common Tank Cleaning Problems
Sometimes, cleaning doesn’t go perfectly. Here’s how I fixed issues I ran into:
- Stains won’t budge: Soak with vinegar overnight. I left mine for 12 hours, and stains vanished.
- Parts are stuck: Spray WD-40 on rusty screws. I loosened a stuck fill valve this way.
- Water won’t drain: Check the shut-off valve. I forgot to turn mine off once!
- Flapper won’t seal: Replace it if it’s slimy. I bought a $5 flapper that fixed leaks.
- Smell lingers: Add a few drops of essential oil after cleaning. I used lemon for freshness.
These fixes are quick and keep your tank sparkling. If problems persist, I’d call a plumber. Let’s talk about maintaining a clean tank.
Maintaining a Clean Toilet Tank
Once your tank’s clean, I want to keep it that way. Here’s what I do:
- Clean every 3-6 months: I deep clean with vinegar twice a year. It takes an hour.
- Use tablets monthly: Cleaner tablets keep buildup at bay. I drop one in regularly.
- Check parts: I inspect the flapper and valve for wear. I replaced my flapper for $5.
- Flush often: Daily use prevents stagnant water. I flush even if I’m away.
- Watch water quality: Hard water causes stains. I use a $10 water softener for my home.
These habits cost $15 a year and save me from repairs. It’s like waxing your car—regular care shines! Let’s compare cleaning methods.
Comparing Toilet Tank Cleaning Methods
To help you choose, here’s a table based on my experiences:
| Method | Best For | Cost | Time Needed | Tools & Materials | Difficulty |
|---|---|---|---|---|---|
| Vinegar & Baking Soda | Deep cleaning, all tanks | $4-$10 | 2 hours | Vinegar, baking soda, brush | Easy |
| Pumice Stone | Hard water stains | $4-$8 | 30 min | Pumice stone, sponge | Medium |
| Tank Cleaner Tablets | Ongoing maintenance | $5-$15 | 5 min | Tablets | Easy |
I love vinegar for thorough cleaning, but tablets are great for upkeep. Pick based on your tank’s needs. Let’s cover safety tips.
Safety Tips for Cleaning Your Toilet Tank
Working with cleaners and water needs care. Here’s what I keep in mind:
- Wear gloves: Protect your hands from germs. I used $1 gloves.
- Ventilate the area: Open a window or run a fan. I aired out my bathroom.
- Avoid mixing cleaners: Don’t combine vinegar with bleach—it’s toxic. I stuck to one cleaner.
- Turn off water: Prevent spills by shutting the valve. I forgot once and got wet!
- Handle tools safely: Use brushes gently to avoid splashing. I kept my face clear.
These tips kept me safe and dry. Safety first, always! Let’s explore why I love this project.
Why I’m Hooked on This Task
Cleaning my toilet tank is one of those chores that makes me feel like a home maintenance pro. Every time I flush and hear that strong whoosh, I’m proud I took care of it myself. It’s not just about saving money—though I saved $150 on plumber fees—it’s about keeping my bathroom fresh and functional. This project is perfect for anyone who loves DIY and wants a cleaner, more efficient toilet. Whether you’re scrubbing stains or dropping in a tablet, you’ll love the results.
Conclusion
There you have it—a complete guide to cleaning a toilet tank! I’ve been through the grime and the shine, and I’m thrilled to share these tips with you. From vinegar soaks to pumice stone scrubs, you’ve got all the know-how to make your tank sparkle and your toilet flush like new. This is a fun, budget-friendly project that anyone can tackle with a few supplies and a little time. So, grab that vinegar, put on those gloves, and get ready to feel like a bathroom hero. You’ll save cash, keep your plumbing happy, and love your fresh, clean toilet. Happy cleaning!
Frequently Asked Questions
How often should I clean my toilet tank?
I clean mine every 3-6 months. It keeps stains and buildup away.
Can I use bleach to clean my toilet tank?
I wouldn’t. Bleach can damage parts. I use vinegar—it’s safer and works great.
What if my tank has rust stains?
Try a pumice stone or vinegar soak. I cleared rust with vinegar overnight.
Do I need to empty the tank completely?
Not always, but it helps. I sponge out water for a thorough clean.
Are tank cleaner tablets safe for septic systems?
Most are, but check the label. I use septic-safe ones for $5.