
Are you tired of that old, flickering fluorescent light fixture that seems to belong in a different decade? It’s time to take control and bring a fresh glow into your space.
Changing a fluorescent light fixture might seem intimidating, but with the right guidance, you can do it yourself without breaking a sweat. Imagine walking into a room where the lighting is perfect, enhancing every moment and making every corner of your home feel inviting and modern.
This article will guide you step-by-step through the process, ensuring you not only succeed but also gain the confidence to tackle more DIY projects in the future. Keep reading to discover how you can transform your living space with just a few simple changes. Your home deserves the best, and so do you!
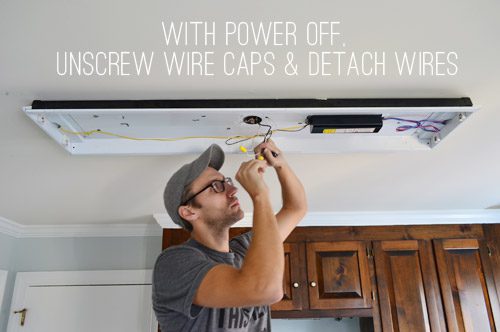
Credit: www.younghouselove.com
Safety Precautions
Always turn off the powerbefore starting. This keeps you safe. Use a sturdy ladderto reach the fixture. Make sure the ladder is stable. Wear glovesto protect your hands. They keep hands safe from cuts. Avoid touching wires directly. Use a voltage testerto check for electricity. It ensures power is really off. Keep the area well-lit. It helps to see clearly. Have a friend nearby. They can help if needed. Safety is very important.

Credit: www.youtube.com
Gathering Necessary Tools
Start by collecting all essential tools. You will need a screwdriver. A ladder is important for reaching high places. Make sure you have a voltage testerto check safety. Get some wire cutters. A new fluorescent light bulb is necessary. Having pliers on hand can be helpful. These tools make the job easier.
Wear gloves for protection. Safety goggles are also a good idea. Keep a bucket or boxnearby for screws. This prevents losing them. Gather everything before you start. It saves time and keeps you organized.
Removing The Old Fixture
Safety first. Turn off the power at the breaker box. Make sure the light switch is off too. Check if the light is still on. This ensures no power flows. Use a voltage tester to double-check.
Remove the cover gently. Unscrew the screws holding the cover. Keep screws safe. Slide the cover off. Be careful not to drop it. Covers can be heavy and fragile.
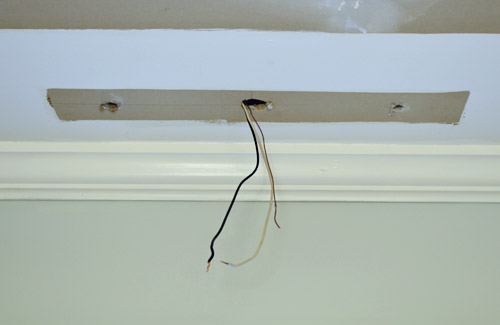
Look at the wires. Unscrew the wire nuts connecting the wires. Keep the nuts safe. Separate the wires gently. Note wire colors for later. Avoid pulling too hard. Wires can snap easily.
Unscrew the fixture from the ceiling. Use a screwdriver. Hold the fixture while unscrewing. Avoid dropping it. Fixtures can be heavy. Keep screws safe for later use.
Preparing For Installation
Inspecting Wiringis crucial before changing any light fixture. Check the wires for damage. Ensure they are not frayed or cut. Be sure the power is off. Use a voltage tester to confirm. Safety is essential. Wear protective gloves. Keep a flashlight handy for dark areas. Label wires if needed. This helps with reconnection. Understanding the wiring prevents mistakes. Follow the instructions carefully. This ensures a safe installation.
Ensuring Fixture Compatibilityis necessary for a successful change. Measure the space for the new fixture. Make sure it fits well. Check the fixture’s voltage requirements. They must match the current wiring. Look at the bulb type. It should be the same or compatible. Consider the fixture’s weight. Ensure the ceiling can support it. Verify the mounting method. It should match the existing setup. Compatibility prevents issues later.
Installing The New Fixture
First, hold the new fixture up to the ceiling. Use a pencil to mark where the screws will go. These marks will help you later. Drill holes where you made the marks. Hold the fixture again and line it up with the holes. Use screws to attach it. Make sure it is tight and secure.
Find the wires from your ceiling. They are usually black, white, and green. Match the wires from the fixture to the ceiling wires. Twist them together. Use wire nuts to cover them. This keeps them safe. Be sure each wire is connected tightly.
Gently push the fixture up to the ceiling. Check that it fits well. Use screws to secure it in place. Make sure everything is tight. You don’t want it to move. Turn on the power to test. The light should work now.
Testing The New Fixture
Replacing a fluorescent light fixture involves testing the new fixture carefully. Ensure all wires are securely connected. Confirm the switch works properly to illuminate the room.
Restoring Power
Turn on the main power switch. Make sure all the wires are connected. Check the light switch on the wall. It should be in the “on” position. If the light doesn’t work, check the circuit breaker. Ensure it is not tripped. Replace the bulb if needed. Sometimes, a bulb might be burnt out. Always handle bulbs carefully. They can be fragile and break easily.
Checking Functionality
Observe the new light fixture. It should light up evenly. No flickering should occur. If it flickers, check the connections. Loose connections can cause issues. Ensure the fixture is secure. It should not wobble. If it does, tighten the screws. A stable fixture is safer. Check that the light is bright. It should illuminate the room well. If not, consider a higher wattage bulb.
Troubleshooting Common Issues
Flickering lights can be very annoying. First, check if the bulb is properly seated. A loose bulb can cause flickering. Tighten it gently. If the bulb is fine, inspect the starter. A faulty starter can cause problems. Replace it if necessary. Sometimes, the ballast might be the problem. A buzzing sound means it’s faulty. Replace the ballast for a better light.
If the light won’t turn on, check the power supply. Ensure the switch is on. Look at the circuit breaker. It might be tripped. Reset it if needed. A burnt-out bulb can also be the cause. Replace it with a new one. Always ensure safety first. Turn off power before checking.

Credit: www.youtube.com
Maintenance Tips
Regular cleaning is key. Dust can build up fast on light fixtures. Use a soft cloth to wipe the fixture. This keeps it bright and efficient. Always check for any loose screws. Tighten them if needed. It prevents the fixture from wobbling.
Inspect the bulbs often. Replace them if they flicker or dim. Use the right type of bulb. It ensures the fixture works well. Check the wiring for any damage. Damaged wires can be dangerous. If you find any, call an electrician. Safety first!
Frequently Asked Questions
How Do You Safely Remove A Fluorescent Light Fixture?
To safely remove a fluorescent light fixture, first turn off the power. Use a voltage tester to ensure the power is off. Carefully remove the fixture cover and bulbs. Unscrew the fixture from the ceiling or wall. Disconnect wiring, noting connections for later.
Follow these steps to ensure safety.
What Tools Are Needed To Change Fluorescent Fixtures?
Changing fluorescent fixtures requires a few basic tools. You’ll need a screwdriver, voltage tester, wire stripper, and electrical tape. Ensure you have replacement parts if necessary, like new bulbs or ballast. These tools help ensure a smooth and safe fixture change.
Can I Replace Fluorescent Lights With Led Fixtures?
Yes, you can replace fluorescent lights with LED fixtures. Ensure compatibility with your existing setup. LEDs offer energy efficiency and longer lifespan. Follow proper installation guidelines for a seamless switch. Consult a professional if unsure about wiring compatibility.
How Long Does It Take To Change A Fixture?
Changing a fluorescent light fixture generally takes about 30 minutes to an hour. This depends on your experience and the fixture’s complexity. Allocate additional time for unexpected issues. Ensure you have all tools and parts ready before starting for a smooth process.
Conclusion
Changing a fluorescent light fixture is simpler than it seems. Start by gathering all necessary tools. Ensure the power is off for safety. Remove the old fixture carefully. Follow the instructions for the new one. Connect wires securely to avoid issues.
Test the light to confirm it works. This task can save money on professional help. It also boosts your confidence in home repairs. Keep safety first, and take your time. Soon, your room will shine bright again. Enjoy the satisfaction of a job well done.