
Quick Summary:
Proper chandelier height ensures both safety and aesthetic appeal. Generally, hang chandeliers 7 feet from the floor in entryways and 30-36 inches above dining tables. Adjust based on room size, ceiling height, and fixture scale for a balanced, inviting look.
Ever stared at a beautiful chandelier, only to wonder if it’s too high, too low, or just… wrong? Getting the height just right can feel like a mystery, especially when you want your new centerpiece to shine without getting in the way. It’s a common stumbling block for many DIYers, but I’m here to tell you it’s totally achievable! With a few simple guidelines and a bit of common sense, you can hang your chandelier with confidence. We’ll walk through it step-by-step, so you can get that perfect glow in your home.
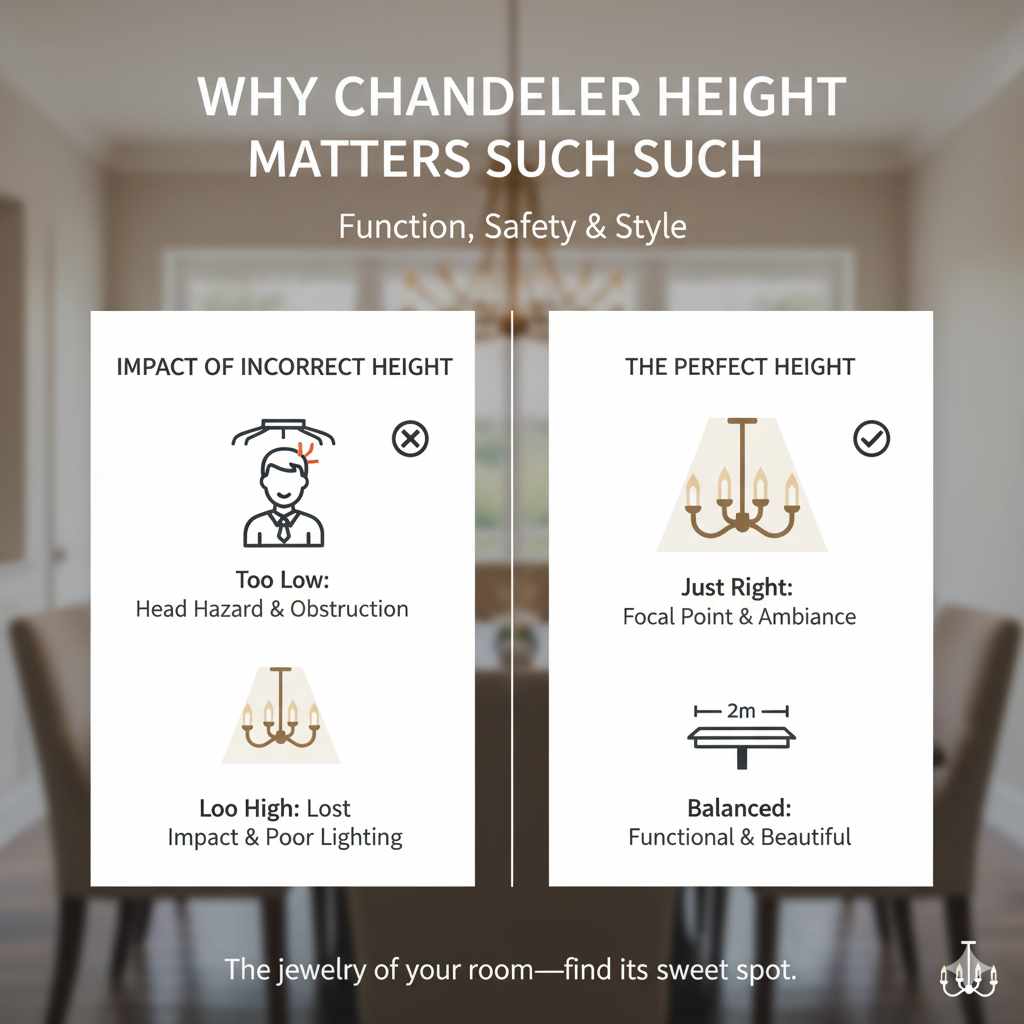
Why Chandelier Height Matters So Much
The height at which you hang a chandelier isn’t just about looks; it’s about function and safety too. A chandelier that’s hung too low can become a hazard, especially in high-traffic areas like hallways or above dining tables where people might bump their heads. On the other hand, a chandelier hung too high can feel lost and fail to make the visual impact you desire. It loses its ability to anchor the room and become a focal point. Finding that sweet spot ensures your light fixture is both a practical source of illumination and a stunning decorative element.
Think of it like this: a chandelier is like the jewelry for your room. Just as a necklace that’s too tight or too loose doesn’t quite work, a chandelier at the wrong height can throw off the entire balance of your space. It affects how the light is distributed, how the room feels, and even how you move through it. We want it to feel just right – inviting, functional, and beautiful.
Understanding the Basics: Key Considerations Before You Hang
Before we get into specific measurements, let’s cover a few fundamental things to keep in mind. These factors will help you make the best decision for your unique space.
Ceiling Height is King
This is probably the most significant factor. A grand, multi-tiered chandelier might look stunning in a room with 12-foot ceilings, but it could be overwhelming and impractical in a room with standard 8-foot ceilings. Conversely, a small, delicate fixture can get lost in a vast, high-ceilinged space.
Generally, for standard 8-foot ceilings, the bottom of the chandelier should be about 7 feet from the floor. For every extra foot of ceiling height, you can typically add about 3 inches to the chandelier’s hanging height. This is a good starting point, but remember it’s a guideline, not a strict rule.
Room Size and Scale of the Chandelier
A massive chandelier in a tiny dining nook will feel cramped and disproportionate. Likewise, a minuscule fixture in a large living room will look insignificant. The chandelier should be scaled to the room. A common rule of thumb for dining rooms is to have the chandelier’s diameter be about half to two-thirds the width of your dining table. For other rooms, consider the overall square footage.
You can find some helpful resources on scaling light fixtures, like those from lighting manufacturers or interior design sites, which often provide charts and calculators. For example, Houzz offers great advice on selecting the appropriate size for your space.
Function of the Space
Is the chandelier going in a high-traffic area like an entryway or hallway? Or is it above a dining table where people will be seated? The function dictates how much clearance you need. In hallways and entryways, you want plenty of headroom, so the 7-foot mark from the floor is crucial. Above a dining table, you need enough clearance for people to sit comfortably without feeling like they’re dining under a ceiling fan, but also low enough to provide intimate lighting.
The Chandelier Itself
The design and structure of the chandelier also play a role. A very tall chandelier with multiple tiers might need to hang higher than a more compact, flush-mount style to avoid looking too heavy or imposing. Always consider the overall visual weight and presence of the fixture.
How Low to Hang a Chandelier: Specific Room Guidelines
Now, let’s get down to the nitty-gritty with some specific height recommendations for common areas in your home. These are excellent starting points that have been tested and proven to work well.
Entryways and Hallways: Safety First!
This is where safety is paramount. You don’t want guests or family members bumping their heads as they walk in or pass through. The general rule here is to hang the bottom of the chandelier at least 7 feet (or 84 inches) from the floor. If you have higher ceilings, you can adjust this upwards, but 7 feet is the minimum for most standard-height rooms.
Consider the pathway. If your entryway has a very long, narrow hall, you might hang the chandelier a bit higher to ensure a clear path. If it’s a more open foyer, you have a little more flexibility, but always err on the side of caution.
Entryway Chandelier Height Table
| Ceiling Height | Recommended Bottom of Chandelier Height (from floor) | Minimum Clearance |
|---|---|---|
| 8 feet | 7 feet (84 inches) | 7 feet |
| 9 feet | 7 feet 3 inches (87 inches) | 7 feet 3 inches |
| 10 feet | 7 feet 6 inches (90 inches) | 7 feet 6 inches |
| 11 feet | 7 feet 9 inches (93 inches) | 7 feet 9 inches |
| 12 feet | 8 feet (96 inches) | 8 feet |
Remember, these are guidelines. Always measure the actual clearance in your space to ensure comfortable passage.
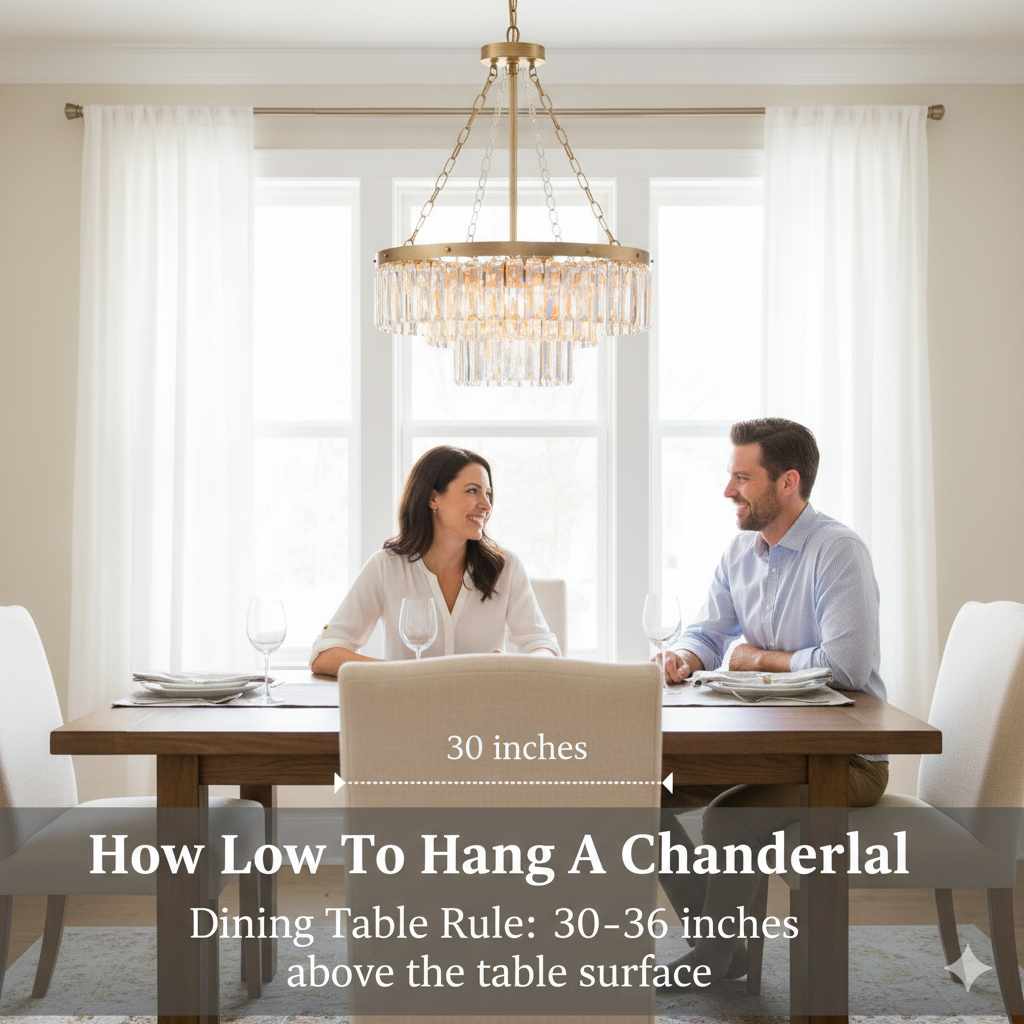
Dining Rooms: The Heart of the Home
Dining rooms are where chandeliers often take center stage. The goal here is to create an intimate ambiance while ensuring enough clearance above the table. The ideal height for a dining room chandelier is typically 30 to 36 inches above the surface of the dining table.
This measurement allows the light to cast a warm glow over your meals without obstructing conversation or views across the table. It also provides enough headroom for people to move around the table easily. If your chandelier is particularly large or ornate, you might lean towards the higher end of this range (36 inches). For smaller or simpler fixtures, 30 inches might be perfect.
Pro Tip: Don’t forget to account for the table itself! If you have a very thick tabletop, measure from the top of the table surface. Also, consider if you’ll ever use a table runner or centerpiece that might interfere with the light.
Dining Room Chandelier Height Guide
| Room Element | Recommended Height (from surface) | Considerations |
|---|---|---|
| Dining Table Surface | 30 to 36 inches | Creates intimate lighting, allows conversation, avoids head-bumping. |
| Floor (for 8ft ceilings) | Approximately 7 feet (84 inches) | Ensures minimum clearance for seated diners. |
| Floor (for higher ceilings) | Adjust upwards by ~3 inches per extra foot of ceiling height | Maintains proportional balance. |
Kitchens: Functionality Meets Style
In kitchens, chandeliers are often used as a statement piece over an island or a breakfast nook. For kitchen islands, the height is similar to dining tables, usually around 30 to 36 inches above the countertop. This provides task lighting and visual appeal without getting in the way of cooking or serving.
If the chandelier is in a breakfast nook, treat it like a small dining area. Measure from the table surface, typically 30-36 inches. It’s all about balancing the light’s presence with the room’s function.
Living Rooms and Bedrooms: Ambiance and Flow
In living rooms and bedrooms, chandeliers are often more about ambiance and less about direct task lighting. The general guideline is to hang the bottom of the chandelier about 7 to 7.5 feet from the floor. This ensures adequate headroom for walking beneath it while still allowing it to be a prominent decorative element.
For very high ceilings (10 feet or more), you have more freedom. You might hang it lower to make it feel more intimate, or higher to emphasize the grandness of the space. Always consider the furniture placement and the overall flow of traffic in the room.
Tools and Materials You’ll Need
Gathering your tools before you start makes the process smoother and safer. Here’s a list of essentials:
- Ladder: A sturdy stepladder or extension ladder is crucial. Make sure it’s tall enough to reach your mounting point comfortably and safely.
- Drill and Drill Bits: For pre-drilling holes and potentially securing mounting hardware.
- Screwdriver Set: Phillips and flathead screwdrivers will be needed for wiring and mounting.
- Wire Strippers/Cutters: Essential for preparing electrical wires.
- Voltage Tester: A non-contact voltage tester is a must for safety to ensure the power is off.
- Measuring Tape: To get those precise height measurements.
- Pencil: For marking drill points or height lines.
- Adjustable Wrench or Pliers: For tightening nuts and bolts.
- Safety Glasses: Protect your eyes from dust and debris.
- Work Gloves: For a better grip and protection.
- Helper: Having an extra pair of hands is invaluable for holding the chandelier, assisting with wiring, and ensuring safety.
Step-by-Step Guide: How to Hang Your Chandelier at the Right Height
Let’s break down the process. Remember, safety is always the top priority. If you’re uncomfortable with any part of this, especially the electrical work, it’s best to call a qualified electrician.
Step 1: Turn Off the Power!
This is non-negotiable. Go to your home’s electrical panel and find the breaker that controls the power to the room or fixture you’re working on. Flip it to the OFF position. To be absolutely sure, use your non-contact voltage tester on the wires in the existing junction box before you touch anything. It should show no power.
Step 2: Remove the Old Fixture (If Applicable)
If you’re replacing an existing light, carefully remove it. This usually involves unscrewing a canopy or mounting bracket. You’ll then disconnect the wires (typically black to black, white to white, and ground to ground). Have your helper support the weight of the old fixture as you disconnect it.
Step 3: Prepare the Mounting Bracket
Most chandeliers come with a mounting bracket that attaches to the electrical box in the ceiling. Ensure this bracket is securely fastened to the ceiling box. The electrical box itself must be rated for supporting light fixtures. If it’s not, you’ll need to replace it with one that is. For heavier chandeliers, you might need a ceiling fan brace or a specially rated electrical box. Check the OSHA standards for electrical installations to understand load-bearing requirements for fixtures.
Step 4: Assemble the Chandelier
Follow the manufacturer’s instructions to assemble your new chandelier. This might involve attaching arms, crystals, or shades. Do this on the floor or a table, not while precariously balanced on a ladder.
Step 5: Determine the Hanging Height and Adjust the Chain/Rod
This is where your measurements come into play.
- For entryways/hallways: Measure 7 feet (or your adjusted height) from the floor. Mark this point on the wall or a temporary hanging point.
- For dining rooms/islands: Measure from the table/island surface up to your desired height (30-36 inches).
Now, hold the chandelier up (with your helper!) to where it will hang. Measure the distance from the ceiling to the desired bottom height of the chandelier. This measurement will tell you how much chain or rod you need to use. Most chandeliers have a chain or adjustable rod. You’ll need to shorten it by removing links from the chain or adjusting the rod to achieve the correct height. Make sure any wire is threaded through the chain or rod correctly.
Important Note on Wire Length: Ensure there’s enough wire to reach the electrical box and make connections. You can usually add extra wire if needed, but consult with an electrician if you’re unsure.
Step 6: Hang the Chandelier on the Mounting Bracket
Once the chain/rod is adjusted, carefully lift the chandelier to the ceiling. Many mounting brackets have a hook or mechanism to temporarily hold the chandelier while you make the electrical connections. This is where your helper is essential for safety and ease.
Step 7: Make the Electrical Connections
With the chandelier supported, connect the wires. Usually, this involves connecting the house wires to the chandelier wires:
- Black (hot) wire from the house to the black wire from the chandelier.
- White (neutral) wire from the house to the white wire from the chandelier.
- Bare copper or green (ground) wire from the house to the ground wire from the chandelier.
Use wire nuts to secure the connections. Tuck the wires neatly into the electrical box.
Step 8: Secure the Canopy
Slide the chandelier’s canopy up to the ceiling, covering the electrical box and mounting bracket. Secure it according to the manufacturer’s instructions, usually with screws. Ensure it sits flush against the ceiling.
Step 9: Install Bulbs and Test
Install the appropriate light bulbs (check the wattage limits!). Go back to the breaker box and turn the power back on. Test the chandelier to ensure it works correctly.
Step 10: Final Adjustments and Enjoy!
Step back and admire your work! Check the height one last time. Make any minor adjustments needed. Clean off any fingerprints, and enjoy the beautiful new focal point in your room!
Common Mistakes to Avoid
Even with the best intentions, a few common pitfalls can derail your chandelier-hanging project. Being aware of them can save you time, frustration, and potential hazards.
- Not Turning Off the Power: This is the most critical mistake. Always, always, always ensure the power is off at the breaker and confirmed with a voltage tester.
- Incorrect Ceiling Box Support: Using a standard electrical box not rated for light fixtures, especially for heavy chandeliers, can lead to the fixture falling. Ensure your box is rated for the weight.
- Ignoring Room Scale: Hanging a tiny chandelier in a grand room or a massive one in a small space. This throws off the visual balance of the entire room.
- Not Accounting for Ceiling Height: Relying solely on a general rule without considering your specific ceiling height can lead to a fixture that’s too high or too low.
- Insufficient Headroom: Hanging a fixture too low in a walkway or over a dining table, creating a bump hazard.
- Not Enough Help: Trying to manage a heavy or complex chandelier alone is difficult and dangerous. Always have a helper.
- Incorrect Wire Connections: Mixing up hot, neutral, or ground wires can cause short circuits, damage the fixture, or pose a shock hazard.

Frequently Asked Questions (FAQ)
Q1: How do I measure the height of my chandelier?
Measure from the floor to the very bottom of the chandelier fixture. For dining tables, measure from the tabletop surface to the bottom of the chandelier.
Q2: What if my chandelier is too long and I can’t shorten the chain enough?
If the chain is too long even when fully shortened, you might need to have a professional remove some links or consider a different fixture. Alternatively, some electrical supply stores sell shorter chain lengths or alternative mounting hardware.
Q3: Can I hang a chandelier from a vaulted or sloped ceiling?
Yes, but it’s more complex. You’ll likely need a special sloped ceiling adapter or a swivel canopy to ensure the chandelier hangs straight down. Consult the manufacturer’s instructions or a professional for these installations.
Q4: What’s the difference between hanging a chandelier in a living room versus a dining room?
In living rooms, the focus is often on general headroom and visual appeal (around 7-7.5 feet from the floor). In dining rooms, the chandelier should be lower, about 30-36 inches above the table, to create intimacy and direct light.
Q5: How do I know if my ceiling electrical box can support a chandelier?
Look for markings on the box, often indicating “For Fixture Support” or a weight limit. If it’s not clearly marked or looks flimsy, it’s best to replace it with a fixture-rated box, especially for heavier chandeliers. A quick guide on electrical boxes can be found on resources like Family Handyman.
Q6: Should the chandelier touch the dining table?
Absolutely not! There should always be at least 30 inches of clearance between the dining table surface and the bottom of the chandelier to avoid head bumps and allow for comfortable dining and conversation.
Conclusion
Hanging a chandelier at the perfect height transforms a room, adding both light and a touch of elegance. By understanding the key considerations like ceiling height, room scale, and the function of the space, you can confidently apply the general guidelines – 7 feet from the floor in entryways and 30-36 inches above dining surfaces. Remember to always prioritize safety by turning off the power and using the right tools and a helper. With these steps, you’re well-equipped to tackle this project and create a stunning, well-lit focal point in your home. Enjoy the beautiful results of your DIY effort!