
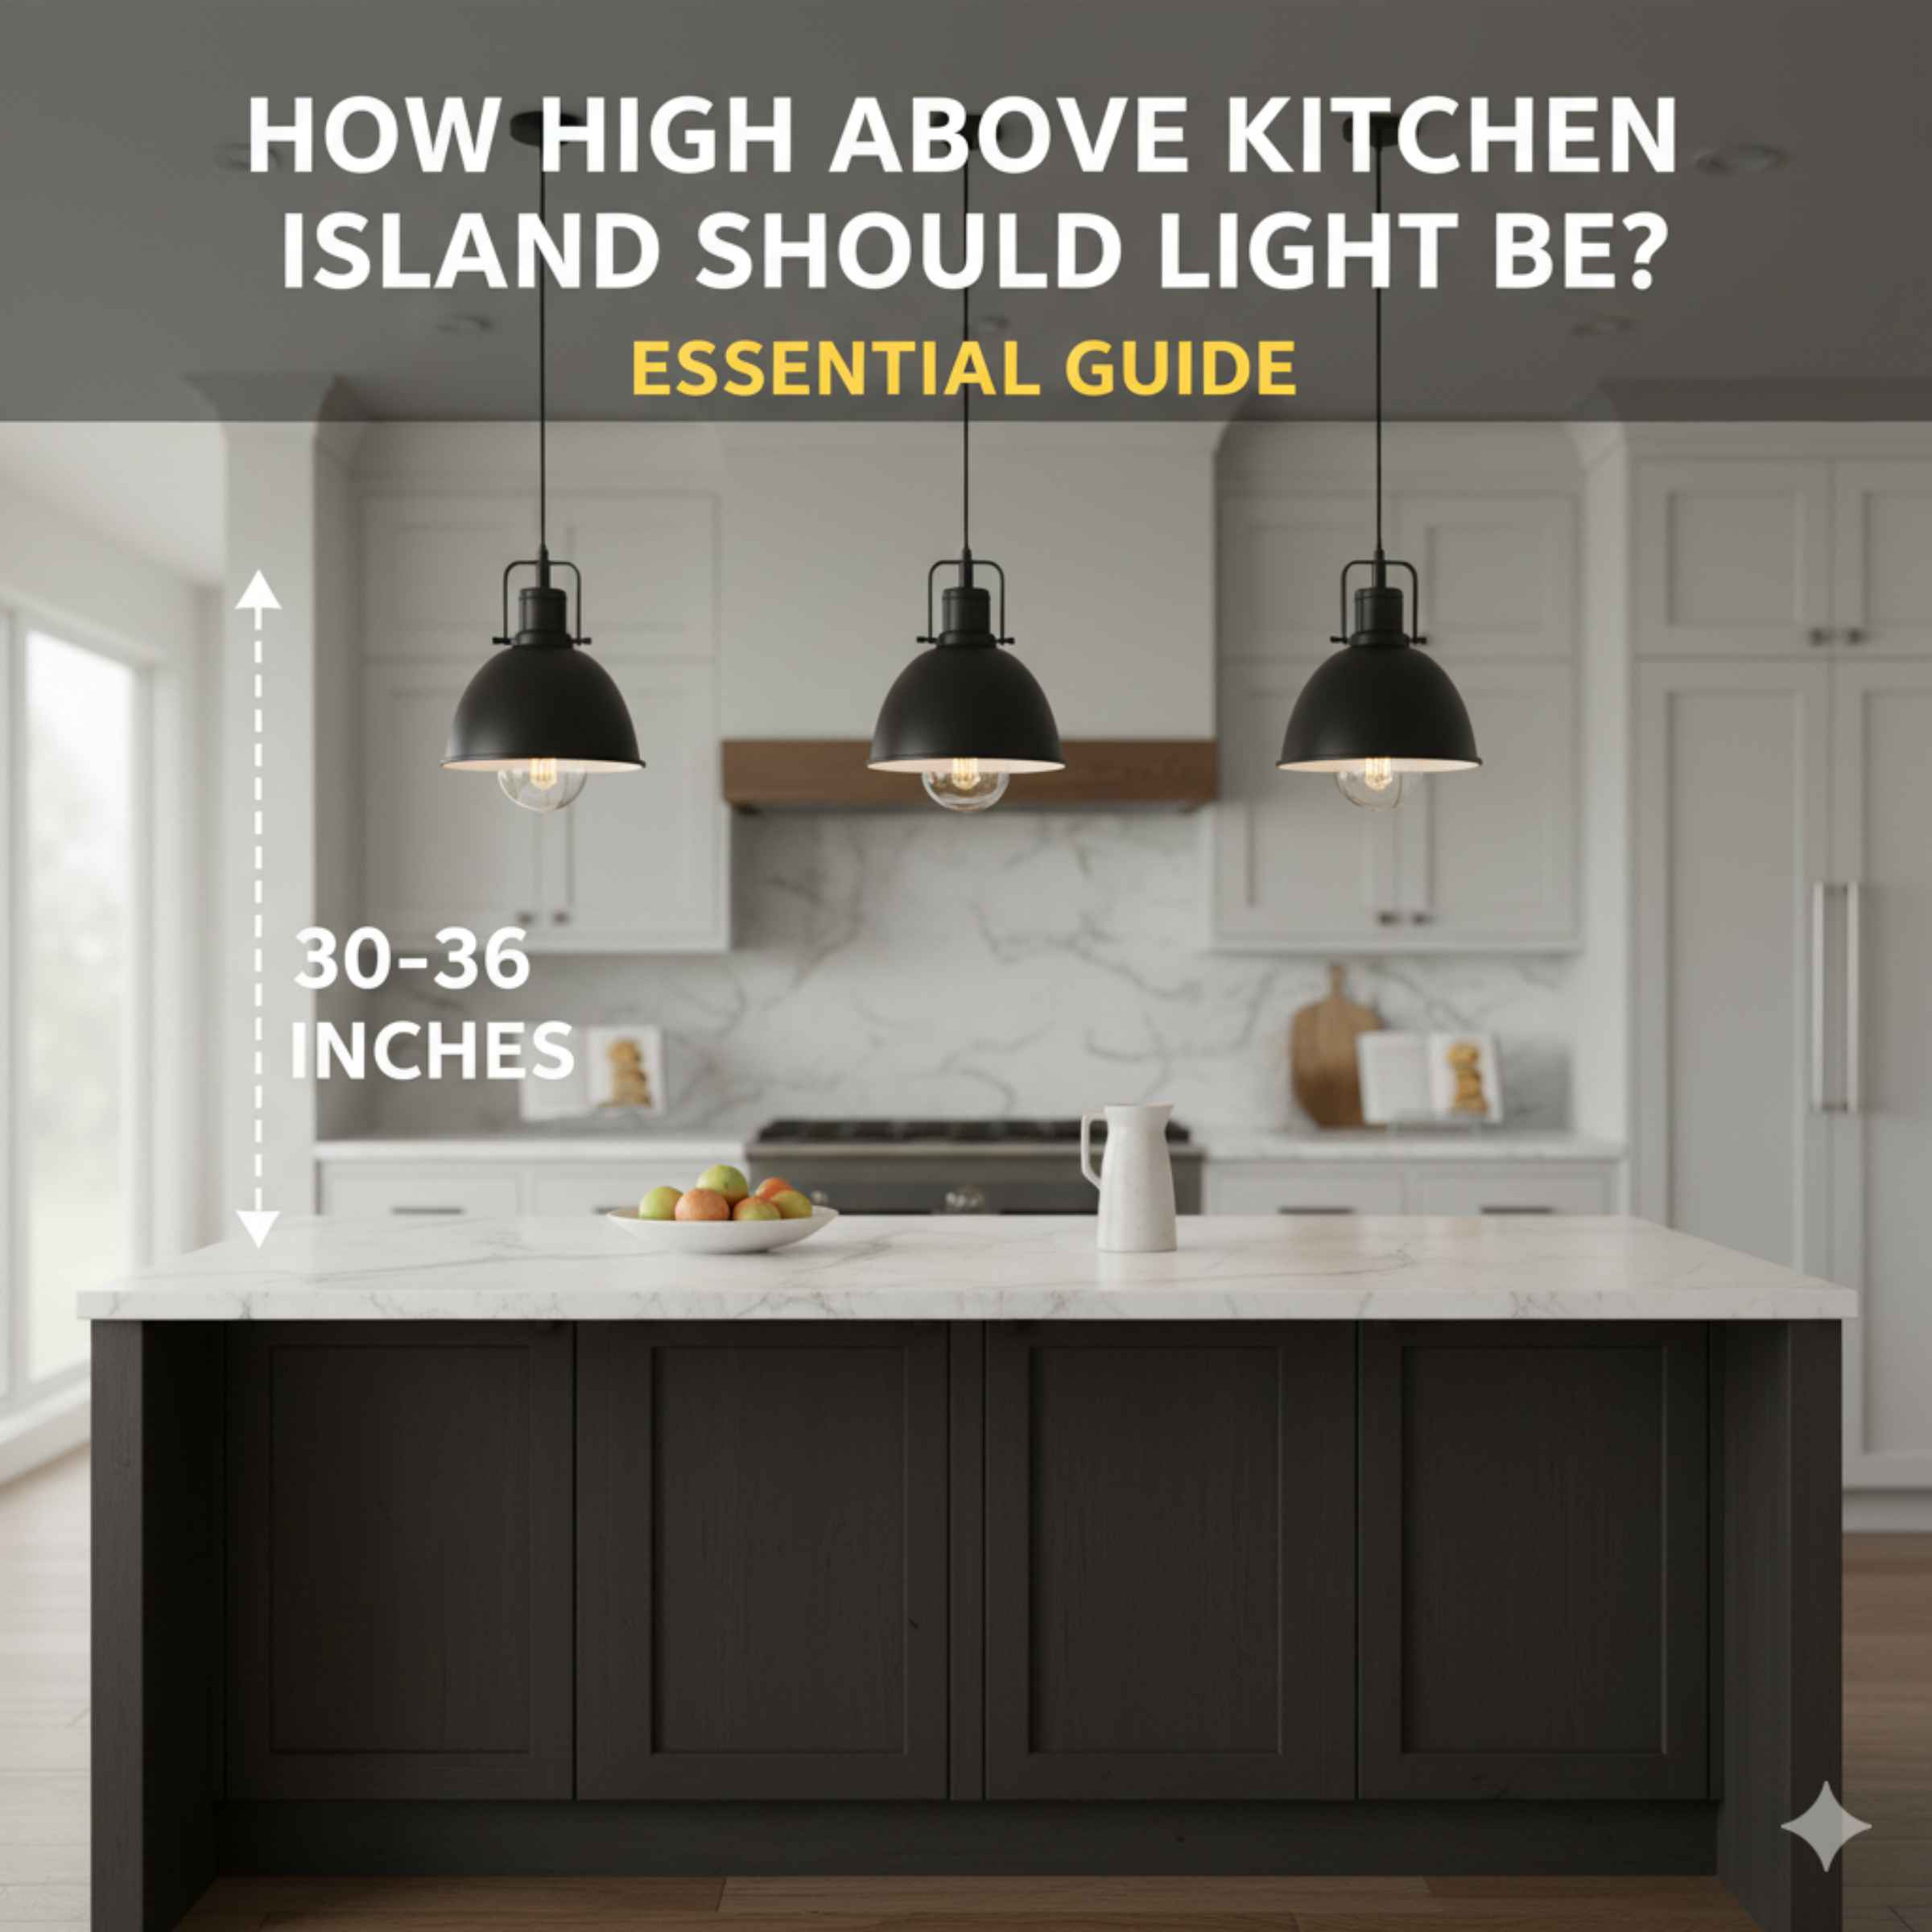
The ideal height for kitchen island lighting is generally 30 to 36 inches above the countertop surface. This range ensures excellent task lighting without causing glare or blocking sightlines, making your kitchen functional and beautiful.
Hanging lights over a kitchen island seems easy, right? You grab a cool pendant, drill a hole, and hang it up. But many homeowners find themselves staring up at lights that are either too high to be useful or too low to see over. Getting the height just right is the secret to a kitchen that looks professional and works perfectly for cooking and gathering. Don’t worry if this feels confusing! As your guide, I’ll walk you through the simple rules and measurements so you can confidently install your island lights at the perfect spot. We will cover the magic numbers, how different lights change things, and easy ways to measure twice before you drill once.
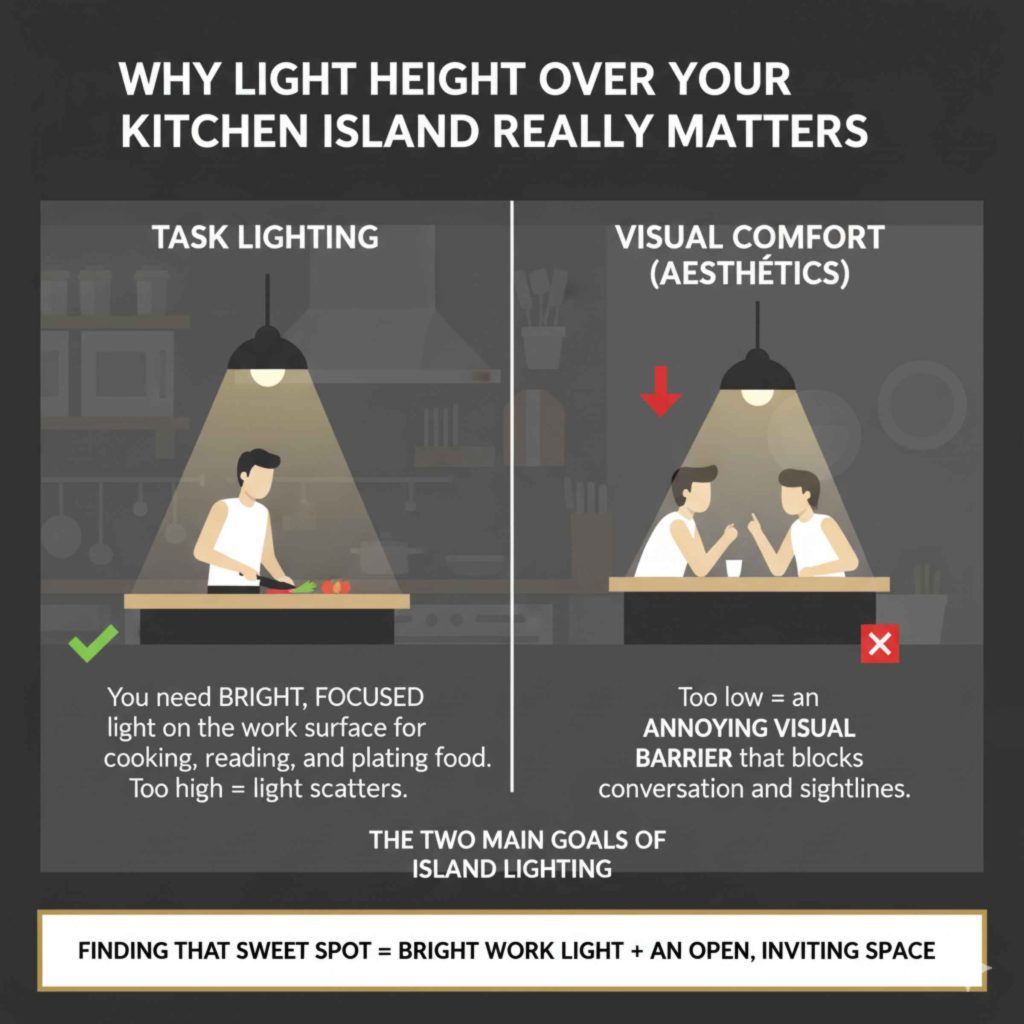
Why Light Height Over Your Kitchen Island Really Matters
The kitchen island is the heart of many modern homes. It’s where you chop vegetables, help with homework, and share morning coffee. Because it serves so many purposes, the lighting above it needs to be just right. This isn’t just about looks; it’s about safety and comfort.
The Two Main Goals of Island Lighting
When we talk about lighting height, we are trying to achieve two main things:
- Task Lighting: You need bright, focused light directly on the work surface so you can see clearly while cutting, reading recipes, or plating food. If the light is too high, it scatters and doesn’t illuminate the task well.
- Visual Comfort (Aesthetics): If the lights hang too low, they become an annoying visual barrier. People sitting or standing across from each other will have to look past a bulb or fixture, which feels awkward and blocks conversation.
Finding that sweet spot means you get the best of both worlds: bright work light and an open, inviting space. Let’s look at the standard guidelines that professionals use to achieve this balance.
The Essential Rule: Standard Height Guidelines
The most important thing to remember is the distance between the bottom of your light fixture and the top of your kitchen countertop. This is the number that DIYers often get wrong. Luckily, there is a very straightforward, widely accepted rule of thumb.
The 30 to 36-Inch Sweet Spot
Most lighting experts and building codes suggest that pendant lights or chandeliers hung over a kitchen island should be:
- Minimum Height: 30 inches above the countertop.
- Maximum Height: 36 inches above the countertop.
This range is based on the average person’s eye level and the standard height of a kitchen island, which is usually 36 inches tall. Hanging a light 30 inches above a 36-inch counter puts the bottom of the fixture at 66 inches from the floor. This height is usually high enough to clear the head of most adults while still providing excellent focused light.
What About Ceiling Height?
While the 30–36 inch rule is key, your ceiling height plays a role in the final look. The total distance from the floor to the bottom of the light fixture is important for the overall room balance. Here is a quick look at how ceiling height affects your choice:
| Ceiling Height | Recommended Bottom of Fixture (From Floor) | Distance from Countertop (The Rule) |
|---|---|---|
| 8 Feet (Standard) | 66 to 72 inches | 30 to 36 inches |
| 9 Feet | 78 to 84 inches | 30 to 36 inches |
| 10 Feet or Higher | 84+ inches (May need longer chains/stems) | 30 to 36 inches |
Notice that even when ceilings are high, we still stick to the 30–36 inch rule above the counter. If your ceiling is very high (say, 10 feet or more), you will use a much longer chain or stem on your pendant to bridge that gap while keeping the light head at the correct level above the work surface.
Adjusting for Different Light Fixture Types
Not all island lights are created equal. A skinny, downward-focused spotlight needs a different placement than a wide, decorative lantern. You must measure the physical size of your chosen fixture.
1. Pendant Lights (The Most Common Choice)
Pendants are the stars over islands. Because they direct light downward, they are perfect for task lighting. The general rule holds firm:
- For standard, smaller pendants (under 12 inches wide): Aim for the middle of the range, around 32 to 34 inches above the counter.
- For very wide or large drum pendants: You might need to go closer to 36 inches. A very wide fixture hanging too low can feel overwhelming and block views more easily than a narrow one.
2. Island Chandeliers
Chandeliers usually have light sources facing multiple directions. If you hang a chandelier too low, the bulbs might shine directly into your eyes when you are standing up, causing harsh glare.
- With a chandelier, it is often safer to lean toward the higher end of the range (34 to 36 inches).
- Make sure the lowest point of the chandelier body, not the bulb, is at least 30 inches from the counter.
3. Recessed Lighting (No Height Adjustment Needed)
If you choose recessed (can) lights flush with the ceiling, you don’t worry about hanging height! Instead, you focus on the beam angle and the spacing between the cans. For good task lighting, you want the light beams to overlap slightly on the island surface. A good starting point is spacing the center of each recessed light about 24 inches apart over the island.
4. Track Lighting
Track lights offer flexibility. You can aim the individual heads precisely where you need them. For track lighting, the bar itself should typically hang about 34 to 38 inches above the counter, giving you enough room to angle the heads downward without the main track body interfering with your line of sight.
Step-by-Step Guide: How to Measure for Perfect Placement
This is where we put on our DIY hats and get precise. Taking the time to measure properly now saves you from patching drywall later! I recommend having a helper for this step.
Tools You Will Need:
- Tape Measure (A reliable, long one is best)
- A Ladder (Stable and safe—never stand on a chair!)
- Painter’s Tape or Chalk (For marking the ceiling)
- The actual light fixture (or its dimensions if it hasn’t arrived)
- A helper to hold things steady
The Installation Measurement Process:
- Determine Counter Height: Measure the distance from the floor to the top of your finished countertop. (Standard is 36 inches, but measure yours just in case!)
- Choose Your Target Height: Decide where the bottom of your light fixture will sit. For beginners, 32 inches above the counter is a fantastic, safe starting point.
- Calculate the Drop Length: Subtract the counter height from the target height.
Example: If your counter is 36 inches high, and you want the light 32 inches above it, the total distance from the floor to the bottom of the light should be 36 + 32 = 68 inches.
- Mark the Ceiling: Using your helper to hold the tape measure straight against the ceiling, mark the spot where the center of your light fixture should hang. If you are installing multiple pendants, mark the center point for each one.
- Use the Fixture for Final Check: Before drilling any holes or making permanent electrical connections, hang your actual light fixture (using the chain or stem it came with) from the junction box. Adjust the chain length until the bottom of the fixture sits exactly where your measurement tape indicated. Does it look right? Can you easily look past it? If yes, you are ready to secure it!
Remember, if you are using multiple pendants, the spacing between them is just as important as the height. A good rule for spacing pendants is to leave about 24 to 30 inches between the center point of each fixture. This ensures even light distribution across the entire island surface.
Advanced Considerations: When to Break the Rules
While 30–36 inches is the golden zone, there are a few situations where you might need to deviate slightly. Always prioritize function over a strict number!
1. Kitchen Islands with Sinks or Cooktops
If you have a sink or a cooktop directly under your lighting, you need more clearance for safety and utility. Water splashing or heat rising from a burner can damage certain fixture materials or cause light bulbs to fail prematurely.
- Sinks: Aim for at least 34–36 inches above the counter to prevent splashes from hitting the fixture’s electrical components.
- Cooktops: Check the fixture’s specifications, but generally, you should aim for 36 inches or higher above the cooking surface to prevent heat damage. Always consult the manufacturer’s guide for heat clearance, as required by many building safety standards.
2. Very Small or Very Large Fixtures
If you choose one massive, globe-style chandelier (say, 30 inches wide) for a small island, hanging it at 36 inches might look dwarfed. In this case, you might drop it to 30 inches to give it more presence, provided the bulb shields are effective against glare.
Conversely, if you have a very long island (8 feet or more) and use tiny, delicate pendants, you might hang them slightly lower (say, 28 inches) to make them feel more substantial over the large surface area, but this requires very narrow, downward-focused lights.
3. Sloped Ceilings
Sloped ceilings mean your electrical box might be higher on one side than the other. When installing multiple pendants, you must ensure that the bottom of all the fixtures lines up perfectly horizontally, even if the chains or stems are different lengths. This creates a clean, professional look that hides the uneven ceiling line. You will need longer stems/chains on the higher side of the slope to achieve the same drop distance from the counter.
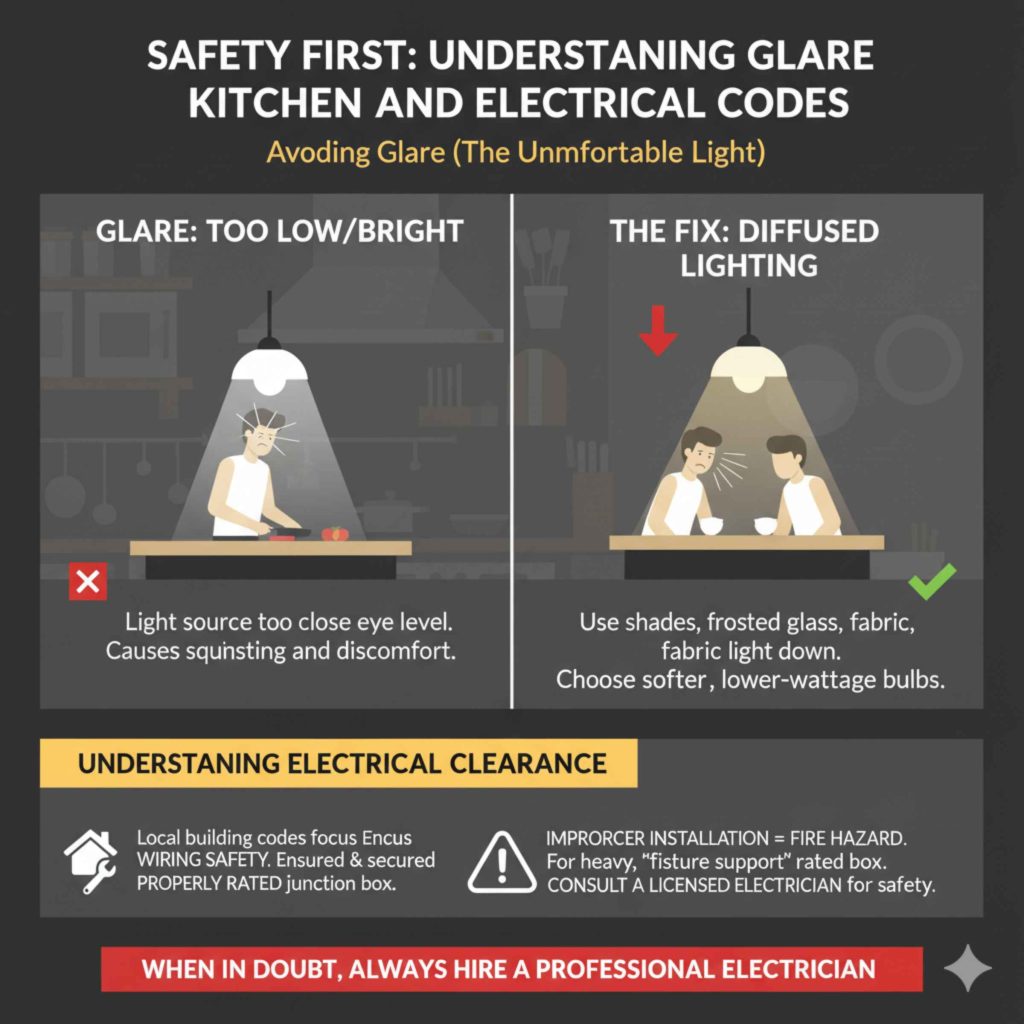
Safety First: Understanding Glare and Electrical Codes
As a DIY guide, I always want to stress safety. Getting the height right isn’t just about looks; it’s about keeping your lights safe and up to code.
Avoiding Glare (The Uncomfortable Light)
Glare happens when the light source is too close to eye level. If you are constantly squinting when you look toward the island, your lights are too low or the bulbs are too exposed.
- Use Diffusers: Choose fixtures with frosted glass, fabric shades, or metal shades that direct light only downward.
- Check Bulb Wattage: Even if the fixture height is perfect, an overly bright bulb (like a very high-wattage clear LED) can cause discomfort. Use the recommended wattage or opt for softer, diffused LED bulbs.
Understanding Electrical Clearance
While local building codes vary, generally, they focus more on the wiring installation than the final hanging height. However, working safely means ensuring your fixture is properly grounded and secured to a junction box rated to support its weight. For heavy chandeliers, you must ensure the junction box is rated for “fixture support.” If you are unsure about your wiring setup, it is always wise to consult the International Residential Code (IRC) guidelines or have a licensed electrician check your connections. Improper installation can lead to fire hazards or fixture failure.
A Quick Look at Different Bulb Types and Height
The type of bulb you use inside your fixture affects how well the light performs at a given height. LEDs have changed the game because they produce less heat and can be very bright without being bulky.
| Bulb Type | Heat Output | Best Use for Island Lighting |
|---|---|---|
| Incandescent/Halogen | High | Requires more distance (closer to 36 inches) due to heat; less common now. |
| Standard LED (A-Shape) | Low | Great for almost any fixture; can often hang lower (30–32 inches) safely. |
| Filament/Exposed LED | Very Low | If the bulb is exposed, you might need to hang slightly higher (34–36 inches) to soften the direct view of the bright filaments. |
FAQ: Your Kitchen Lighting Questions Answered
It is completely normal to have lingering questions when tackling home projects. Here are answers to the most common things homeowners ask about island light placement.
Q1: What is the absolute minimum height I can hang a pendant light above my island?
A: The absolute minimum is 30 inches above the finished countertop. Hanging lower than this risks glare and blocking views, making conversations awkward.
Q2: Should the height be different if I have an island seating area (bar stools)?
A: No, the 30–36 inch rule still applies to the countertop surface. However, if people will be leaning their heads forward while eating, ensure the bottom of the fixture doesn’t interfere with their heads or shoulders when they sit down.
Q3: How do I calculate the length of the chain or stem needed for my fixture?
A: First, find the total desired distance from the floor to the bottom of the light (e.g., 68 inches). Then, subtract the length of the fixture body itself. What remains is the necessary length of the chain or stem needed to drop from the ceiling box to the fixture canopy.
Q4: If I use two or three small pendants, do they all have to be the exact same height?
A: For the cleanest, most professional look, yes, they should all hang at the exact same height. Consistency is key when using multiple fixtures in a row.
Q5: What is the best height if my island is used mainly for decoration, not cooking?
A: If your island is purely decorative and you never prep food there, you have more flexibility. You can hang fixtures slightly higher (up to 40 inches) if you prefer an unobstructed view across the kitchen, but ensure they still look balanced relative to your ceiling height.
Q6: My ceiling is 12 feet high. Can I hang a single large fixture instead of pendants?
A: You can, but you will need a very long chain or stem! The bottom of that single fixture will likely need to be around 88 to 96 inches from the floor to maintain the 30–36 inch clearance above the counter. Make sure the fixture you choose is designed to handle that much suspension length.
Conclusion: Confidence in Your Kitchen Lighting
Installing lighting can feel intimidating, but figuring out how high above kitchen island should light be is one of the easiest DIY decisions you can make once you know the golden rule: 30 to 36 inches above the countertop. This measurement gives you the perfect blend of focused task lighting for your meal prep and clear sightlines for easy socializing.
Remember to measure twice, use a helper to hold the fixture up for a visual check, and always prioritize safety when working with electricity. By sticking to the standard guidelines, adjusting slightly for your specific fixture shape, and confirming your measurements before drilling, you’ll create a kitchen that is not only beautifully illuminated but also perfectly functional for years to come. You’ve got this—happy installing!