
In the realm of recreational sports and precision activities, the emergence of DIY axe throwing has gained significant traction, prompting enthusiasts to seek efficient and effective solutions for their practice environments. A well-constructed DIY axe throwing target is crucial, as it directly influences accuracy, skill development, and safety during gameplay. Selecting the right materials and construction techniques can enhance the overall experience, ensuring a durable and reliable target.
This article delves into the intricacies of creating your own axe throwing target, exploring design considerations, material selection, and construction tips that will transform your backyard into an exhilarating axe-throwing arena.
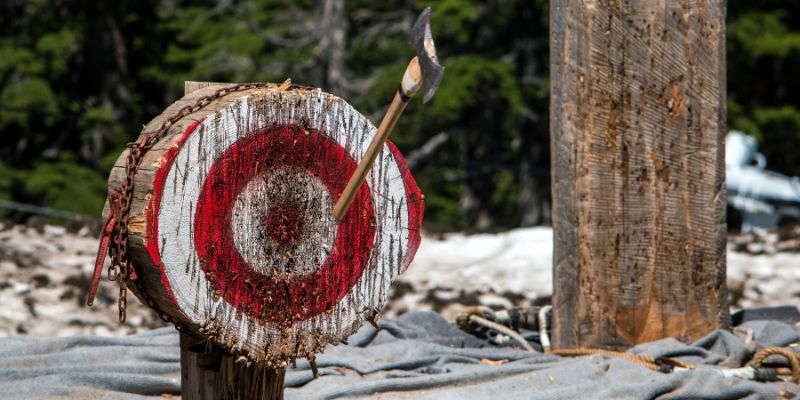
How To Create The Perfect Diy Axe Throwing Target
Creating a DIY axe throwing target is an exciting and rewarding project for enthusiasts looking to elevate their backyard fun. This guide provides step-by-step instructions on crafting a durable and effective target that meets typical standards for axe throwing. From selecting the right materials to assembly tips, the focus is on achieving a balance between safety and performance. With the right approach, building your own target can enhance your skills while offering a great social activity for friends and family.
Understanding Axe Throwing
Brief history and popularity of axe throwing. Importance of having a proper target.
Axe throwing has roots that reach back to ancient times. Keep in mind, early lumberjacks weren’t tossing their axes for fun; they were just trying not to miss the tree! Today, the sport has become wildly popular in urban areas, where people gather to unleash their inner lumberjack amidst laughter and competition.
Having a proper target is crucial for safety and accuracy.
It helps you aim better and avoid using your neighbor’s fence as a practice board. Plus, a well-made target makes every throw feel like a bullseye, even if it just barely grazes the edge!
| Time Period | What Happened |
|---|---|
| Ancient Times | Axes were tools for hunting and farming. |
| Modern Era | Turned into a competitive sport in urban settings. |
Materials Needed for DIY Axe Throwing Target
List of essential materials (wood types, tools, etc.). Recommended safety gear.
To create your own axe throwing target, you’ll need a few essential materials. Start with wood, like cedar or pine, because they love to take a hit! Grab a saw, screws, and a drill to put everything together.
Don’t forget your trusty measuring tape and safety glasses. Safety first, because nobody wants an axe in the foot! Check out this table for a quick rundown:
| Material | Purpose |
|---|---|
| Wood (Cedar or Pine) | Target surface |
| Saw | Cutting wood |
| Screws | Holding pieces together |
| Drill | Boring holes for screws |
| Measuring Tape | Ensuring accuracy |
| Safety Glasses | Protecting your eyeballs |
Step-by-Step Instructions to Build Your Axe Throwing Target
Step 1: Choosing the right design. Step 2: Cutting and assembling the wood. Step 3: Adding finishing touches (paint, marks, etc.).
Building an axe throwing target is fun and simple! Follow these steps:
- Step 1: Choose your design. Look for one that is easy to make with a sturdy structure.
- Step 2: Cut the wood pieces to size.Assemble them tightly to ensure safety while throwing.
- Step 3: Add finishing touches. Consider painting your target bright colors or adding marks for scoring.
Now you have a great target ready for practice!
Proper Target Dimensions and Setup
Standard dimensions for axe throwing targets. Recommended distance for throwing.
To create a safe and fun experience, it’s important to measure your axe throwing target correctly. Here are the standard dimensions:
- Target diameter: 24 inches
- Inner bullseye diameter: 6 inches
- Thickness: 4 inches for durability
For optimal throwing, position the target at a distance of 12 to 15 feet from the throwing line. This distance allows for better accuracy and safety while practicing your axe throwing skills.
Maintenance and Care for Your Target
Tips for keeping your DIY target in good condition. Signs to look for when it needs repairs or replacement.
To keep your wooden target sturdy and ready for action, check it regularly for cracks and signs of wear. If it starts to look like it’s been through a chipper shredder, it might need a repair or a refresh. Give it a good coat of sealant once a year to keep moisture away; even axes fear soggy wood!
Here’s a quick table to help you remember the care tips:
| Tip | When to Check |
|---|---|
| Inspect for cracks | Every month |
| Seal the wood | Once a year |
| Replace if too worn | When hit marks are deep |
Remember, a happy target is a target that lasts! So keep an eye on it, and you’ll keep throwing axes like a pro.
Safety Tips for Axe Throwing
Safety practices to follow while using the target. Guidelines for spectators and participants.
Before you start your epic axe throwing adventure, let’s talk about safety! Always stand behind the throwing line—this isn’t a free-for-all! Only throw axes when everyone is safely in their spots.
For spectators, it’s best to perch at a safe distance. No one wants a surprise axe shower, right? Remember, axes are not boomerangs! When not in use, keep the axes secured and out of reach.
Follow these tips, and you can safely unleash your inner lumberjack without turning it into a comedy sketch!
| Safety Tips | Details |
|---|---|
| Stay Behind the Line | Only throw from the safe area. |
| Watch Your Friends | Make sure everyone is safe before you throw. |
| Secure the Axes | Keep axes out of reach when not in use. |
Engaging the Community: Axe Throwing Competitions and Events
How to find or organize local axe throwing events. Benefits of participating in competitions.
Joining local axe throwing events can be a fun way to engage with your community. Check online forums or social media for upcoming competitions. You can also visit local sports clubs or check community boards for announcements.
Participating in these events has many benefits:
- Builds teamwork skills with friends.
- Boosts confidence with each throw.
- Offers a chance to meet new people and make connections.
Organizing your own event?
Gather friends, find a safe location, and set up some targets. Everyone will enjoy the challenge!
Conclusion
In summary, creating a DIY axe throwing target is a rewarding project that not only enhances your backyard experiences but also encourages skill development. With minimal materials and simple instructions, anyone can craft a durable and effective target. Embrace the thrill of axe throwing, enjoy quality time with friends and family, and elevate your outdoor activities with this engaging and fun DIY endeavor.
FAQs
What Materials Are Best Suited For Constructing A Diy Axe Throwing Target?
The best materials for constructing a DIY axe throwing target include end-grain wood, such as hardwoods like pine, oak, or maple, as they provide durability and better absorption for axe impacts. A frame made from sturdy lumber can help support the target structure. Additionally, using a weather-resistant finish can protect the wood from the elements if the target is placed outdoors. It’s also recommended to use a backing board to catch any missed throws for safety.
How Do You Determine The Ideal Dimensions And Weight For A Homemade Axe Throwing Target?
To determine the ideal dimensions and weight for a homemade axe throwing target, start with a standard size of 4 feet in height and 2 feet in width, using a wooden disc of about 1.5 to 2 inches thick. The weight should be heavy enough to withstand repeated impacts, typically around 70-100 pounds, depending on the materials used. Ensure the target is stable by securing it to the ground or a sturdy backboard. Additionally, consider using soft woods like pine or spruce, which are forgiving on axe edges and provide better feedback during throws.
What Safety Precautions Should Be Taken When Building And Using A Diy Axe Throwing Target?
When building a DIY axe throwing target, ensure it is constructed from sturdy materials like softwood to absorb impact. Secure the target firmly to prevent tipping or falling during use. Always wear appropriate safety gear, such as closed-toed shoes and eye protection, while throwing axes. Finally, maintain a safe distance from spectators and ensure the throwing area is clear of obstacles.
How Can I Enhance The Durability And Lifespan Of My Diy Axe Throwing Target?
To enhance the durability and lifespan of your DIY axe throwing target, use high-quality materials like untreated hardwood, as it withstands impacts better than softer woods. Regularly rotate the target to ensure even wear and consider applying a weatherproof finish if it’s outdoors to protect against moisture. Reinforcing the back with plywood can absorb some of the impact and prevent splitting. Lastly, regularly inspect and repair any damage to maintain its integrity over time.
Are There Any Creative Designs Or Styles For Diy Axe Throwing Targets That Can Make The Activity More Enjoyable?
Absolutely! Creative designs for DIY axe throwing targets can include themed motifs, such as animals or popular characters, to add visual appeal. You can also create targets with varying sizes and shapes for different skill levels, making the game more engaging. Adding color-coded scoring zones or incorporating lights for evening use can enhance the overall experience. Finally, customizing the target’s material, such as using plywood, logs, or even cardboard, can bring unique challenges to the game.