
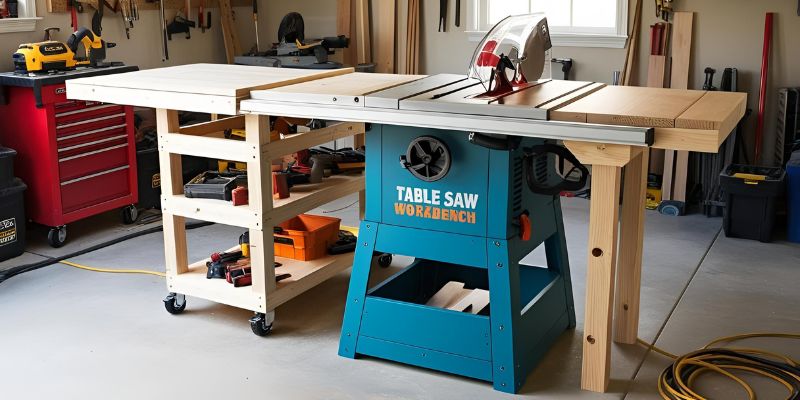
In the realm of woodworking, the synthesis of precision and functionality is paramount, especially when crafting a DIY table saw workbench. Leveraging advanced engineering principles and ergonomic design, the construction of a table saw workbench not only enhances the accuracy of cutting operations but also maximizes workspace efficiency. By integrating features such as adjustable height, integrated storage solutions, and stability mechanisms, artisans can create an indispensable tool that adapts to various woodworking tasks. Delving into the intricacies of this project reveals essential techniques and innovative strategies that will elevate your woodworking experience—read on to discover how to bring this vital workspace to life.
Build Your Own DIY Table Saw Workbench For Ultimate Precision
This summary delves into the essential aspects of building a DIY table saw workbench, highlighting its importance for woodworking projects. A well-constructed workbench not only enhances efficiency but also provides stability for precise cuts. This guide covers the necessary materials, design considerations, and step-by-step instructions to create a functional and durable workbench tailored to your needs. Whether you’re a seasoned woodworker or a hobbyist, this DIY project promises to elevate your workspace capabilities significantly.
Understanding the Importance of a Table Saw Workbench
Benefits of having a dedicated workspace. How it enhances cutting accuracy and safety.
A dedicated workspace for your table saw offers many advantages. It helps keep tools and materials organized. This organization allows for quicker and easier access while working. An improved setup also enhances cutting accuracy.
With everything in place, you can measure and cut more precisely. Safety increases too, as a clean space reduces accidents. Here are some key benefits:
- Better organization of tools
- Improved accuracy in cuts
- Increased safety by reducing clutter
Essential Tools and Materials Needed
List of tools required for construction. Recommended materials for durability and functionality.
Building a DIY table saw workbench requires some key tools and materials. Here’s what you need:
- Table saw – for making precise cuts.
- Drill – to create holes for screws and fittings.
- Screws and bolts – to securely assemble parts.
- Wood glue – for added strength.
- Level – to ensure a flat surface.
For materials, consider using:
- Plywood – it’s strong and durable.
- Hardwood – great for longevity.
- Metal brackets – for extra support.
With the right tools and materials, your bench will be functional and sturdy!
Designing Your DIY Table Saw Workbench
Factors to consider in the design process. Layout ideas for different workspace sizes.
Creating your own workbench can be exciting! Here are important factors to think about:
- Space: Measure your workshop area.
- Height: Ensure it’s comfortable for you.
- Storage: Plan for tools and materials.
Consider different layouts based on your workspace size:
- Small spaces: Compact design that fits snugly.
- Medium spaces: An L-shaped workbench for more working area.
- Large spaces: A central island for versatility and mobility.
These ideas will help you build a functional and efficient workbench!
Step-by-Step Construction Process
Detailed guide on building the frame. Installing the table surface and saw. Adding features like storage and accessories.
Building a DIY table saw workbench is exciting and fun! Start by constructing a sturdy frame. Use 2×4 wooden pieces for strength. Cut them to size and assemble with screws.
Next, install the table surface securely on top. Make sure it’s level for safety. Attach the table saw in the center for easy access.
Finally, create space for tools and materials by adding shelves and drawers.
- Make the frame first.
- Install a flat tabletop.
- Secure the table saw properly.
- Add storage options.
Enhancing Your Workbench with Additional Features
Suggestions for integrated storage solutions. Options for mobility (casters) and adjustability.
Adding features to your workbench can boost both fun and function. First, consider integrated storage solutions. You could build drawers or shelves right into your workbench.
This way, your tools won’t play hide-and-seek anymore! Next up is mobility. Adding casters means you can roll your workbench around like a pro, or just to show off. Finally, let’s not forget adjustability.
Why not make it a workbench that grows with you? After all, everyone needs a bench that can adapt to their needs, right?
| Feature | Benefits |
|---|---|
| Integrated Storage | Keep tools organized and within reach. |
| Mobility (Casters) | Easily move the bench to any workspace. |
| Adjustability | Height and size can adapt to your projects. |
Maintenance Tips for Longevity
Regular maintenance checks to keep the workbench functional. Tips to protect the surface and saw.
To keep your DIY table saw workbench running like a champ, regular maintenance checks are key. Check bolts and screws to avoid surprises, like unexpected wobbles during your cuts! A quick wipe down keeps the surface shiny and free of dust.
Want to protect your saw and the top? Use a soft cover when not in use. It’s like a cozy blanket for your tools!
| Task | Frequency |
|---|---|
| Inspect bolts and screws | Every Week |
| Clean surface | After Each Use |
| Cover with protective layer | Always |
Common Mistakes to Avoid When Building a Workbench
List of frequent pitfalls and how to bypass them. Importance of planning and measurements.
Building a workbench can be fun, but some common mistakes can turn it into a headache. Measure twice, cut once! It sounds silly, but wrong measurements can lead to crooked benches that might wobble like a puppy on ice. Planning is your best friend here.
Create a simple sketch before diving in. Misreading plans is like trying to read a treasure map upside down—it just won’t work! Check out this table for easy pitfalls and how to dodge them:
| Common Mistakes | How to Avoid |
|---|---|
| Skipping measurements | Measure everything carefully |
| Poor material choices | Use strong, suitable wood |
| Weak joints | Reinforce with screws/glue |
| Ignoring space | Plan for storage and tools |
With these tips, you’ll build a bench that stands strong and doesn’t throw any surprises (except when your friends ask to borrow it!
Inspiration and Variations: Customizing Your Workbench
Ideas for personalization based on project requirements. Examples of creative designs and setups from the community.
Personalizing your workbench can make your DIY projects more fun and efficient. Think about what you need for your projects. Here are some ideas:
- Storage solutions: Add shelves or drawers for tools.
- Height adjustments: Create a height-adjustable surface for comfort.
- Built-in lighting: Install lights for better visibility.
- Custom tools holders: Design specific spots for your favorite tools.
Check out creativity from the community!
Many people share unique designs online. Use their ideas to inspire your own custom bench.
Conclusion
In conclusion, building a DIY table saw workbench is an excellent project for enhancing your woodworking workspace. Not only does it provide a sturdy and dedicated area for your saw, but it also offers customization options to fit your specific needs. With the right materials and careful planning, you can create a functional and efficient workbench that will elevate your craftsmanship.
FAQs
What Are The Essential Materials Needed To Build A DIY Table Saw Workbench?
To build a DIY table saw workbench, you will need a sturdy workbench top, typically made from plywood or solid wood. Essential materials also include a frame made of 2×4 lumber for stability, steel brackets for reinforcement, and screws for assembly. Additionally, a set of caster wheels can provide mobility, while tools such as a drill, saw, and measuring tape are necessary for construction. Finally, a safety guard and dust collection system are recommended for safe and clean operation.
How Can I Ensure That My DIY Table Saw Workbench Is Stable And Aligned Properly?
To ensure your DIY table saw workbench is stable and aligned properly, start by using sturdy, high-quality materials and a solid base that can support the weight of the saw. Make sure the workbench is level by adjusting the legs or adding shims as needed to eliminate any wobbling. For alignment, use a square to check that your saw’s alignment is accurate with the miter slots and the workbench surface. Regularly check and tighten all connections and bolts to maintain stability over time.
What Are Some Effective Storage Solutions To Incorporate Into My DIY Table Saw Workbench Design?
To enhance your DIY table saw workbench, consider incorporating under-bench drawers for easy access to tools and materials. Utilize pegboards on the sides for vertical tool storage, maximizing space efficiency. Adding shelves above or below the workbench can provide additional storage for larger items, while magnetic strips can keep frequently used tools readily accessible. Lastly, integrating a rolling cart beneath the workbench can offer mobile storage for various supplies.
How Can I Customize My DIY Table Saw Workbench To Accommodate Different Types Of Cutting Tasks?
To customize your DIY table saw workbench for various cutting tasks, consider adding adjustable supports or extensions to accommodate different material sizes. Incorporate a T-track system for quick and easy attachment of jigs and fixtures tailored to specific cuts. Install a dust collection system or a vacuum port to keep your workspace clean during projects. Finally, ensure your bench surface is flat and durable to withstand the wear and tear of diverse cutting tasks.
What Safety Features Should I Include When Constructing My DIY Table Saw Workbench?
When constructing your DIY table saw workbench, incorporate features such as a sturdy, stable base to prevent tipping and vibration. Add a push stick or paddle to keep your hands safely away from the blade while cutting. Install a blade guard or riving knife to minimize the risk of kickback. Lastly, ensure proper dust collection to maintain a clean workspace and reduce fire hazards.